Learn to Recognize Your Beneficial Insects

Know What’s In Your Garden

It is good to understand the importance of beneficial insects in the garden — both pollinators and predators. We try to encourage the good guys into our gardens and celebrate their appearance.

Except…how can you be sure that the less-than-cuddly-looking four-legged creatures walking amongst your blossoms are the right ones? After all, heroes aren’t necessarily handsome (although we always assume they must be). No, your knights-in-shining-armor may have a face only a mother could love — or a gardener.

LadybugsBeneficial Insects - Ladybug feeding on aphid

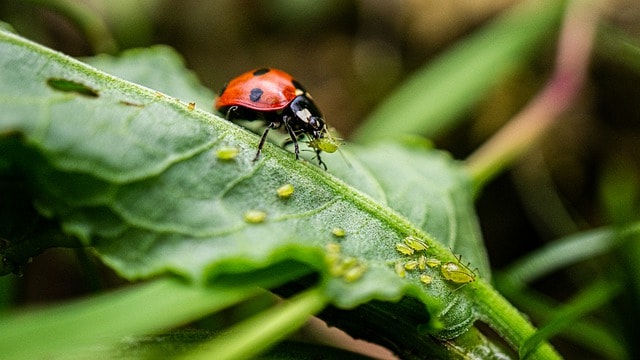
You might be surprised at how many good guys you don’t recognize. For instance, most people are very familiar with ladybugs and recognize them as part of the cavalry. The Volkswagen-shaped beetles will consume about 50 aphids a day, munching on plant mites and scales while they’re at it.  They are definitely beneficial insects!

Yet I wonder how many ladybug children are killed simply because they don’t have Brad Pitt’s good looks. If you didn’t shudder when I mentioned the little darlings, then you probably haven’t met them. If you can picture a cross between an alligator and a lobster wearing black and orange/red leather biker pants — only creepier — then you’re on the right track. As far as looks go, ladybug larvae have nothing in common with their charming parents.

Ladybugs overwinter as adults, hiding under leaf debris.  They do a quasi-hibernation called “diapause” and wake up when the days start getting longer or warmer.  When they wake up they are hungry and look for pollen and insect eggs (like aphid or mite eggs).

Ladybug facts:

There are over 300 types of Ladybugs just in North America

Ladybugs come in many colors besides red: pink, yellow, white, orange, and black.

The hard shell covering the adult ladybug protects the fragile wings and is called the elytra. It is so thin you can see through it and is used to make the ladybug look dangerous to predators. They actually secrete a foul-tasting, orange fluid from the joints in their legs. Ladybugs will even play dead if threatened.

See more here

Assassin Bugs

Another bug I met this week is what insect scientists call a “true bug” whose common name is “Assassin Bug”!   All of the creatures we call “beneficial insects” are beneficial because they eat bugs we don’t like in our gardens. We love the predators that eat thrips and whiteflies or all the beetle eggs on squash.  We’re so happy to see the insects we like eating the babies of the insects we don’t like.  But sometimes the top predators aren’t too picky and they eat bees and ladybugs and butterfly caterpillars too.  Fortunately, they assassinate many more bad bugs than good bugs.

The bugs at the top of the food pyramid have some great names like assassin bugs or pirate bugs.  They are still beneficial in our book because they are eating lots of the bad guys.  Of course, they happily eat cute ladybugs and even their own siblings when they’re ravenous after hatching.  Keep an eye out in your garden for some of these more interesting creatures.

  • Pirate Bugs
  • Predatory Stink Bugs
  • Big Eyed Bugs
  • Damsel Bugs  (Another example of a less-than-lovely beneficial insect.  As the old saying goes;  she’s plainer than a mud fence”.)

10 Beneficial Garden Bugs

Macro photos of insects

Spined Soldier Bug

There is a look-alike bug to the stink bug called the Spined Soldier Bug who is a bug superhero!  This bug eats two of the most damaging villains in our gardens:  the Mexican bean beetle and the Colorado potato beetle.  It also eats the eggs of its look-a-like, the Brown Marmorated stink bug.  Learn to tell the difference between this beneficial insect and the annoying stink bug.   The Soldier Bug has sharp spiny shoulders and is more likely to be alone and not as afraid of you.  My rule for pulling weeds is always, “Don’t pull anything unless you know its name.”  My rule for killing bugs is now the same, “Don’t kill anything unless you know its name for sure!”  No guessing!

How to tell the difference

Pictures of Beneficial predator insects

CricketsBeneficial Insects - Crickets

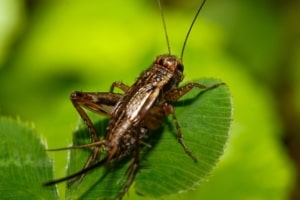
Crickets live in our gardens and yards all year and we mostly don’t even notice them until they begin their singing melodies announcing that the end of summer is coming.  Crickets play a large role in our garden ecosystem.  Crickets are Detritivores and Omnivores.  They love their meat like small insects, egg pupae, scale, and aphids.  Some feed primarily on plant material.  Others balance their diet with pollen and nectar.  They are known to eat a lot of weed seeds and mostly they eat decaying plant material and fungi.  They live in and feed on the decaying leaf litter of the garden and yard.  They leave behind tiny little cricket manures that help fertilize the soil.  Another great beneficial insect.

Crickets are an important part of the food chain.  (Another good reason not to use insecticides.)  The list of who eats crickets is long:  birds, mice, shrews, bats, rats, toads, frogs, small snakes, and salamanders.  Other predators of crickets are lizards, mantids, spiders, wasps, ground beetles and ants, and of course, humans!

What crickets eat

Cricket song

SpidersBeneficial Insects - Daddy Longlegs

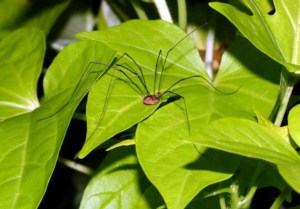
These leggy creatures are our friends!  I’m not suggesting that you invite black widow spiders into your house, but spiders in the garden are hugely beneficial.  Daddy Long Legs, otherwise known as “Harvestmen” eat bugs, especially aphids.  Once again, we discover that we have yet other friends helping us produce food and flowers.  They also eat other bugs and mites, dead insects, and bird droppings.  Daddy Long Legs are related to the spider family but have no venom sac and no fangs.

Great microscopic photos of the insects among us

An important note!

The most important thing you can do in your garden and yard for all of the beneficial insects is not to clean up very well.  You can pick up lots of leaves, but leave some of them scattered throughout the garden and in out-of-sight areas to give them a safe place to overwinter or lay eggs and forage.   In the fall it’s best to try to not tidy up too much.  Leave standing flower seed heads, leave leaf litter, and leave some hollow stems of plants and shrubs if you want your yard to be natural habitat.  Most songbirds switch from eating seeds to insects during nesting season, then turn back to seeds for fall and winter.   Lacewings, Ladybugs, and solitary bees hide in tiny nests under grasses and at the feet of willows or in debris under the shrubs.  Leaving your garden and yard a more natural habitat will provide seeds for birds and give beneficial insects a place to nest all winter.

Helping migratory birds

Photo of finch perching on thistle 

Photo of bird preparing for winter

More on Native Bees

So, you can see how vital insect recognition can be if only so you don’t squash the same critters that are there to save the day! The best place to start is by learning about the insects local to your area. I like having a bug identification page called Mac’s Field Guide and they’re available for different regions. This large, laminated card has good garden bugs on one side and bad ones on the flip side. The one I have for California has images of the kids next to the adults, too. It also tells you where to look for both good beneficial insects and bad bugs and which plant whets their appetites.

If a particular insect really piques your interest, catch it in a jar. Bring it down to your local nursery or your local Cooperative Extension Office (Master Gardeners) for proper identification. You were probably going down there to see what new vegetable starts they brought in this week anyway.


10 Reasons Why You Should Prune Trees and Shrubs

10 Reasons Why You Should Prune Trees and Shrubs

Tree & Shrub Pruning Tips

by Chris McLaughlin

Not sure about pruning your plants? We’ve compiled 10 reasons why you should prune trees and shrubs in your yard or garden to help maintain their long-term health.

Practicing simple techniques, using the right tools, along with proper timing for each plant species is the key to effective pruning and most require very little pruning in order to achieve the gardener’s goal. But before taking sharp tools to your plants, you should understand exactly what those goals are and why you’re pruning them in the first place.

Remember that every cut made will alter the plant’s shape and growth. In fact, the list below addresses the many reasons that any tree or shrub should be pruned in the yard or garden. If you are interested in having your trees or bushes trimmed, remember that you can use a service like TreeSurgeon.Care to help.

Here are ten great reasons to prune trees (including fruiting) and shrubs:


Reason #1: Vigor

Pruning a growing shoot stimulates new growth production. So if you’re looking for some vigorous new growth on a shrub, prune it hard (a lot). Consider this type of pruning when you have a shrub that has a weak section of growth; such as the back. In fact, when you “pinch” back new growth with your fingers on any plant, you’re actually pruning.

Reason #2: Shape

Plants that have grown out of balance with either the yard or their own growing pattern (such as stray and awkward branches) can be reshaped by pruning.

Reason #3: Restrict a Plant’s Size

This can be especially important if you live in an area with restricted space. Gardeners living in urban and suburban areas almost always have to prune trees and shrubs to keep them from out-growing the yard, garden, or container. Root-pruning is another technique that can help restrict the size of plants in containers.

Reason #4: Let in More Light

If you have an extremely shady yard or you’d like to have more sun reaching the area under a tree for plants or lawn, careful pruning can let in a little extra sunshine.

Reason #5: Health and Structural Soundness

Any diseased, injured, dying, or dead branches should be removed for the health of the tree. Branches that rub together should be removed to eliminate potential damage to a main branch. Much of maintaining structural soundness in a tree is about careful pruning practices such as not “topping” trees. Topping can make the tree weak and susceptible to pests. It’s also associated with the slow death even if it takes years for the tree to actually die.

Reason #6: Create Special Effects

Most often, pruning for special effects is seen in formal-type gardens. They often take the shape of boxwood topiary or an apple tree that’s been trained as an espalier. Pollarding or coppicing pruning techniques may be used, as well.

Reason #7: Encourage Flowering and Fruit

Pruning can coax growth spurs (produces the flowers and the fruit) to form on the branches. Strong flower buds are also encouraged to form due to pruning. Fruit trees can be lightly pruned in the summer which will provide better air circulation around the fruit. This results in less trouble with fruit diseases and the fruit ripens faster.

Reason #8: Protect People and Property

Prune trees that have been planted near homes, sheds, play structures, and other buildings as they propose a potential threat to human safety if heavy branches break off or the tree falls. They can also interfere with telephone or power lines. Proper pruning can keep people, pets, and property safe.

Reason #9: Keep Evergreens Proportionate

Pruning will keep boundary hedges under control. Evergreens benefit from light pruning as it keeps their foliage dense, and therefore, attractive.

Reason #10: Improve Appearance

Many gardeners’ top priority when pruning their plants is about their appearance in the yard or garden. Removing dead, unwanted branches, as well as suckers creates a pleasing shape and leaves plants looking neat and tidy. Many lovely blooming shrubs such the Butterfly Bush (Buddleia spp.) are capable of spectacular blossom displays due to good pruning techniques.

Usually pruning is about working with a plant’s natural growth pattern as it’s developing, as well as maintaining mature tree and shrub species. One of the few exceptions is when it’s used to create effects such as espalier. In general, a successful pruning job will leave your healthy, beautifully-shaped fruit trees or shrubs looking like they haven’t been touched at all.

Ready to get pruning in your garden? Check out our list of must-have gardening tools!

5 Easy Tips for Successfully Planting Grass Seed

Five easy tips for successfully planting grass seed.


by Sam Doll

Now that fall is nearly upon us, it’s time to start thinking about planting grass seed! Don’t know what you are doing? Don’t worry. We are here to help.

Here are our 5 tips for successfully planting grass seed this season:


1.      The Season Matters

While some warm-weather grasses, like bermudagrass, should be planted in early summer, most grasses need mild weather to successfully germinate and survive. Freezes and harsh heat can kill off your baby grass before it has a chance to become established. Late Spring and early Fall, when the soil temperature is between 50 to 80 degrees, is the best time to plant most grass seeds.

2.      Find the Right Seed

Find the grass that will suit your lifestyle and location. Some mixes, like our Green Manure and Cool Season Cover Crop, are great for restoring the soil nutrients in your soil. Some, like our Colorado Supreme Turf Grass Mix, are better for heavy foot traffic. Native and drought-tolerant grasses are great for creating a sustainable and low-maintenance landscape. Make sure to consider your soil type, climate, amount of sun, and intended use when picking a grass mix.

We have a wide variety of grass mixes that will suit all your needs.

3.      Prepare Your Soil

Once you’ve chosen your site, use a shovel or a sod cutter to remove the existing plants and grass from the area. Remove any debris and rocks you see, till the soil, and fill in any low spots. You want your soil to be broken into pebble-sized particles.

Rake the site to even out the soil and remove small debris. Be careful when bringing in new topsoil to make sure it doesn’t contain unwanted weed seeds.

Optional: You can send a soil sample to your local extension office to have it tested to see if you need any soil amendments. You can find extension offices near you with the help of this tool from GardeningKnowHow.com.

As for pH, you generally want to keep the soil between 6.0 and 7.0.

4.      Seed and Fertilize

Once your site is prepped, it’s time for planting your grass seed! Using a drop spreader or a broadcast spreader, spread half the seed lengthwise over your site, then use the other half and spread crosswise over your site.  A recommended seeding rate will be listed on the seed tag.

Feeding with starter (weak) fertilizer the same day as you spread seed will provide proper nutrients for early growth and establishment. Make sure the site stays moist, but not soggy, through germination.

5.      Maintenance

Different mixes require different maintenance. Generally, once grass reaches 5-6 inches (for turf type), it is recommended to cut it to encourage even growth. Water and fertilize as needed.


We hope these tips will make planting grass seed a breeze for you! If you still have questions or need any other advice, please don’t hesitate to contact us.


Ruby-Throated Hummingbird

Ruby-Throated Hummingbird

A female Ruby-throated Hummingbird in flight.

Photo courtesy of pixabay – skeeze


All About The Ruby-Throated Hummingbird

The Ruby-throated Hummingbird is one of the most commonly recognized hummingbirds in North America, especially in the eastern half of the country where they spend their summers. They are the only hummingbird to breed east of the Great Plains. Commonly found in open woods, forest edges, parks, gardens and yards, their familiar green and red plumage make them easy to identify.

Ruby-throated Hummingbirds are 3-3.75 inches in length and weigh around 10-13 ounces with a life span of about 4-6 years. These speedy little birds flap their wings 53 times per second, can hover in mid-air and fly upside down and backward. The males have a striking bright red or red-orange iridescent throat. The males’ upperparts and head are bright green. The female’s underparts are plain white and upperparts green, but they lack the brilliant red throat of the male.

Ruby-throated Hummingbirds feed mostly on nectar and insects. They are strongly attracted to red and orange flowers, like those of trumpet vine, red columbine, bee balm, scarlet sage and many Penstemon varieties. They happily feed from nectar feeders too.

Ruby-throated Hummingbirds are solitary birds that only come together to mate. The female builds her cup-shaped nest about 10-20 feet above ground in a well-camouflaged area of a shrub or tree.  Here she will commonly produce 1-2 broods of 2 white eggs per year. The incubation period is 10-16 days. The female, alone, will care for the young for 2-3 weeks before they are mature enough to leave the nest.

In early fall, the Ruby-throated Hummingbird will begin its migration to Mexico & Central America crossing over 500 miles of water in their nonstop journey across the Gulf of Mexico. They can become a little more aggressive near food sources in late summer as they begin preparing for the journey.

To attract more of these lovely birds to your yard keep a clean and full nectar feeder, plant more nectar-rich flowers in their favorite colors of orange and red, limit insecticide use and provide a water source such as a mister or shallow fountain for these birds to bathe and preen in.

Let us help you plant more nectar-rich hummingbird attracting flowers with our Wildflowers for Hummingbirds Mix.

Sweet Corn – the Best Part of Summer

History of Sweet Corn and Recipes

By Engrid Winslow

Photo of fresh sweet corn on the cob.

Image by Couleur from Pixabay

“The first ear of corn, eaten like a typewriter, means summer to me—intense, but fleeting.” ― Michael Anthony

There are two flavors of summer that I will unapologetically eat until bursting with absolutely no apologies because they haunt my food memories in the dead of winter. One is tomatoes fresh from the garden and the other is sweet corn.

Sweet corn is a vegetable that originated in the Americas and has spread worldwide. Originally referred to as maize the cultivation of corn was introduced in South America from Mexico in two waves: the first, more than 6000 years ago, spread through the Andes. Evidence of cultivation in Peru has been found dating to about 6700 years ago. The second wave, about 2000 years ago, spread corn through the lowlands of South America. Around 4,500 B.C., maize began to spread to the north; it was first cultivated in what is now the United States at several sites in New Mexico and Arizona, about 4,100 B.C.

During the first millennium AD, maize cultivation spread more widely in the areas north. In particular, the large-scale adoption of maize agriculture and consumption in eastern North America took place about A.D. 900. Native Americans cleared large forest and grassland areas for the new crop.

Corn is used in many foods including grits (in the South), polenta (in Italy), cornstarch, chowder, cornbread, cornflake cereal, hominy, popcorn, corn dogs, tamales and tortillas. But fresh sweet corn on the cob has to be the most popular and is a sure sign of summer.

Be sure to visit a farm stand that picks their corn daily and cook and eat it on the same day it was picked. The intensity of flavor will be at its peak and you won’t want to go back to the supermarket for corn ever again. Resist the urge to open the ears as that can cause the ears to dry out. Just feel for firm kernels and fill up your bag to overflowing with fresh, delicious sweet corn.

Last year a friend shared her secret to cooking corn easily and I now use this method exclusively. Instead of boiling a pot of water, shucking the corn and trying to remove all of the silk, use your microwave. Just pop un-shucked corn into the microwave for 4 minutes per ear, up to four ears at a time (16 minutes). Let cool slightly and then see how easily the shucks and silk come off the cooked ears. From there you can do all sorts of things with it. It’s easy to scrape off the kernels with a sharp knife and stash them in the freezer to bring back a taste of summer when you need it the most.

Here is one of my favorite ways to combine my two summer favorites – corn and tomatoes. It is delicious and you will want to make it as often as possible while these two summer vegetables are at their peak.

CORN AND TOMATO SALAD

Serves 2-4

Slice one pint of cherry tomatoes and salt generously (at least 1 teaspoon)

4 ears of corn, prepared as above and scraped from the cob

6-7 leaves of fresh basil, chiffonade

The key to this mixture is to set the salted tomatoes to the side for at least 30 minutes so that the tomatoes give up some of their juice and become slightly jammy.  Add cooled corn and basil and enjoy. It keeps well and is one of the best things you will ever eat.

There are many add-ons you can do for this salad. It’s great with a few squeezes of lime juice, a drizzle of olive oil, or you can add chopped sweet onions, drained and rinsed black beans and cotija cheese for a great vegetarian taco or salsa fresca for fish tacos, a dip or topping on grilled fish or chicken. You can also substitute the cilantro, chopped parsley or thyme for the basil.

“A light wind swept over the corn, and all nature laughed in the sunshine. “ Anne Bronte


A Packet of Golden Bantam Sweet Corn.

For The Love of Leeks

Heirloom Vegetable Seeds

By Engrid Winslow

A close-up photo of sliced leeks.

Image by Susann Wagner from Pixabay

“If you can mock a leek, you can eat a leek!” ― William Shakespeare, Henry V

Since you planted leeks in the spring, now is the time to pat yourself on the back and enjoy the harvest. One of the simplest ways to enjoy leeks is to sauté them in butter and olive oil with mild peppers. It is also a good idea to slice them thinly and freeze them for adding to soups and stews during the winter.

Leeks are related to onions as they are both in the Allium family) but have a much more mild flavor. The Hebrew Bible talks of leeks, and reports it as abundant in Egypt. Dried specimens have been discovered at archaeological sites in ancient Egypt along with wall carvings and drawings, which indicate that the leek was a part of the Egyptian diet from at least the second millennium BCE. Texts also show that it was grown in Mesopotamia from the beginning of the second millennium BCE. The leek was a favorite vegetable of the Roman Emperor Nero, who consumed it in soup or in oil, believing it beneficial to the quality of his voice.

Some of the most common uses of Leek are as an ingredient of cock-a-leekie soup, leek and potato soup, and vichyssoise, as well as plain leek soup. But here are a couple of other ways for you to enjoy your harvest of leeks:


LEEKS AND CHICKEN

Serves 4

4 TBL extra-virgin olive oil                                             4 medium leeks, white and tender green parts, thinly sliced

1 lb cremini mushrooms, sliced thinly                      2 lbs boneless, skinless chicken breasts, cut in 2-inch pieces

¼ cup flour, plus 1 TBL more, if needed                  3 cups chicken stock

1 tsp fresh thyme, leaves only                                   2 TBL nonfat plain Greek yogurt

4 tsp Dijon mustard                                                         1/3 cup water

Salt and pepper

Heat 2 Tablespoons of oil in a skillet and add leeks, sauté for a few minutes until they begin to wilt, then add 1/3 cup of water and cover. Let the leeks steam for up to7 minutes until very soft and melted, stirring every minute. Add the mushrooms and season with salt and pepper. Cover and cook until the mushrooms are tender, about 5 minutes. Empty leeks and mushrooms into a separate bowl or plate.

Season chicken with salt and pepper and toss in ¼ cup of flour. Heat remaining oil in skillet and brown chicken until golden brown, add stock and thyme and simmer until chicken is just cooked through (about 1 more minute). Transfer chicken to bowl with vegetables.

Simmer the stock over moderate heat until reduced by half, 4-5 minutes. If the sauce is not thick enough, mix  1 tablespoon flour into vegetables and chicken. If too thick, add additional stock. Return vegetables and chicken to skillet and simmer until warmed through, about one minute. Blend yogurt and mustard together and stir into the stew. Season with salt and pepper, if needed and serve over rice.A packet of organic American Flag Leek seeds.

Plant Your Cool Season Vegetables Now

Know Which Crops to Plant and When

by Heather Stone

Photo of a hand holding two red radishes.

Photo courtesy of pexels – skitterphoto 9301 (1)

Mid- August to Mid- September is the prime time to start planning and planting your fall vegetable garden and your cool season vegetables. Even though it’s still hot outside, the nights are getting cooler and the days shorter. Now is the time to get those quick-growing, cool-season vegetables in the ground. For bountiful late-season harvests here are a few guidelines to follow.

-Know which crops to plant and when. Here’s a list of our favorite cool-season vegetables and their days to maturity.

  • Kale should be planted 85 – 90 days before the first frost. The leaves can handle a few light touches of frost and become sweeter each time.
  • Carrots can be planted 80-85 days before frost.  They can be harvested when young and tender.  Even after the cold temperatures shrivel the tops, they can be dug, sweet and juicy, from the ground throughout the fall.
  • Beets can do double duty with green tops for salads and tasty roots as well.  Plant seeds about 65-70 days before frost, depending on the type you choose.
  • Leafy greens such as spinach and leaf lettuces, arugula, mustard greens and Swiss chard all do best in the cooler temperatures of fall. Plant seeds about 50-60 days before frost depending on the type of green chosen. These can be harvested when young and immature for delicious baby greens.

    Photo of leafy green seedlings.

    Photo courtesy of pexels by kaboompics 5809

  • Radishes are always great to spice up salads. These are fast-growing and can be planted 30-35 days before the first frost. Pull them when young and tender.


-Keep moist. The garden will dry out more quickly in the warm days of late summer than it did in the spring. Keep a close eye on new plantings to make sure those seeds or seedlings stay well-watered. A light covering of grass clippings or straw can serve as mulch, helping to retain moisture. Using a light row cover over newly planted areas can also help retain moisture, provide shade and protect against light frosts further down the road.

Fertilize once a week with an organic fertilizer with nitrogen and enjoy delicious salads and veggies all fall long.

August Garden Chores

Photo of gloved hands working in a garden.

photo courtesy of pixabay – photoAC 2518377_1280

Gardening Tips

We are deep into August. Here are a few tips and reminders about where should we be focusing our time and efforts in the garden this month to make the most impact.

For many, August in the garden is an explosion of flowers, fruit and vegetables. Keep on top of harvesting! A daily inspection of zucchini plants ensures none escape your eye and turn into what more resembles a baseball bat than a vegetable. Check tomatoes for blossom end rot and adjust watering if needed.


  1. Start gathering recipes for the crops you have in abundance. Hit up some of your favorite websites or blogs for recipe ideas. Check out our reader shared recipes here.


2. Harvest herbs for either fresh use or to save for later. Here are some tips for preserving herbs by freezing, drying or in vinegar.


3. As crops are harvested and bare space appears in the garden another August garden chore is to protect your soil by covering it with mulch or planting a cover crop.


4. Side-dress your warm-season crops with a little compost to give them a boost to finish out the growing season.


5. Now is the time to plant another sowing of cool-season vegetables like lettuces, chard, kale, radish, spinach, arugula, beets, carrots and peas. This doesn’t have to take long and you’ll thank yourself later when you have fresh salad greens throughout the fall. Plant another row of bush beans too for a fall harvest.

Harvesting beans is an August garden chore.

Photo courtesy of pixabay – couleur 3702999_1280

6. Keep weeds under control in both the perennial and vegetable gardens. Weeds rob moisture, nutrients and light from our desired plantings.


7. Keep perennials deadheaded and cleaned up. Tuck a pair of pruners in your pocket while walking through and enjoying your garden. I little clean up here and there helps keep pests at bay and saves on time later.


8. Continue to care for your plants in pots by deadheading, removing dead and diseased foliage and regularly fertilizing.


9. Take notes and/or pictures of what worked and what didn’t in your garden. These reminders will help next spring when it’s time to plant again.


10. Start planning your fall bulb plantings.

Four Tips for Growing Your Best Watermelons

Gardening Tips

by Heather Stone

Picture of a just-cut red watermelon

Photo courtesy of pixabay

If you have space, make room for a hill or two of watermelons in your garden. They are easy to grow and like any fruit and vegetable, they just taste better when they are plucked straight from the garden. Besides, nothing says summer quite like a juicy slice of watermelon.


Here are a few tips for successfully growing watermelon.


    1. Choose the right variety for your climate

Most watermelons need 80-95 days to ripen, but some varieties require even longer. Choose one that works for your area. You can get a head start by starting seeds indoors about three weeks before your last frost date or by purchasing established plants. Plant outside when all chances of frost have passed and the soil temperatures are in the 70’s.


  1. Give them room to roam

Watermelons need lots of room to ramble. It is not uncommon for vines to reach up to 20 feet in length. The vines don’t like to be regularly moved so pick a spot where you can let them roam freely.


  1. Know when to water

Keep plants moist when starting off and until fruits begin to form. Watermelons are fairly deep-rooted plants, so in some climates, you might not need a lot of extra moisture except during extended dry periods. When watering, water at the roots and try to avoid getting the leaves wet. This helps to keep down on the spread of fungal diseases. Once the fruit has begun to set, experts say to hold off on the water to concentrate the sugars in the fruit, giving you a sweeter melon.


  1. Know when to harvest

    Tips for growing watermelon.

    Photo courtesy of pixabay

It’s not always easy to know when your watermelon is ripe. To start, check the “days to harvest” of your variety and begin to check for maturity when plants have reached that age. The color of the bottom spot where the melon sits on the ground will turn from white to yellow as the melon matures. Also, watch for the rind to turn from a bright, slick appearance to a more dulled look. The skin or rind should be tough enough that a thumbnail won’t pierce the skin. After picking, chill for best flavor.