Tag Archive for: Health

PRAISE FOR THE LOWLY CABBAGE

Heirloom Vegetable Seeds

by Engrid Winslow

Photo of a growing head of purple cabbage.

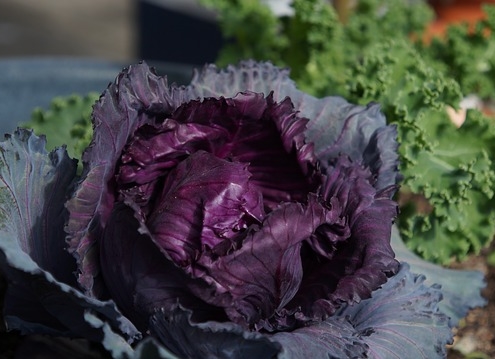
photo courtesy of pixabay – angelsover

Pity the lowly cabbage, which doesn’t get the love of its sexier brassica brothers and sisters such as Brussels sprouts, broccoli, cauliflower or kale. But this overlooked vegetable is plentiful and inexpensive at this type of year. Cabbage is also a breeze to grow and does great in cool spring and fall temperatures. They actually taste sweeter when exposed to light frosts as do other cool-season brassicas.

It comes in two types: European and Asian. The European types are white or green cabbage, red cabbage and savoy. The most popular Asian types are bok choy and Napa. Napa is an excellent choice for summer slaw when combined with grated carrots, red bell peppers and simple soy and rice-wine vinegar dressing with a touch of honey. Toss in some peanuts for crunch and/or cooked chicken to make it a complete meal. But today we are focusing on a couple of winter cabbage recipes.

If the taste of cabbage doesn’t convince you then maybe this will: cabbage is full of vitamin K and anthocyanins that help with mental function and concentration. These nutrients also prevent nerve damage, improving your defense against Alzheimer’s disease and dementia. Red cabbage has the highest amount of these power nutrients. Cabbage is an excellent source of vitamins C, B1, B2 and B6. It is also a very good source of manganese, dietary fiber, potassium, folate and copper. Additionally, cabbage is a good source of choline, phosphorus, magnesium, calcium, selenium, iron, pantothenic acid, protein and niacin.

This soup is adapted slightly from the wonderful cookbook: Six Seasons – A New Way with vegetables by Joshua McFadden which you might want to add to your cookbook library. https://www.amazon.com/Six-Seasons-New-Way-Vegetables

The red coleslaw is a family Easter favorite that is great as a side with ham and scalloped potatoes.

Two other favorite cookbooks for you to also consider are Brassicas by Laura B. Russell https://www.amazon.com/Brassicas-Healthiest-Vegetables-Cauliflower-Broccoli and The Book of Greens by Jenn Louis https://www.amazon.com/s?k=the+book+of+greens+by+jenn+louis&crid

Cabbage Recipes

COZY CABBAGE and FARRO SOUP

Serves 4

Notes: If you use savoy cabbage it will not take as long as green cabbage once it is added to the pot to steam.

  • 1 pound cabbage, savoy or green
  • Olive oil
  • 1 medium onion, thinly sliced
  • Kosher salt and freshly ground black pepper
  • 3 garlic cloves, peeled and chopped finely
  • 1 sprig of rosemary or thyme
  • 1 tablespoon red wine or white wine vinegar
  • 2/3 cup uncooked farro
  • About 4 cups chicken or vegetable stock
  • 1 tablespoon fresh lemon juice
  • Shaved parmesan, to finish
  • Cut out the cabbage core and finely chop it. Cut the leaves into fine shreds or about 1/8-inch ribbons. Heat 1/4 cup olive oil in a large pot or Dutch oven over medium heat. Add the onion and cabbage core, some salt and pepper, and cook, stirring frequently, until the onion starts to soften but is not yet browned, about 5 to 7 minutes. Add the garlic and cook another 3 to 5 minutes, until the garlic softens too. Add the shredded cabbage leaves and herb sprig. Reduce the heat to medium-low and cover the pot and let it steam a bit to soften the leaves, then toss the cabbage to combine with other ingredients. Cook, covered, until the cabbage is very sweet and tender, which may take 30 minutes or as little as 15 to 20 minutes, stirring occasionally.

Meanwhile, in a small skillet, heat 2 Tablespoons of olive oil over medium and add the uncooked farro. Toast it, stirring, for a few minutes, until half a shade darker.

When the cabbage is ready, stir in the vinegar. Taste and season with more salt and pepper. Add toasted farro and stock. Bring mixture to a low simmer and cook for 25 to 35 minutes, until farro is tender and all the flavors are married. The soup will be very thick, but if you’d prefer more liquid, add another 1/2 cup stock. Taste and adjust seasoning again. Stir in lemon juice.

Ladle into bowls and finish each with a drizzle of olive oil and a shower of parmesan, with more parmesan passed at the table.

Soup keeps well in the fridge for 3 days and for much longer in the freezer.


RED CABBAGE COLESLAW

Serves 4

Vinaigrette:

  • ¼ cup extra virgin olive oil
  • 2 teaspoons chopped, fresh tarragon
  • ½ cup tarragon or apple cider vinegar
  • 1 tsp dry white wine
  • 1 tsp Dijon mustard
  • 1 TBL honey
  • Salt and pepper to taste

Put all in a blender and blend for 1 minute.

Toss with:

  • 1 head shredded purple cabbage
  • 1 cup golden raisins
  • 1 tsp caraway seeds

The vinaigrette will keep for 5 days and after prepared, the salad will keep for two days in an airtight container.


Here is a recipe from our blog “The Dirt” for Spicy Tofu Tacos with Cabbage Slaw from the kitchen of Michael Scott

and more on planting Cabbage and other uses, here.

How To Make Easy and Delicious Sauerkraut

Photo of Green Cabbage with white text stating, "How to make delicious sauerkraut".

by Sam Doll

Everybody is fermenting! From deliciously tart Kombucha to mouthwatering sourdough, home-fermented foods are the foodie trend du jour. Fermentation projects can be intimidating though. Many require multiple steps, special equipment, and difficult to find ingredients.

Ready for a step up? Check out our guide to making your own Kombucha at home!

So where should you start their fermentation journey? That’s easy: sauerkraut!

What is Sauerkraut?

Sauerkraut is green cabbage that has undergone lactic acid fermentation. Lactic acid fermentation is when lactobacillus, a beneficial strain of bacterium, metabolizes sugars in an anaerobic (without oxygen) environment.

The lactic acid created as a byproduct of this process acts as a preservative and can keep homemade sauerkraut fresh and safe to eat for up to six months.

Dive into fermentation with this list of potential projects

What will you need?

Ok! Enough with mumbo jumbo. The beauty of making sauerkraut is how easy it is! You’ll need three ingredients:

  • One head of Green Cabbage*
  • Kosher Salt
  • Caraway seeds (optional)

* We love the Flat Dutch Green Cabbage for making Sauerkraut. It matures beautifully in cold weather and it is super easy to grow! If you don’t have the time or space to grow your own cabbage, many farmers markets have beautiful, local cabbages late into winter.

That’s it! The best part is that all the equipment required is probably already in your kitchen:

  • Cutting Board
  • Chef’s Knife
  • Large mixing bowl
  • Mason jars with lids

Great! Let’s move on.

How to make Sauerkraut

Sauerkraut is super easy to make, but it takes a little time and elbow grease to make it happen at home. Block off at least 45 minutes to an hour for this project (although you can probably get it done in less than 30 minutes if you are a Sauerkraut making machine).

1.      Sanitize Everything

Since we are fermenting, we are creating an environment that is good for microorganisms to live in. The trick is to make sure we are only getting the good bacteria! The good bacteria that will do all our fermentation are already living on the surface of the cabbage leaves, so we don’t have to worry about them.

For everything else, we want to sanitize our equipment and make sure we are working with clean hands. Sanitize your equipment by running it through a dishwasher or washing it thoroughly in hot, soapy water while making sure to rinse off any soap residue. Wash your hands following these CDC recommendations.

2.      Prepare the Cabbage

Rinse off the cabbage in cold water. Remove the more wilted or damaged outer leaves of the cabbage. Save a couple of these for later. Slice the cabbage into wedges and remove the core.

Then slice the remaining cabbage into whichever shapes you prefer. Ribbons will be the easiest to work with, but diced cabbage or even larger chunks can give your different and versatile textures.

3.      Squeeze the Cabbage

Move the sliced cabbage into a large bowl and add the salt. You want to add about a ½ tbs. of kosher salt for every pound of cabbage. It may not seem like a bunch but remember that you’re trying to create a nice home for the bacteria, not pickle the cabbage. Remember, your homemade sauerkraut will be a lot less salty and acidic than the store-bought stuff.

Now it’s time to get your (washed) hands a little dirty! Grab fistfuls of the cabbage in the bowl and begin massaging and squeezing it. Keep at it for about 10 minutes to get the best results. The cabbage will break down and get limp and watery. This water will be the brine that your cabbage ferments in.

If you like the classic flavor of the caraway seeds, add about 1 tbs now.

4.      Begin the Fermentation

Begin to pack the cabbage into your mason jars. You’ll want jars that you can comfortably fit your hand into because you’ll need to tamp the cabbage down with your fist. This releases more juice and helps remove air bubbles.

Add any liquid released from the cabbage into the jar and place one of the cabbage leaves you saved from earlier on top. This will help keep the cabbage submerged, once more juice has been released. Weigh the cabbage down with clean marbles, stones, or specialty fermentation weights (we just used some thoroughly cleaned river rocks).

Cover the top of the jar with a breathable cheesecloth or towel and secure it with twine or a rubber band. This will allow the sauerkraut to breathe, but keep out dust and bugs.

5.      The first 24 hours

Make sure that your baby sauerkraut is being stored in a dark, cool place. Too much light or heat can cause off flavors and the growth of things that you do not want in your sauerkraut. Every so often, check on the sauerkraut and push it down with a clean hand or jar that’ll fit into the fermentation container. This will release more juice from the cabbage and should end up submerging the solids.

If your cabbage isn’t submerged after 24 hours, make extra brine by dissolving 1 tsp. kosher salt into one cup of water and adding that to your fermentation jar until it is submerged.

6.      The Waiting Game

Store your sauerkraut for 3-10 days, depending on how strong you like the sauerkraut taste. Occasionally, a white film will form on the top. This is a normal part of the fermentation process. Just skim it off and continue.

Sometimes, you’ll even find a little mold on the top of the fermentation jar. Most times, this can be removed without it affecting your sauerkraut. However, if it looks or smells off, don’t be afraid to toss it. Trust your senses.

7.      Time to eat!

Once you have your sauerkraut to where you like it, you can go ahead an enjoy it! If you’re not ready to eat right then, seal the jar with a lid and store it in the fridge for up to 6 months.

If you want to store it longer than 6 months, you can go through the canning process. Follow the directions from the National Center for Home Food Preservation.

Grow. Enjoy. Share…the beauty and the bounty!

HERBAL SALVE FOR YOUR BEST FRIENDS PAWS

Close of of furry dog face. Herbal salve for paws.

Photo of Cute fluffy dog compliments of M. Cosselman.

Herbal Salve for Paws

By Engrid Winslow

It’s clearly winter and we can tell because our skin gets drier and we use more lotions and balms to combat dry, chapped skin. But what about your dog? Winter means cold, ice and salted roads, all of which can dry out your furry friends’ paws. Did you know that there are herbs which are particularly healing for dogs and can be mixed into a salve? Here are a few ideas and the master recipe for turning them into a creamy topical application for your dog. If you didn’t save any of these from last year’s herb garden or have never grown them, this will give you some ideas for the next growing season. Also, there are herbal apothecaries in many towns or you can order the ingredients from https://www.rebeccasherbs.com/. You should gently massage the salve into the skin before your dog spends long periods outside. Also, these are safe on humans as well as dogs so when you apply it to your dog’s paw pads, you will get the benefit too.

Calendula

(Calendula officinalis) flowers are antimicrobial, antifungal, antibacterial and very healing. It is ideal for treating all skin irritations and wounds for humans and dogs. It can, however, be potentially toxic to cats, so refrain from sharing it with feline house members.

Chamomile

(Matricaria recutita, Chamaemelum nobile) flowers don’t just make a calming tea. It is also antibacterial and can help soothe irritated skin. Occasionally, a dog will have an allergic reaction so proceed with caution to be sure your pet is not one of those unlucky few.

Rosemary

(Rosemarinus officinalis) leaves, stems and flowers is a versatile herb for cooking as well as having anti-inflammatory and antifungal properties. It works well in treating abrasions and is antifungal.

Sage

(Salvia officinalis) leaves or flowers have both cleansing and antiseptic properties and are very healing. It is also a very safe herb as long as you take care for to use Artemisia (Artemisia spp.) sages.

Slippery Elm’s

(Ulmus fulva) inner bark is healing for topical wounds and soothes irritation. Rarely, a dog will have an allergic reaction so, once again, be in-tune with your dog and watch for any signs of itching sneezing or other allergy symptoms.

MASTER SALVE RECIPE

5 oz. coconut oil

3 ½ oz. powdered or finely ground herb from the list above

4 oz. beeswax

Heat the coconut oil and herb in the top part of a double boiler and let the water boil for 1 ½ hours to infuse the herb.

Strain the herb out of the oil with cheesecloth, squeezing out as much liquid as possible. Return to oil to the double boiler and add the beeswax. Heat over boiling water, stir frequently until the wax is melted and thoroughly combined.

Pour into small jars and allow to cool, then seal.  If stored in the refrigerator, this herbal salve for paws will keep for at least two years.


Preserving Foods

Food Preservation

by Rebecca Hansen

Many of us have tried our hands at the new Victory Gardens and are getting back to our roots in our community’s Grow Local movements.  With the flow of garden produce increasing each minute, we have donated excess to the local Community Food Share programs and, we are beginning to be mildly panicked at the thought of all of that fresh produce going to waste solely because we can’t use it fast enough.

With our neighbors slamming their doors when they see us heading their way with an armload of our best organically grown zucchinis we find ourselves wishing the bounty could be spread out over the year and last well beyond the late summer flush.  More and more people are turning to home food preservation as a way to keep the bounty of their hard-earned, organic, heirloom, non-genetically modified gardens coming.

Now is the time to start your research, before the tidal wave of tomatoes sweeps you away. The number of food preservation methods is exciting and a bit daunting.  Drying foods is one of the oldest methods of preserving foods. Also, canning, freezing, pickling, curing and smoking, and fermenting are ways to keep your pantry full during the winter.

What could be more fulfilling than pulling out a sparkling jar of homemade salsa when the snowflakes are flying to bring back warm memories of those beautiful heirloom tomatoes growing on the vine?  CSU Extension has a couple of great publications on how to dry vegetables and fruits with all that you need to know about nutritional values, methods and safety precautions.

Also in the extension’s Nutrition, Health and Food Safety publications, are fact sheets on smoking and curing meats and making pickles and sauerkraut and preserving without sugar or salt for special diets.  Check out the one on safe practices for community gardens for tips on ensuring safe food for all gardeners.

With all of our efforts to ensure that we each have gotten the most nutritious value from our fresh produce, it would be prudent to search for the newest scientific research into home food preservation methods.  We want to eat healthy fruits and vegetables even when they are not in season.  The USDA encourages us to use safe canning methods. Scientific developments have changed recommendations over time. Always use up-to-date methods and do not just rely on the practices of past generations.  A great place to start is by exploring the National Center for Home Food Preservation website from the University of Georgia.

Publications and resources are available at the center’s website with useful tips for proper preservation techniques.  Also, not to be missed is an awesome, free, online self-study course called;

Preserving homegrown food can be an economical and fulfilling way to enjoy quality, nutritional food from your garden all year long.  So when your heirloom tomatoes, squash, onions, peppers, beans, garlic, beets, and turnips cover every surface in your home and garage and the refrigerator is brimming with more fragile produce, you will be fortified with the knowledge necessary to safely preserve the bounty for the time when the snowflakes will inevitably fly.