Celebrate St. Patrick’s Day With Irish Soda Bread

Photo of a round loaf of Irish soda bread

Image by HomeMaker from Pixabay

History of Irish Soda Bread

By Engrid Winslow

Picture of two shamrock leaves

Image by Rebekka D from Pixabay

The tradition of Irish soda bread is a much newer invention than the celebration of St. Patrick’s Day which began in 400 B.C.  A bread made without yeast to leaven it was first reported in the Americas when settlers and indigenous people used potash before the invention of baking soda in the mid-1800s. Due to Ireland’s financial strife and lack of access to ingredients, the inspiration for Irish Soda Bread was one of necessity. It made use of the most basic and inexpensive ingredients available: “soft” wheat flour, baking soda, salt, and soured milk. For soda bread, “soft” wheat flour, a low-gluten variety of flour used in most quick bread recipes, is ideal, rather than the hard wheat flour most likely to be found in a yeasted bread. And, since Ireland’s unique climate is only suitable to growing wheat of the soft variety, soda bread became a perfect match for Irish cooks.

Soda bread was also an ideal Irish recipe as even families who lived in the most isolated areas with little access to cooking equipment were able to create this simple and filling dish. Since many of the lower-class and farmhouse kitchens had no ovens, the bread was cooked in iron pots or on griddles over open hearths. This unique cooking method resulted in the signature dense texture, hard crust, and slight sourness that soda bread is known for.

The traditional mark of a cross on the top was adopted for superstitious reasons. It was believed that if a cross was cut on the top of the bread it would ward off evil and protect the household. The shape of the loaves varies by region. Southern Irish regions bake their loaves in the traditional fashion—round with a crossed top— and Northern regions divide their dough into four pieces and cook triangle-shaped flatbreads (also known as Farl) on a griddle.

Modern recipes for Irish soda bread usually use buttermilk instead of sour milk and have other ingredients added such as butter, egg, currants, raisins, or nuts. Here is a traditional recipe followed by one that is richer due to some of those other mix-ins. Both recipes are a delicious accompaniment to green beer!


Traditional Irish Soda Bread                                        (one round loaf)

 4 cups unbleached white flour                                                   1 TBL salt

1 tsp baking soda                                                                             ¾ tsp baking powder

1 ½ – 2 cups buttermilk

Combine dry ingredients and mix thoroughly then add enough buttermilk to make a soft dough. Knead on a lightly floured board for 2-3 minutes until velvety and smooth. Place in a well-buttered 8 inch cake pan. Cut a cross on the top with a serrated knife and bake at 375 for 40 to 50 minutes. The loaf should have a hollow sound when rapped on the bottom.

Irish Soda Bread                                                               (one round loaf)

  • 4 cups unbleached flour plus an extra tablespoon for currants
  • 4 tablespoons sugar
  • 1 teaspoon baking soda
  • 1 1/2 teaspoons kosher salt
  • 4 tablespoons (1/2 stick) cold unsalted butter, cut into 1/2-inch dice
  • 1 3/4 cups cold buttermilk
  • 1 extra-large egg , lightly beaten
  • 1 teaspoon grated orange zest
  • 1 cup dried currants
  1. Preheat the oven to 375 degrees F. Line a sheet pan with parchment paper.
  2. Combine the flour, sugar, baking soda, and salt in the bowl of an electric mixer fitted with the paddle attachment.
  3. Add the butter and mix on low speed until the butter is mixed into the flour.
  4. With a fork, lightly beat the buttermilk, egg, and orange zest together in a measuring cup. With the mixer on low speed, slowly add the buttermilk mixture to the flour mixture.
  5. Combine currants with flour and then add to the dough which will be quite wet.
  6. Dump the dough onto a well-floured board and knead it a few times into a round loaf.
  7. Place the loaf on the prepared sheet pan and lightly cut an X into the top of the bread with a serrated knife. Bake for 45 to 55 minutes, or until a cake tester comes out clean. When you tap the loaf, it will have a hollow sound.
  8. Cool on a baking rack. Serve warm or at room temperature.


Celebrating the Winter Solstice


Photo of a snowy winter sunset.

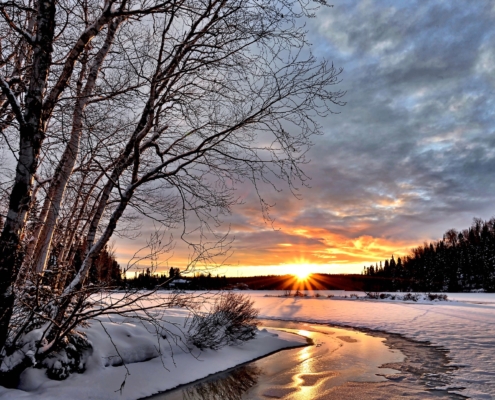
photo courtesy of Pixabay – AlainAudet

by Heather Stone

Midwinter is approaching. If you live in the north the days have been getting shorter, the nights longer, the temperatures colder and the landscape perhaps covered in snow. The winter solstice- (‘solstice’ means ‘standing still of the sun’) also known as Midwinter or Yule, marks the shortest period of daylight and the longest night of the year. This year the solstice falls on Friday, December 21st at 3:23 pm Mountain time.


For people throughout the ages midwinter has been an important time of ritual, reflection, and renewal; something I’m sure many of us could use more of in our lives. As our everyday living has moved more indoors we have lost touch with many of nature’s cycles. So why not take some time this solstice to rest, reflect and celebrate nature and the return of the light.

Photo of a burning tealight candle.

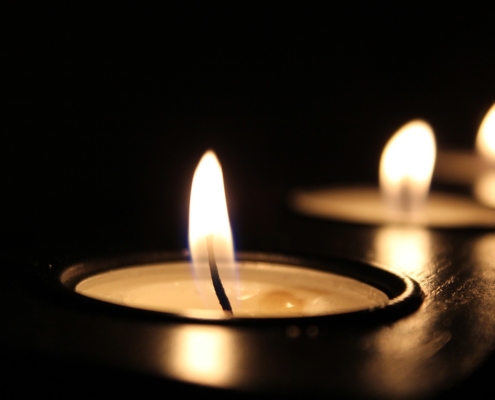
Photo courtesy of Pixabay – pexels

Here’s a list of a few ways that you can mark this day:

  1. Visit a place outdoors that’s special to you. Maybe that’s your regular hiking trail, a spot in your garden or your favorite place to watch the sunset.
  2. Light a candle to welcome back the sun. Or take it one step further and spend the evening lit only by candlelight.
  3. Watch the sunrise or sunset.
  4. Share food with friends and family to celebrate the return of the sun.
  5. Create an altar with objects gathered on a walk through nature.
  6. Take time to be silent.
  7. Burn a Yule log (traditionally this log is oak). Burn your Yule log and keep a piece to kindle the Yule log the following year.
  8. If you’re feeling creative, write a poem, paint of picture or sing a song to celebrate winter and/or the return of the sun.


“Again we come”

Again we come
to the resurrection
of bloodroot from the dark,

a hand that reaches up
out of the ground,
holding a lamp.

–Wendell Berry

A TRIO OF WINTER SOUPS

Image of a cauldron of bubbling soup over a fire.

photo courtesy of Pixabay

My Favorite Italian Winter Soups

From the Kitchen of Engrid Winslow

Maybe you have figured out by now that I have a long-standing love affair with all things Italian? No, well then, here I am giving you a trio of Italian winter soups. The first one hails from Emelia Romagna and the next is from Umbria followed by a traditional Tuscan bean soup. By the way, a great source for traditional Italian foods of all types, including beans, check out www.Gustiamo.com. If you prefer to stay in the USA, www.ranchogordo.com is also a wonderful source for heirloom beans and grains. Both websites have wonderful recipes as well. All of the recipes serve 4-6 people with some leftovers.


Sausage and Lentil Soup

  • 1/2 yellow onion
  • 1 large carrot, peeled
  • 3 Tbsp of Tomato Paste
  • 1/3 Cup Chicken stock or water
  • 850 grams (1 large can) whole peeled tomatoes
  • 2 cups lentils (the tiny Italian ones, called Lenticchini, are preferred)
  • 1 lb. sweet Italian Sausage
  • Olive Oil
  • Salt & Pepper to taste


Cooking the Lentils:

Wash the lentils in a strainer. In a large pot (big enough to hold cooked lentils, sausage and sauce), cover the lentils with 1.5 inches or 2 fingers worth of water. Cook the lentils over medium-high heat until the water boils and then decrease flame to low and cover the lentils. Stir occasionally and add more water as needed until the lentils are soft ((about 45 min).  Add salt and pepper to taste.


Make the “Soffritto”:

Grate the onion, carrot, celery, and garlic. Add olive oil to a deep frying pan (big enough to hold the vegetables and sausage) and place over medium-low heat. Add the grated vegetables to the frying pan and let reduce, occasionally stirring until soft (10-15 min).


Combine the Ingredients:

While the soffritto is developing, remove the casing from the sausage and mash flat using the back of a spoon or your hands. Once the vegetables have turned a golden hue and the onions are translucent, add the mashed sausage. Once the sausage has browned add the tomato paste, 1/3 cup of water or stock and stir. Puree the whole peeled tomatoes and, after the sausage mixture has cooked for ten minutes, pour in the tomatoes and stir. Allow it to simmer for 25 min, covered on medium-low heat. Add the lentils and season to taste with salt and pepper.


Umbrian Farro Soup


  • 1 cup chopped yellow onion
  • 3/4 cup chopped celery, medium chop
  • 3/4 cup chopped carrot
  • 2 minced cloves garlic2 1/2 ounces dried porcini mushrooms
  • 21/2 cups tomato sauce (canned or homemade)
  • 3 cups cooked farro, cooked al dente
  • 1 quart beef stock (use vegetable stock if desired for a vegetarian version

Directions

  1. Sauté the onions, celery, and carrots until translucent.
  2. Heat 1 cup of the beef stock and add the porcini to reconstitute.
  3. Use an immersion blender or food processor to blend about 3/4 of the vegetables, the garlic, 1 cup of the cooked farro, and all of the porcini and liquid until smooth.
  4. Add back to the pot and add the remaining farro, vegetables and stock. Add 2 1/2 cups of tomato sauce. Season and simmer for 30 minutes. Taste and add salt and pepper as needed.
  5. Drizzle with a bit of olive oil and Parmigiano Reggiano (optional)


Tuscan Bean Soup with Squash and Kale

 (Zuppa Frantoiana)


  • 1 finely chopped carrot
  • 1 stick finely chopped celery
  • 1 small finely chopped onion
  • 1 14 ounce can (400 grams) of cooked Borlotti (cranberry) beans (you can also use cannellini beans or chickpeas)
  • 1 cup of pumpkin or butternut squash, peeled and diced
  • 2 medium potatoes, peeled and diced
  • 1 small bunch of cavolo nero (Also known as Dinosaur or Tuscan) kale (you could use Swiss chard, beet greens, collards or spinach instead)
  • 4 cups of water or vegetable stock
  • salt and pepper to taste
  • Extra virgin olive oil, for drizzling

Gently cook the carrot, celery and onion in a few tablespoons of olive oil and a good pinch of salt in a heavy-bottomed saucepan on low heat. Let the vegetables sweat, not color, for about 10 minutes or until softened. Add the borlotti beans with about a cup of water (enough to cover) and bring to a simmer. Cook 15 minutes. Blend about half of the mixture to a smooth paste and return to the pot.

In the meantime, prepare the cavolo nero kale by slicing out the long, central stalk of the leaves and discarding and chop just the leaves roughly.

Add the pumpkin, potatoes and cavolo nero (if using silverbeet or spinach hold onto it until a few minutes towards the end of cooking) and top with enough water or stock to cover (up to 4 cups or 1 liter) and cook for 30 minutes, uncovered, over an active simmer so that the liquid reduces slightly and the vegetables are tender. Adjust seasoning.

Serve with a good grinding of black pepper, a drizzle of olive oil, and toasted bread rubbed with garlic and drizzled with olive oil.


Christmas and Holiday Gifts From the Kitchen

Holiday Recipes

by Engrid Winslow

Holiday Gifts from the Kitchen.

Image by Terri Cnudde from Pixabay

Whether you want to bring one of these along to gift a hostess or surprise a friend or neighbor, these are easy and fun Holiday Gifts from the Kitchen. They will be welcomed by the recipient as they appreciate your thoughtfulness and good taste.


HOT COCOA

1/2 cup granulated sugar
1 tablespoon cornstarch
3 ounces semi- or bittersweet chocolate, roughly chopped
1/2 cup cocoa powder
1/4 teaspoon vanilla extract
1/8 teaspoon fine sea salt

Combine all ingredients in a food processor and blend until powdery. Store in an airtight container at room temperature for up to 2 months.

To use: Heat one cup of milk in a saucepan over medium heat until steamy. Add 3 tablespoons hot cocoa mix. Whisk over heat for another minute or two, until it begins to simmer and mix is completely dissolved. Pour into a mug, top with mini-marshmallows or a dollop of whipped cream.

Variations: Mexican Hot Chocolate (with some chili powder, cayenne and cinnamon), Mint Hot Chocolate (with mint extract instead of vanilla), Mocha Hot Chocolate (with a couple tablespoons of espresso powder)

For gift-giving: Package in a pretty jar and decorate as you wish along with mini marshmallows and a pretty mug or two.


SPICE & HERB BLEND

This is a great addition to soups, stews, meatloaf, sauces and ragouts. Yields 2/3 cup.

½ cup peppercorns                              4 tsp. ground ginger                            4 tsp grated nutmeg

1 tsp whole cloves                               2 cinnamon sticks, broken up              4 crumbled bay leaves

¾ tsp. ground mace                             ½ tsp. allspice

Combine ingredients and grind into a powder. Sift and pack tightly into an airtight container and store away from heat and light.

SUGARED AND SPICED NUTS

1 egg white                             1 TBL water                            1 lb. pecan or walnut halves

2/3 c superfine sugar               1 tsp salt                                  2 tsp ground cinnamon

¾ tsp ground ginger                ¾ tsp ground allspice              ½ tsp ground coriander

Preheat oven to 250 with one shelf in the upper third and the other in the lower third.

Whisk the egg whites and water until foamy, add the nuts and pour into a sieve to drain for 3 minutes.

Combine the spices and sugar and mix well in a large plastic bag.  Add the nuts and shake to coat. Spread on two baking sheets so that nuts do not touch each other.

Bake for 15 minutes, then stir and reduce heat to 225. Continue to bake, stirring occasionally until dried and crisp – this can take as long as 1.5 hours. Switch pans at the midpoint. Let the nuts cool completely and store in an airtight container.

7 Stocking Stuffers Under $25 for Gardeners

Gifts for Gardners

by Sam Doll

Here are 7 must-have tools to keep in mind if you are looking for great gardening gifts for your favorite gardener.

–Nisaku Japanese Hori Hori Garden Knife for 24.95 on amazon.com

Photo of a garden knife and sheath to give as a garden gift.

photo courtesy of Nisaku


These compact garden tools feature serrated and straight edges that are perfect for a variety of garden needs, including cutting back weeds at the root. They also feature handy measuring marks, so you know the exact depth when planting and sowing. Get this handy little tool for the gardener who can appreciate a tool that can get the job done!


Photo of tan leather gardening gloves.

Photo courtesy of Home Depot

–Leather Gardening Gloves for $10.98 at homedepot.com


Upgrade your favorite gardener’s glove game with some stylish and comfortable leather gloves. The more your green thumb works in these, the better they’ll fit! These pigskin gloves from Home Depot will last for years.


–Wildflower Seed Mixes from $5.79 at bbbseed.com

The front of the Monarch Rescue seed mix.

Wildflower mixes can provide season-long color and important forage for bees and butterflies. BBB Seed has a variety of regional and specialty wildflower seed mixes that will make any gardener, novice or expert, smile all season long!


–Gardening Knee Pads for $8.49 at amazon.com

Photo of green strap-on gardeners knee pads.

Photo courtesy of Fiskar’s


Save your friends knees with these waterproof and forgiving knee pads. These knee pads are designed specifically for getting your hands dirty in the backyard.


–Garden-Themed Jewelry from Etsy

Silver watering can earrings.

Photo courtesy of Glitterartijewellry.


A little costume jewelry can show a personal touch for someone you care about! We love how many cute, garden themed charms, pendants and earrings you can find on Etsy.


Garden Snips from $11.99 at Fiskars

Photo of gardener's snips.

Photo Courtesy of Fiskar’s

You can always use new snips. Especially nice ones from Fiskars.


–A BBB Seed Gift Card

Gift Card from BBB Seed.


Still don’t know what to get someone? Don’t worry about it. Just get them a gift card to bbbseed.com and they can get whatever they want!

The History of the Jack-O-Lantern

History of the jack-o-lantern.

photo courtesy of pixabay


by Heather Stone

As the last days of October approach pumpkins carved in an array of faces and lit from within by candles dress porches, stoops, windows and walkways. The jack-o-lantern as we know it is a true American icon of Halloween, but where and how did this tradition begin?

There are several theories on the origin history of the jack-o-lantern. In 17th century Britain, an unknown man or night watchman carrying a lantern was referred to as “Jack of the lantern.”

During the same century in Ireland the “lanterns of Jack” were one of many names to describe the strange phenomenon of lights seen flickering over the peat bogs. These lights are known by many names including the “will o’ the wisps.”

Scooping out the innards of a jack-o-lantern.

photo courtesy of pixabay

My favorite history of the jack-o-lantern theory is based on an old Irish folktale about a man named Stingy Jack who tricked the Devil. The legend of “Stingy Jack” has many forms. Here is one.

Stingy Jack invited the Devil to have a drink with him, but Stingy Jack didn’t want to pay for his drink, so he convinced the Devil to turn himself into a coin (the Devil being able to take one any form) that Jack could use to buy their drinks. After the Devil turned himself into a coin, Jack decided to keep the money placing it in his pocket. Inside his pocket lay a silver cross preventing the Devil from changing back into his original form. Jack agreed to free the Devil, under the condition that he would not bother Jack for one year. The next year, Jack again tricked the Devil into climbing into a tree to pick a piece of fruit. While he was up in the tree, Jack carved a sign of the cross into the tree’s bark so that the Devil could not come down until the Devil promised Jack not to bother him for ten more years. Eventually, Jack died and legend has it that God would not allow him into heaven and the Devil angry from being tricked didn’t want Jack either. The Devil is said to have sent Jack off into the night with only a burning ember to guide his way. Jack but this ember into a carved out turnip and roams the earth to this day.


In Ireland, folks began carving faces into turnips to ward off Stingy Jack and evil spirits on All Hallow’s Eve. Beets were used in England. This tradition likely came to America with immigrants from these countries. The pumpkin being plentiful here and easy to carve became today’s jack-o-lantern.

Read more about the Queen of Halloween.

Roasted Pumpkin Seeds

Graphic for Roasted Pumpkins Seeds Recipe.

Pumpkin Seed Recipe

by Sam Doll

There are so many reasons to enjoy the month of October, but one of the truly special traditions is carving spooky jack-o-lanterns for Halloween! While making funny faces and creative carvings can be a blast, I get most excited for turning the slimy guts of the pumpkins into crispy, salty, roasted pumpkin seeds.

If you are interested in other Halloween Crafts, check out these 9 great craft ideas!

Pick the Right Pumpkin

Pumpkin seeds are a delicious, healthy seasonal snack that can be as creatively flavored any way you want!  The first thing you need to do is pick a pumpkin!

Want to grow your own pumpkins? The Jack-O-Lantern Variety is perfect for eating and carving.

Wandering through a pumpkin patch, it might seem impossible to know which pumpkin would be good for carving and roasting seeds. Lucky for you, the easy part is figuring out which ones are chock full of seeds. Just pick it up! The heavier the pumpkin, the more likely it is to be full of seeds.

If you need help picking out a perfect pumpkin for carving, check out this guide.

Harvest the Seeds

This is the fun part! Once you cut the top of your jack-o-lantern off, it’s time to get your hands dirty.

Set up two bowls. Scoop out as much of the guts and seeds as you can with your hands. Separate as many of the seeds from the pulp as you can and put them in one bowl. It’s okay if they are still slimy and still have a little pulp on them, you’ll clean that off later.

As you get near the end, use a large metal spoon to scrape down the inside walls of the pumpkin to clean out any remaining strands and straggling seeds. Wash up and finish carving your pumpkins!

If you need ideas or templates for carving, here are all you could ask for!

Prepare the Seeds

Place the seeds in a colander and rinse the seeds under cold, running water. Use your hands to remove any pulp still attached. Once clean, remove them and set aside

Here are four other great pumpkin craft ideas.

Boil the Seeds

Depending on how many seeds you have, fill a saucepan or pot with water and salt it until it tastes like the sea. Bring to a boil and add the cleaned seeds.

Boil for 5-8 minutes until the seeds begin to look translucent. Remove the seeds to a baking sheet and pat them dry.

The boiling gives the seeds a pleasant salty flavor throughout and ensures that they cook evenly and without burning in the oven.

Roast ‘Em

Preheat the oven to 400-425 (this isn’t an exact science) and add the seeds. Roast until golden, crispy and delicious (about 10-15 minutes).

Remove them from the oven and add them immediately to a clean mixing bowl for seasoning.

Check out these incredibly delicious pumpkin recipes while you’re at it!

Season ‘Em

This is the fun part. No matter what seasoning you go with, you’ll probably want to use 1 tbsp of high-quality olive oil and some coarse kosher salt as a base. The oil helps the seasoning stick to the roasted pumpkin seeds and the salt helps elevate the other flavors.

Now, you can keep them simple and enjoy these classic fall snacks! If you are feeling a little wild, here are some other delicious flavoring suggestions.

The amount of seasoning will depend on how many seeds and what size you have, so start with a little and keep adding until it is just perfect

  • Sugar and Cinnamon: I like a mixture of 4 to 1 white sugar to cinnamon (here is more information if you are curious). If you want it a little hotter, add more cinnamon to the mixture
  • Curry: Any pre-made curry powder will work here, but you can make your own if you are feeling ambitious. I like this Thai Curry Powder
  • South of the Border: Use a 1:1 cumin to red chili flake mix. If you like it really spicy, add some cayenne powder.
  • Spicy and Savory: Use a 2:2:1 garlic salt (omit the kosher salt above if using this or just use garlic powder), lemon pepper, and cayenne to create a savory and hot mix.

9 Great Halloween Crafts

Siloutte of Haloween figures.

photo courtesy of pixabay

Our Favorite Halloween Crafts

by Heather Stone

It’s this time of year when the weather cools down and life begins to move back indoors I get the itch to get crafty. Halloween is the first holiday I really can’t wait to get started on. The possibilities are almost endless when it comes to Halloween crafts. You have pumpkins, bats, witches, ghosts, monsters, spiders, skeletons, mummies and so much more. Where to begin?

We’re only days away from the spookiest holiday of the year so it’s time to get started. Here is a list of some of my favorite Halloween crafts that we love to do year to year.

  1. Paper pumpkins- So simple but always fun. All you need is some orange paper and a pipe cleaner.
  2. Bats galore– A swarm of paper bats flying across the front door, up the stairs or across a wall is sure to send a chill up just about anyone’s spine. Hang them from the trees or the dining room chandelier too.

    Child holding an orange pumpkin with black paper cut-out eyes and grin. Halloween Crafts.

    photo courtesy of pixabay

  3. Haunted Houses- This can be an easy two-dimensional drawing or an elaborate creation from recycled boxes. Let your imagination take the lead. Here’s a template for a fun and easy to create 2D haunted house or if you want to go 3D try making one from a recycled cereal box and place a light inside.
  4. Garlands- ghosts, cats, spiders or whatever spooks you this easy craft is fun for all ages.
  5. Halloween paper bag puppets– We make these every year in some form or fashion. Try making them from paper bags, toilet paper tubes or foam people shapes. They can be as simple or intricate as you like.
  6. Mummy or monster door- this is so easy to do and makes a great decoration indoors or out. Just cover your door in toilet paper or strips of white cloth, add a pair of eyes and your done.
  7. Halloween slime– green, purple filled with spiders, eyeballs, pumpkin guts, glow in the dark. The possibilities are endless.
  8. Pumpkin carving– Halloween wouldn’t be the same if there wasn’t the carving or decorating of jack-o-lanterns. There are an endless amount of ideas across the internet. Try something new this year!

Want more Halloween craft ideas? Check out our Pinterest page. It’s filled with fun ideas for all ages to get into the spirit of Halloween.

Skull, candle and jug of bat potion. Halloween Crafts.

photo courtesy of pixabay

Food as Art. Art as Food.

Decorate for Fall with Delicious Foods

by Sandy Swegel

Thanksgiving week is almost upon us with endless opportunities for creative and artistic expression. Besides the creative recipes you’re cooking, you also get to decorate your table and your home with the many gifts from nature and use your food as art. A walk down the grocery store aisle and through the woods will give you all the raw materials you need to make Thanksgiving centerpieces and artful home decorations.

You know the raw materials:

All the beautiful gourds and squashes and pumpkins

Pine cones and berries and nuts

Colorful maple leaves and cool branches. 

Purple and orange vegetables

And finally, if it’s not enough to arrange your food into art…you can also take inspiration from that clever company Edible Arrangements, to cut your fruit appetizer trays into edible art! Slice fruit like cantaloupe and pineapple and apples into thin slices and use thanksgiving-themed cookie cutters to turn the fruit into decorative shapes.

Celebrate the harvest with joy and art!

Photo credits:

http://www.foodnetwork.com/how-to/vegetable-centerpiece/index.html

http://www.parisiennefarmgirl.com/2010/11/diy-thanksgiving-centerpiece.html

http://thestir.cafemom.com/food_party/1237/DIY_Thanksgiving_Centerpieces_Made_From

http://pinterest.com/noteforge/food-healthy-for-the-most-part/

http://www.ediblearrangements.com/fruit-baskets.aspx?CategoryID=283&Section=1

What Kind of Holiday Season Person are YOU?

My Favorite Gift Giving Tips

by Sandy Swegel

Are you the kind who is frantically looking around for inexpensive gifts to bring to a party you’re going to tomorrow night?  Or perhaps you’re the kind of person who had your holiday shopping and decorating done by Thanksgiving evening and now you’re relaxing in your lovely cinnamon and pine scented home.  I’ve always wanted to be the latter person but I still resemble the frantic running late person too often.

So here’s what I’m doing today to meet the needs of the person I am today.

Last-minute gifts for gardening friends who love to cook:

Herb-infused olive oils: 1 bottle of organic olive oil. Fresh Mediterranean herbs: lots of rosemary including the sticks, moderate amounts of thyme, lesser amounts of oregano. Cute decorative bottles. A handwritten label with a note that it needs to age another two months before use. Curly Ribbons in beautiful colors. http://mountainroseblog.com/herbal-culinary-infusions/

Last-minute gifts for friends who like to drink: Limoncello! Same bottles, ribbons and labels as above. Limoncello can be ready in only 20 ish days. So label accordingly or give it as gifts on Christmas Day. Ingredients: Vodka, on holiday sale at the liquor store, organic lemons fresh from warmer places in the grocery.

Last-minute gifts for friends who don’t cook or drink: Calendars with exquisite pictures.  My favorite this year (2013) for gardeners/mystics is the Flower Spirits Calendar.

And Now the Gift for You and Me because We can plan ahead: Indoor pots full of young lettuce and spinach. In only three weeks you’re going to be making New Year’s Resolutions and eating healthy. Right now the thing to do is get your greens seeds and make some windowsill pots of young lettuces and spinaches and kales.  On January 1st you’ll have pots full of organic baby spinach mixed greens that you have to pay a fortune for in the grocery.