Cool Season Planting
Cool Season Planting
- When mid-summer brings a bounty of produce from your garden and you are enjoying the fruits of your labor, it is time to start planting again. The prime planting time for late-season harvests is late summer. Success with fall vegetables requires proper timing. In the spring gardeners wait to plant outside until after the last spring frost, well, in the fall the race is against the season’s first frost. Many of the cool season crops can withstand a few light touches of frost and even become sweeter. Check with your local county extension service to find your area’s first expected frost date.
Check the back of the seed packet to find the days to maturity. Take your frost date and count backward to find the best time to start your next round of seeds. Cooler fall growing temperatures may require an extra week or two for the plants to reach maturity. Many of your fall crops can be harvested when young and immature, too.
Which crops to plant for the Cool Season Planting?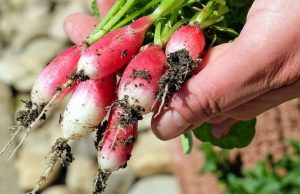
Plants that do well in the early spring work for the cool fall temperatures. These will do well right up to the frost date and even beyond.
Cabbage takes a long season to mature and many gardeners don’t even plant cabbage in the spring because it doesn’t have enough time to mature before the mid-summer’s heat stops growth. Start these seeds mid-summer, a good 3 months before the first frost date.
Kale should be planted 85 – 90 days before the first frost. The leaves can handle a few light touches of frost and become sweeter each time.
Carrots can be planted 80-85 days before frost. They can be harvested when young and tender. Even after the cold temperatures shrivel the tops, they can be dug, sweet and juicy, from the ground throughout the fall.
Broccoli has the same problem as cabbage with a long time to mature as cabbages, so planting for a fall harvest is often best. Plant broccoli seed directly in the soil about 80-85 days before frost.
Beets can do double duty with green tops for salads and tasty roots as well. Plant seeds about 65-70 days before frost, depending on the type you choose.
Leafy greens such as spinach and leaf lettuces, rocket, and Swiss chard all do best in the cooler temperatures of fall. Plant seed about 50-60 days before frost depending on the type chosen. These can be harvested when young and immature for delicious baby greens.
Radishes are always great to spice up salads. These are fast-growing and can be planted 30-35 days before the first frost. Pull them when young and tender.
If you have any questions at all about how to start your BBB Seed please do not hesitate to email us at info@bbbseed.com. We look forward to answering any questions you might have!
Download our E-Book here:

Find your Hardiness Zone
CONTAINER GARDENING
Growing a Garden in a Container
Planning ahead-
Take a moment to look at the locations where you want to place your containers. Consider such things as sunlight (strength and time) and wind. If you have pots with sun/heat-loving plants, arrange them to shade your pots with those plants that need less sun and heat. Tall plants or plants that vine can be trellised to grow vertically and provide a natural barrier for tender plants. Make sure to anchor trellises and containers with tall plants, to keep them from getting blown over. If you plan to place your containers on a covered porch or balcony or any place that receives limited sunshine, you should select vegetables and flowers that don’t require as much. Leafy greens, snap peas, Chinese mustards, and kale will do quite well in these conditions, but tomatoes, and peppers, probably not.
When growing your garden in containers rather than a garden plot, it is just as important to choose varieties that will be able to reach maturity in your growing season. If you have a short growing season, check the maturity dates on the packages and plan to start some seedlings in the warmth of the indoors to get a jump on the growing season.
These varieties are not practical for container gardening due to their size or length of growing season (At the end is a list of vegetables/plants that will do well in containers.):
Watermelon and most cantaloupes (although there are some midget varieties that can do well)
Large Pumpkins and winter squash
Corn
Head cabbage (except as microgreens)
Mammoth sunflowers (except as sprouts or micro greens)
Beefsteak type tomatoes
Garlic bulbs/full sized Onions
Make sure to prepare your containers and pots properly, to give your veggies the best chance possible. You will be surprised by how much those little seedlings will expand, and there is as much growth below the soil as there is above the soil, so don’t squeeze them into tiny containers. Any type of vessel can be used, just keep in mind the size of the plants and the location. Terra cotta pots are inexpensive but dry out more quickly than others, metal tends to get quite hot in the sun, and plastic is versatile and lightweight.
………………………………………………………………………………..
Getting started-
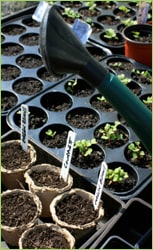
 For Container Gardening, start your long-season varieties, indoors, in good quality starting soil or soilless mixture. Seedlings should be kept consistently moist (not wet) and exposed to fairly strong light, sunlight, or florescent, for at least 10 – 12 hours each day as soon as sprouts appear. This will keep them from getting leggy and looking for light. Seedlings that are sown more closely together can show more vigor as their roots symbiotically help each other extract nutrients from the soil. As the first true leaves appear, choose the strongest seedling starts that you will need for your containers and clip off the remaining which gives the strong ones some space to expand. Transplant to pots and containers shortly after the first true leaves appear. When transplanting to your containers and pots, make sure to space the seedlings according to the package directions for each type of vegetable.
Here are some plants that do not like to be transplanted. Instead, start them in individual moss starter cubes or use homemade newspaper pots or toilet paper tubes that can just be set into your containers at the appropriate spacing.
Beans Squash Burnet
Chinese Cabbage Borage Chervil
Cucumbers Caraway Pumpkins
Melons Coriander Dill
Root crops (except beets, turnips, and celeriac)
Make sure that your container has drainage holes in the bottom. Place a couple of layers of newspaper in the bottom of the pot to keep soil from falling through the holes, then place a 1-inch layer of moss on top of the newspaper. If you don’t have a source for sphagnum moss, coarse gravel will work. Fill the container with good, rich pre-moistened, potting soil, leaving room at the top. Pat it down firmly to fill in the spaces but do not pack hard. Take your young transplants (holding by the leaves or root ball, not the tender stem) or degradable seedling pots, one at a time, placing each on the top of the soil. Spread out the roots, and sprinkle more pre-moistened soil over the roots, covering them completely. Use enough soil to bring the level up to just under the first leaves for most seedlings. Do not cover the crown on plants such as lettuce. The plant’s first leaves should be at the level of the top of the container. Pat the soil gently, firming it over the roots and young stems.
Fertilize with low doses of good quality organic fertilizer every 7-10 days.
Don’t be shy about removing plants that are past prime or are beginning to bolt. Removing these will leave spaces where you can plant another round of short-season varieties and ones that prefer to mature in the cooler weather of fall. Lettuces and other leafy greens are good for this, maybe another round of snap peas, beets or radishes, arugula, and bunching onions. Mustards and kales and fennel love the cool days of fall
………………………………………………………………………………..
Design – Container Gardening can be beautiful
Create groupings with your pots and experiment with variations in height, by placing some containers on concrete blocks or other empty containers turned upside down. This adds visual appeal and at the same time maximizes the space available. Groupings also help to make the job of watering a bit easier. Pick a particularly spectacular container plant to be the visual focus and arrange other not-so-pretty container plants around.
Make your containers a bit more decorative by planting different varieties together in one pot. Use the spaces under taller plants to place smaller herbs and leafy greens. Some vegetables live in harmony with one another, some are actually beneficial to each other and some hate each other. Mix colors and textures and think about including edible flowers tucked in around the edges. See the article, Flavorful Flowers. 
• Lettuce does well with beets, bush beans, pole beans, cabbage, carrots, cucumbers, onions, radishes, and strawberries. You can also plant your lettuce at the base of young sunflowers for a little shade.
•Celery, dill, onions, and potatoes are great companion plants for cabbage. Planting clover with your cabbage will keep insects away and chamomile will improve the flavor. Cabbage does not like strawberries, tomatoes, peppers, eggplant, rue, grapes, or pole beans.
•Cauliflower is compatible with basil, beans, dill, garlic, hyssop, lettuce, mint, onion, rosemary, sage, and thyme. It does not like grapes and rue.
•Plant your peas with bush beans, pole beans, carrots, celery, cucumber, eggplant, parsley, radish, spinach, strawberry, sweet pepper, tomatoes and turnips. Keep your peas away from chives, and onions.
•Tomatoes grow well with asparagus, basil, beans, carrots, celery, chives, cucumber, garlic, head lettuce, marigold, mint, nasturtium, onion, parsley, peas, peppers and marigold. Basil will repel flies and mosquitoes from your tomato plants while also improving their growth and flavor. Beebalm, chives, and mint will improve the health and flavor of your tomatoes. Keep potatoes, fennel, dill, cabbage, and cauliflower away from your tomato plants.
………………………………………………………………………………..
VEGETABLES/PLANTS THAT DO WELL FOR CONTAINER GARDENING:
Beans (Pole and Bush types)
Direct sow into containers when night temperatures reach 60 degrees F, 6“ minimum soil depth, full sun, and harvest in mid-late summer, Provide a trellis or climbing structure
Beets – Direct sow into containers in early spring and late summer, 6” minimum soil depth, full sun to partial shade, harvest early summer and again in fall
Carrots (Nantes, Round, or Finger-type are best for containers) – Direct sow into containers when night temperatures reach 60 degrees F, 8” minimum soil depth, full sun, harvest in summer through fall.
Cucumbers (vine or bush-types) – Direct sow into containers when the day temperatures reach 70 degrees F or start indoors and transplant, 10” minimum soil depth, full sun, harvest in summer, Provide a trellis or climbing structure for vine-types.
Eggplant – Start inside 8 weeks before temperatures usually reach 80 degrees F for your area, then transplant to your container, 10” minimum soil depth, full sun, and harvest late summer.
Leafy Greens (Swiss chards, Collards, Kales, Mustards, Asian Greens, Pak Choy) – Direct sow into containers when the nighttime temperatures are above freezing, or, start indoors 3-4 weeks before and transplant, 8” minimum soil depth, full sun to partial shade, harvest late spring through winter.
Lettuces and Salad greens – Direct sow into containers after Spring’s last frost date, or start indoors 4 weeks before and transplant after hardening off when about 2 “ tall, sow seed again in early fall, 6” minimum soil depth, full sun to partial shade, harvest spring through early summer and again in fall.
Onions, Garlic, Leeks – Direct sow into containers after Spring’s last frost date, 6” minimum soil depth for bunching onions and young (green) garlic, 8” for Leeks, full sun, harvest summer to fall. Mounding soil up around the base of bunching onions and leeks will encourage long white stalks. Grow garlic in containers to use the green shoots and any small bulb growth.
Peas – Direct sow into containers when the soil is no longer frozen, Soaking the seeds overnight will speed up germination, use an inoculant (a beneficial bacteria that enables the roots to use the nitrogen pulled from the atmosphere and stored in nodules on the roots), especially when planting into containers with new potting soil. 8” minimum soil depth, full sun, harvest in late spring to early summer with secondary fall crops possible, Provide trellising for vine-types or cages to support bush-types.
Peppers – Plant seeds indoors, keeping at 80 degrees F for about 2 weeks, starting 10 weeks before nighttime temperatures remain above 55 degrees and daytime temps reach at least 70 degrees. Transplant into containers after hardening off, 8” minimum soil depth, full sun, and harvest in late summer.
Potatoes – Plant disease-free seed potatoes in a large container (30” deep, 20” across) filled 1/3 full of potting soil, 5-6 “ apart, and cover with 2 inches of soil, When plants are about 6” tall cover the bottom half with potting soil, continue doing this as the plant grows until reaching the top of the pot. Full sun, harvest summer to fall.
Radishes – Direct sow into containers when the soil is no longer frozen and every other week till late spring, 4” minimum soil depth, full sun to light shade, harvest all spring and second harvest in fall.
Spinach – Direct sow into containers when the soil is no longer frozen, replant first of August for fall, 6” minimum soil depth, full sun to partial shade, harvest in spring, early summer, and fall.
Squash (zucchini, yellow summer, yellow crookneck, patty pan, mini pumpkins) – Plant seeds indoors 2-3 weeks before the spring last frost date, transplant into sunny, warm containers, and cover with a row cover for several days, 10” minimum soil depth, full sun, harvest summer to early fall, pick when young and small, provide trellis and support for vines.
Tomatoes – Plant seeds indoors keeping them at 75 degrees F for about 2 weeks, starting 6-8 weeks before Spring’s last frost date, transplant at least once to another larger pot when they have 3 sets of true leaves burying them up to the first set of true leaves, keep in good light, 12” minimum soil depth, full sun, harvest late summer and fall.
Herbs – Herbs are mostly perfect plants for container gardens, being small and not fussy.
5 Easy Tips for Successfully Planting Grass Seed
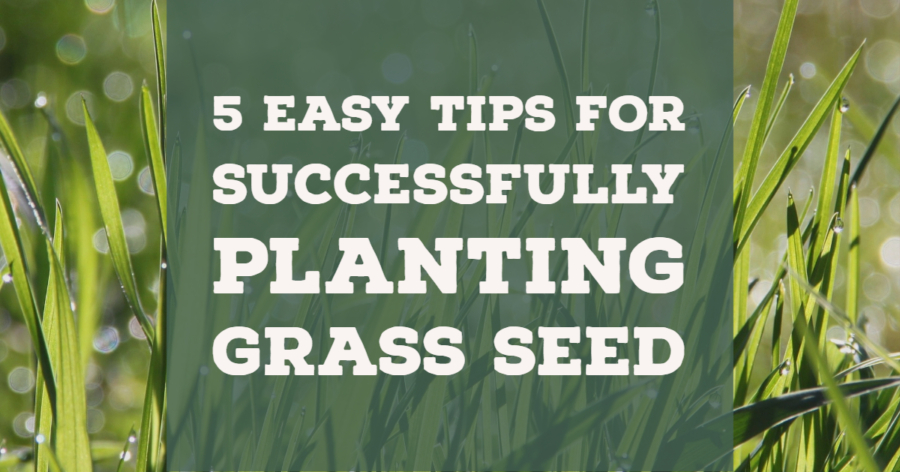
by Sam Doll
Now that fall is nearly upon us, it’s time to start thinking about planting grass seed! Don’t know what you are doing? Don’t worry. We are here to help.
Here are our 5 tips for successfully planting grass seed this season:
1. The Season Matters
While some warm-weather grasses, like bermudagrass, should be planted in early summer, most grasses need mild weather to successfully germinate and survive. Freezes and harsh heat can kill off your baby grass before it has a chance to become established. Late Spring and early Fall, when the soil temperature is between 50 to 80 degrees, is the best time to plant most grass seeds.
2. Find the Right Seed
Find the grass that will suit your lifestyle and location. Some mixes, like our Green Manure and Cool Season Cover Crop, are great for restoring the soil nutrients in your soil. Some, like our Colorado Supreme Turf Grass Mix, are better for heavy foot traffic. Native and drought-tolerant grasses are great for creating a sustainable and low-maintenance landscape. Make sure to consider your soil type, climate, amount of sun, and intended use when picking a grass mix.
We have a wide variety of grass mixes that will suit all your needs.
3. Prepare Your Soil
Once you’ve chosen your site, use a shovel or a sod cutter to remove the existing plants and grass from the area. Remove any debris and rocks you see, till the soil, and fill in any low spots. You want your soil to be broken into pebble-sized particles.
Rake the site to even out the soil and remove small debris. Be careful when bringing in new topsoil to make sure it doesn’t contain unwanted weed seeds.
Optional: You can send a soil sample to your local extension office to have it tested to see if you need any soil amendments. You can find extension offices near you with the help of this tool from GardeningKnowHow.com.
As for pH, you generally want to keep the soil between 6.0 and 7.0.
4. Seed and Fertilize
Once your site is prepped, it’s time for planting your grass seed! Using a drop spreader or a broadcast spreader, spread half the seed lengthwise over your site, then use the other half and spread crosswise over your site. A recommended seeding rate will be listed on the seed tag.
Feeding with starter (weak) fertilizer the same day as you spread seed will provide proper nutrients for early growth and establishment. Make sure the site stays moist, but not soggy, through germination.
5. Maintenance
Different mixes require different maintenance. Generally, once grass reaches 5-6 inches (for turf type), it is recommended to cut it to encourage even growth. Water and fertilize as needed.
We hope these tips will make planting grass seed a breeze for you! If you still have questions or need any other advice, please don’t hesitate to contact us.

Our Ultimate Milkweed Growing Guide
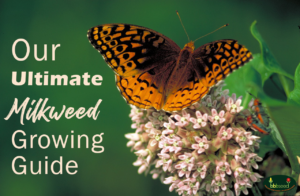
Tips for Planting and Growing Milkweed Successfully
by Sam Doll
Milkweeds are hardy, perennial wildflowers found throughout North America. Some species can grow up to six feet tall and they produce beautiful, fragrant flower clusters. Since they’re common ingredients in traditional medicine, their genus name, Asclepias, comes from the Greek god of medicine.
Milkweed has gotten a bad rap over the years. Allergies and perceptions of the wildflower as a weed have caused it to be wiped out throughout large portions of North America.
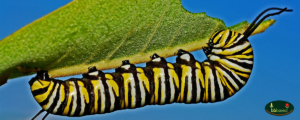
This is bad news for the Monarch Butterfly. Monarch mothers will only lay their eggs on milkweed plants (genus Asclepias) and, once hatched, their caterpillars exclusively live on and eat the leaves of those same plants. They cannot survive without them. The prevalence of pesticides has not helped and the loss of milkweed, wildflowers, and other floral resources has devastated the monarch butterfly population. However, by restoring Milkweed to urban and wild landscapes, we can begin the process of saving the Monarch Butterfly! And our Ultimate Milkweed Growing Guide is here to help.
Don’t have your seeds yet? Check out our Complete Milkweed Buying Guide for all you need to know about our Milkweed Products!
Milkweed Growing Guide Table of Contents
- Prep
- Planting
- Transplanting
Why all these steps?
Milkweed seed has a high percentage of dormancy, which means many of the seeds won’t germinate without a little special treatment or might need to age for a season. Since we want to make sure you have complete success with our seeds, here are some tips!
Prep:
Milkweed seeds need to be exposed to cold temperatures that normally occur in winter to help break their natural dormancy and begin to soften their hard outer casing. If you are planning to start your Milkweeds indoors, you will need to do this cold stratification yourself.
You can do this by putting your Milkweed seed in a damp paper towel, folding it to fit into a sealed plastic bag, then placing the bag into the refrigerator. Keep it there for 4-6 weeks before planting.
Planting:
Plant your seeds in small 2-4″ peat pots (recommended) or tall plastic pots. Make sure to use ‘seed-starting’ soil or medium. Moisten the soil, place 1-2 seeds into each pot and cover with no more than 1/6″ damp soil or medium.
Place the pots where they can drain. Water gently or fill a tray with 1/2” of water to be absorbed from the bottom of the peat pots. Dump the excess water after absorption. Water when the top of the soil is dry and be mindful to not overwater.
Milkweed seeds germinate in warm conditions, so place your tray of pots in a warm spot like a sunny window, greenhouse, or under a grow light. Germination usually occurs after 10-15 days for cold-stratified seeds. To encourage sturdy stems, place your grow light bulb close to the soil. Sometimes a small fan blowing gently towards the new seedlings will encourage sturdier stems.
Other planting methods: Plant non-stratified seed into peat pots filled with seed-starting soil or medium. Moisten, and place in a greenhouse or under a grow light. Germination in this scenario might take several months.
If planting outside, seed in late fall. Let the Milkweed seed remain over the winter. This will accomplish the cold-stratification, needed. Germination should occur when the soil warms and the days are longer.
Oh, and while you’re at it, check out our Monarch Rescue Wildflower Mix. It has Butterfly Milkweed and a mix of other wildflower seeds to provide a nectar-rich place for Monarch Butterflies to fuel up and raise their young! Find it here!
Transplanting:
When the danger of frost is past and your plants reach 2-3″ tall, you can transplant outdoors. Choose a location in full sun if possible.
Milkweed produces a long taproot, so take care to not disturb the roots. Plant peat pots so that the top edge of the small pot is underground to avoid drying out. If your Milkweed seedlings were planted in plastic pots, be extremely careful with the roots. Continue to water after planting until plants become established. Once they are established, you can taper off your watering unless the season is extremely dry. The newly planted Milkweed seedlings may lose all their leaves due to transplant shock but should grow them back again.
Congratulations!
You’re now a proud Milkweed parent! Now just sit back and watch the Monarch Butterflies arrive!
P.S. – Save our Milkweed Growing Guide for next year by bookmarking this page on your browser.
*Note that all Milkweed contains cardiac glycosides, chemicals that are toxic when eaten. These chemicals, in turn, make the Monarch Butterflies toxic to any would-be predators. Avoid letting livestock and small children eat milkweed and wash any skin that comes in contact with the sap to avoid irritation.
Learn more about the Monarch Butterfly Migration by checking out this Blog post!

The Complete Milkweed Buying Guide
What Species of Milkweed is Best For You
By Sam Doll
Monarch Butterflies are amazing North American animals! Their iconic, colorful wings are actually warnings for potential predators. Those spots and strips are big caution signs saying: STOP; I TASTE BAD!
Every year, the Monarchs embark on one of nature’s most astonishing mass migrations. This incredible journey takes four generations and covers over 3000 miles through the United States, Mexico and Canada.
Monarch mothers will only lay their eggs on milkweed plants (genus Asclepias) and, once hatched, their caterpillars exclusively live on and eat the leaves of those same plants. They cannot survive without them.
The problem is that milkweed has gotten a bad rap over the years. Allergies and perceptions of the wildflower as a weed have caused it to be wiped out throughout large portions of North America. The prevalence of pesticides has not helped and the loss of milkweed, wildflowers, and other floral resources has devastated the monarch butterfly’s population.
It’s not without hope, though! Everyone can do their part to help. The most important thing you can do is to plant more milkweed on your property and in your community. This guide to purchasing milkweed seed will help you figure out which species of milkweed is best for you, and you can help Monarch Butterflies!
Oh, and while you’re at it, check out our Monarch Rescue Wildflower Mix. It has Butterfly Milkweed and a mix of other wildflower seeds to provide a nectar-rich place for Monarch Butterflies to fuel up and raise their young! Find it here!
1. Common Milkweed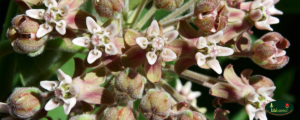
The Common Milkweed is a hardy perennial with fragrant, terminal blossoms made up of tiny dusty-pink blossoms on hairy stems. This milkweed is found throughout the Great Plains and is tough enough to tolerate most soil conditions. It does well in soils that are clay, sandy or rocky calcareous (high in calcium carbonate). These conditions occur naturally along stream banks, ponds, lakes, forest margins, and roadsides. Common Milkweed grows 2′ – 6′ tall and like areas with full sun. They bloom from June through September and will germinate between 65° and 85° F.
This milkweed is also a favorite of other butterflies, native bees and hummingbirds. The seeds will grow easily and do well when planted in the fall or when cold-treated for three months prior to planting. Common Milkweed will spread both through seed normal distribution and as well as through underground shoots. Common milkweed spread readily and may need to be controlled. Common milkweed is particularly good for wetland rehabilitation and as a component in wildlife seed mixtures.
2. Showy Milkweed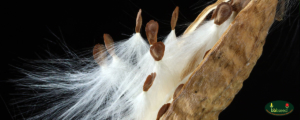
Similar to the Common Milkweed, this hardy perennial is a favorite of butterflies. This species has traditionally provided food, medicine and fiber to indigenous peoples. The clusters of star-shaped flowers will range from dark-rose to white. The plant has tall woody stems with milky sap and with alternate, oval leaves that are velvety underneath. Showy Milkweed grows 24” – 36” tall and like areas with full sun. They bloom from May through July and will germinate between 65° and 85° F.
These plants grow well in a variety of locations from prairies and open woodlands to roadsides. The seeds are very easy to grow and do well when planted in the fall or when cold-treated for three months prior to planting. Showy Milkweed will spread through seed distribution and underground shoots
3. Butterfly Milkweed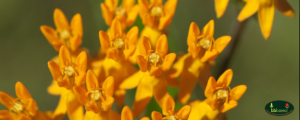
Also known as Butterflyweed, this hardy perennial. Unlike their cousins, this species lacks the milky sap that gives milkweed their namesake. The clusters of flowers will range from dark orange to white on tall woody stems with smooth shiny leaves that are velvety underneath. The blooms begin in May and will last through July. These plants will grow between 12”-24” and perform well in a variety of locations; from prairies and open woodlands to roadsides.
Butterfly Milkweed is only pollinated by large insects. This trait is common among fall wildflowers, many of which depend on specific pollinators to survive. Butterfly Milkweed pollen is contained in a heavy, sticky structure called pollinium. Since these pollinium structures are so large and sticky, only larger insect pollinators can fly with them. There are several nectaries per flower and multiple flowers per bloom, which makes these flowers great pollen and nectar resources
The seeds will grow well when planted in the fall or when cold-treated for three months prior to planting in the Spring. Butterfly Milkweed will spread through seed distribution and underground shoots.
4. Swamp Milkweed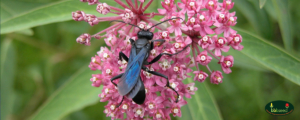
The Swamp Milkweed is widely distributed across the U.S. and Canada; from Quebec and Maine south to Florida and Texas and west to Nevada and Idaho. This species prefers neutral to slightly acidic soil, although it will tolerate a pH up to 8.0. It has high moisture requirements, and it is usually found in wet habitats such as meadows, riverbanks, pond shores, stream banks, wet woods, swamps, and marshes, although it will also grow in drier areas such as prairies, fields, and roadsides. Swamp milkweed needs full sun or partial shade to flourish.
The plant grows into a two=foot tall perennial with fragrant, terminal blossoms made up of tiny rosy-purple blossoms. This milkweed prefers average to very moist soils, will tolerate heavy clay soils and is easy to start from seed and deer resistant. Like most milkweed, Swamp Milkweed seeds are easy to grow and do well when planted in the fall or when cold-treated for three months prior to planting. Swamp Milkweed will spread through seed distribution and underground shoots.
Like the Common Milkweed, Swamp Milkweed is great for wetland rehabilitation and as a component in wildlife seed mixtures.
5. Bloodflower Milkweed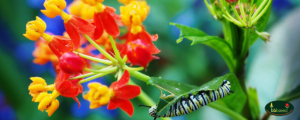
Bloodflower Milkweed, also known as Tropical Milkweed, is winter hardy in zones 9-11 and is easily grown from seed each year as an annual. It is great for attracting hummingbirds, butterflies and a wide variety of pollinators. Showy red-orange flowers with yellow hoods in rounded clusters grow on upright stems with medium-green, glossy, pointed leaves. Attractive foliage and flowers for beds, borders, cottage gardens, meadows and butterfly gardens. It is also a good cut flower. Dried seed pods are attractive in arrangements. Monarch Butterflies lay their eggs on the leaves and the larvae feed on the plants. Plant in rich, well-drained soil. These have a longer blooming period than most other milkweeds, ranging from June through October.
This milkweed is not native to North America and can potentially be invasive in warmer climates. If you’re one of our Southern friends, monitor your plantings and keep out of wild lands and ranches and cut the foliage to the ground in the winter to avoid luring Monarchs away from their migratory paths.
*Note that all milkweed contains cardiac glycosides, chemicals that are toxic when eaten. These chemicals, in turn, make the Monarch Butterflies toxic to any would-be predators. Avoid letting livestock and small children eat milkweed and wash any skin that comes in contact with the sap to avoid irritation.
Learn more about the Monarch Butterfly Migration by checking out this Blog post!
Nasturtiums!
Wildflower Seeds
by Heather Stone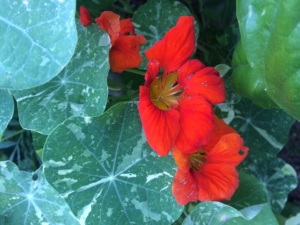
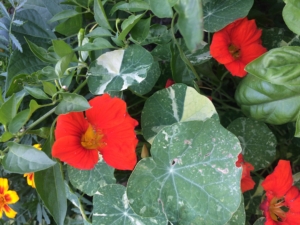
The bright, rich colors of nasturtium flowers make an impact along the edge of the border, in a pot or climbing a wall or trellis. Their gorgeous rounded leaves, much like a water lily, are a vibrant shade of green with a few varieties having variegated leaves. These easy to grow annuals deserve a place in any garden.
Growing Nasturtiums is easy from seed. Sow directly in the garden starting in late spring after all chances of frost have passed. If you want to get a head start you can plant seeds indoors 3-4 weeks before your last frost date. Plant the seeds ½- 1” deep and about 10” apart. Nasturtium seeds are large and germinate quickly (5-7 days) which makes them a great seed to plant with children. Nasturtiums can be grown in full sun or part shade. They prefer a leaner soil and do not need to be fertilized. Keep them watered during dry spells and remove spent blossoms to encourage prolonged blooming.
Flower colors range from orange to red to yellow, peach and even burgundy. Both the flowers and leaves of the nasturtium plant are edible. The flowers have a peppery flavor and make a bright addition to any salad. They are delicious stuffed with soft cheese or can be used to make an infused vinegar.
Nasturtiums make great edging plants. I especially like to use them along the edges in my vegetable garden where they spill over the sides of my raised beds and attract the bumblebees. They are also great tucked into bare spots in the garden. The climbing varieties can share space with roses and clematis in the perennial garden or beans and cucumbers in the vegetable garden.
Bring these gorgeous and tasty flowers to your garden by planting our Alaska Mix Nasturtium
A Trio of Morning Glories to Welcome Spring
The Morning Glory
By Engrid Winslow
Morning Glories are one of the easiest annuals to start from seed. In some areas, they will re-seed from last year’s dropped seed and some varieties may even be perennial in mild climates. After an overnight soak in water, plant the seeds about 1/2 inch deep and then stand back and watch!
Best started in fertile soil with adequate moisture during germination and early growth, morning glories can produce vines up to 15 feet long and will clamber over gazebos, fences and trellises with their twining limbs. Some gardeners even grow them up a downspout and along a roofline or up into the limbs of a tall tree. They can be so vigorous as to choke out other plants nearby and can be vigorous re-seeders which grow best in average soil and full sun.
They are called “morning glory” because they bloom early in the day and the petals deflate and fall off in the evening. The Morning Glory was first cultivated in China for its medicinal uses, due to the laxative properties of its seeds. It was introduced to the Japanese in the 9th century, and they were the first to cultivate it as an ornamental flower. The Japanese have led the world in developing varieties and the colors range from blue and pink to red, purple, lavender, white and even brown. The flowers are attractive to hummingbirds, butterflies, and bees.

Here is a trio of Morning Glories:
Heavenly Blue Morning Glory
(also called Clarke’s Heavenly Blue) blooms with 5-inch flowers all summer and is an heirloom variety dating back to the 1920s. It is a lovely blue with a white center. These are one of the most easily recognized and popular of all morning glory varieties and can be up to 12 feet long. The foliage is an attractive heart shape.
Grandpa Ott’s Morning Glory
bears velvety deep-purple flowers with red stars at their center. This self-sowing annual was originally grown by Grandpa Ott, a Bavarian immigrant, who lived on a 40-acre farm in St. Lucas, Iowa and was preserved by the family in conjunction with the Seed Savers Exchange. This one can climb to 15 feet tall if given support to grow on. Grandpa Ott’s grows very quickly, spreads easily and looks stunning. It will also adapt to part shade.

Moonflower
Although also called “morning glory” start to bloom in the late afternoon and close in the morning light. If the day is overcast or cool and cloudy they may stay open for a longer period. Moonflower is fragrant enough to perfume the air within 6 feet of the blossoms and loved by hummingbirds and night moths, including the large Sphinx Moth. The blooms are 5-6 inches across and the vines can grow up to 20 feet. They are native to tropical and subtropical regions of the New World, from northern Argentina north to Mexico and Florida.