We are deep into August. Here are a few tips and reminders about where should we be focusing our time and efforts in the garden this month to make the most impact.
For many, August in the garden is an explosion of flowers, fruit and vegetables. Keep on top of harvesting! A daily inspection of zucchini plants ensures none escape your eye and turn into what more resembles a baseball bat than a vegetable. Check tomatoes for blossom end rot and adjust watering if needed.
Start gathering recipes for the crops you have in abundance. Hit up some of your favorite websites or blogs for recipe ideas. Check out our reader shared recipes here.
2. Harvest herbs for either fresh use or to save for later. Here are some tips for preserving herbs by freezing, drying or in vinegar.
3. As crops are harvested and bare space appears in the garden another August garden chore is to protect your soil by covering it with mulch or planting a cover crop.
4. Side-dress your warm-season crops with a little compost to give them a boost to finish out the growing season.
5. Now is the time to plant another sowing of cool-season vegetables like lettuces, chard, kale, radish, spinach, arugula, beets, carrots and peas. This doesn’t have to take long and you’ll thank yourself later when you have fresh salad greens throughout the fall. Plant another row of bush beans too for a fall harvest.
Photo courtesy of pixabay – couleur 3702999_1280
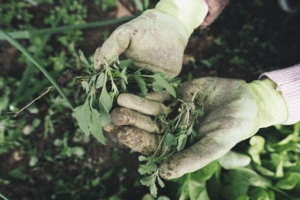
6. Keep weeds under control in both the perennial and vegetable gardens. Weeds rob moisture, nutrients and light from our desired plantings.
7. Keep perennials deadheaded and cleaned up. Tuck a pair of pruners in your pocket while walking through and enjoying your garden. I little clean up here and there helps keep pests at bay and saves on time later.
8. Continue to care for your plants in pots by deadheading, removing dead and diseased foliage and regularly fertilizing.
9. Take notes and/or pictures of what worked and what didn’t in your garden. These reminders will help next spring when it’s time to plant again.
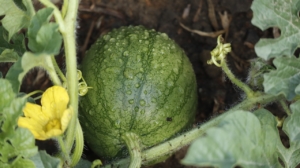
If you have space, make room for a hill or two of watermelons in your garden. They are easy to grow and like any fruit and vegetable, they just taste better when they are plucked straight from the garden. Besides, nothing says summer quite like a juicy slice of watermelon.
Here are a few tips for successfully growing watermelon.
Choose the right variety for your climate
Most watermelons need 80-95 days to ripen, but some varieties require even longer. Choose one that works for your area. You can get a head start by starting seeds indoors about three weeks before your last frost date or by purchasing established plants. Plant outside when all chances of frost have passed and the soil temperatures are in the 70’s.
Give them room to roam
Watermelons need lots of room to ramble. It is not uncommon for vines to reach up to 20 feet in length. The vines don’t like to be regularly moved so pick a spot where you can let them roam freely.
Know when to water
Keep plants moist when starting off and until fruits begin to form. Watermelons are fairly deep-rooted plants, so in some climates, you might not need a lot of extra moisture except during extended dry periods. When watering, water at the roots and try to avoid getting the leaves wet. This helps to keep down on the spread of fungal diseases. Once the fruit has begun to set, experts say to hold off on the water to concentrate the sugars in the fruit, giving you a sweeter melon.
Know when to harvest
Photo courtesy of pixabay
It’s not always easy to know when your watermelon is ripe. To start, check the “days to harvest” of your variety and begin to check for maturity when plants have reached that age. The color of the bottom spot where the melon sits on the ground will turn from white to yellow as the melon matures. Also, watch for the rind to turn from a bright, slick appearance to a more dulled look. The skin or rind should be tough enough that a thumbnail won’t pierce the skin. After picking, chill for best flavor.
https://bbbseed.com/wp-content/uploads/2023/11/BBB-Seed-logo-with-tagline-2023.png00Mike Wadehttps://bbbseed.com/wp-content/uploads/2023/11/BBB-Seed-logo-with-tagline-2023.pngMike Wade2019-07-31 09:43:032021-02-04 11:16:09Four Tips for Growing Your Best Watermelons
What’s bugging your garden? Mysterious holes in the leaves of your favorite rose? Earwigs buried deep in the leaves of your lettuce? Flea beetles mangling your perennials and vegetables? Most people are averse to creepy crawlies in their gardens but, please, BEFORE you reach for the chemicals to blast them into the stratosphere, consider that all of the insects are essential to having a healthy garden and planet. So here are a few suggestions for less toxic remedies of getting rid of garden pests to try in your garden.
Slugs – small saucers of beer tucked under leaves will attract them and they will fall in and drown. Slugs aren’t picky so don’t waste a craft brew on them – Coors works just fine.
Earwigs – There are a couple of things you can try for these and one is a small saucer of soy sauce with a little bit of vegetable oil and you’ll get the same results as with the slugs, above. You can also roll up several sheets of newspaper and get them fairly wet. Slide them under your plants in the evening and throw them away in the morning.
Aphids – These are a very weak, soft-bodied insect that feed on tender new foliage and buds. You can bet that if you have aphids, you will soon have a host of ladybugs feasting on them. If you can’t wait, then use soapy water with a few drops of oil and spray or dab on the foliage. You can also use garlic spray.
Photo courtesy of pixabay.
Flea and other beetles – Diatomaceous earth is a mineral composed of the skeletal remains of tiny sea creatures. It has edges that are sharp and will pierce the bodies of beetles and cause them to dry out. It will harm beneficial insects and earthworms, so use sparingly. Also, don’t breathe it into your lungs.
Other insects – Use a lightweight row cover to protect young plants and the ones that are being chomped on the most.
There are other products available at most garden centers now that gardeners are more aware of the consequences of the use of most pesticides to insects, animals, fish and even people. Some of the best tools in your arsenal are: (1) creating biodiversity and selecting plants that attract pollinators and (2) nurturing the soil by using products such as compost and nettle teas. Recognize that most pests run their course if you are patient and wait for their predators to show up.
https://bbbseed.com/wp-content/uploads/2019/07/Whats-Bugging-Your-Garden.jpg300300Engrid Winslowhttps://bbbseed.com/wp-content/uploads/2023/11/BBB-Seed-logo-with-tagline-2023.pngEngrid Winslow2019-07-09 14:26:402021-05-18 19:41:56What’s Bugging Your Garden
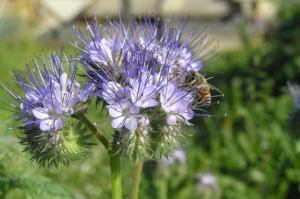
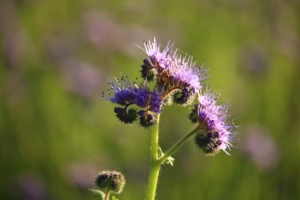
One of my favorite plants began blooming this week, Lacy phacelia, Phacelia tanacetifolia, so I wanted to take a moment to tell you all about Lacy Phacelia. It has many common names including lacy scorpionweed, tansy leaf phacelia, blue tansy, purple tansy and my favorite, bee’s friend. Clusters of light blue-violet flowers that unfurl in a fiddlehead shape sit atop attractive fern-like foliage. Reaching heights of 1-3 feet and blooming for 6-8 weeks this fast-growing wildflower is an excellent addition to any garden. It also makes an excellent cut flower.
Native to the southwestern United States, this easy to grow annual does well in hot, dry conditions but easily adapts to a variety of site conditions. Lacy phacelia seeds germinate readily in 15-30 days. Sow seeds early in the spring while there is still a possibility of frost. Ideal soil temperatures for best germination are between 37-68 degrees F. Press seeds gently into the soil at a depth of ⅛-¼”.
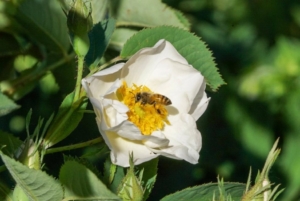
It’s not only the lovely blue-violet flowers that make lacy phacelia one of my favorite plants. Lacy Phacelia is well known for its ability to attract bees and butterflies to an area. It is a heavy nectar producer and is listed in the top 20 pollen-producing flowers for honeybees. Having this source of high-quality nectar and pollen means you’ll be attracting many native bees, bumblebees, honey bees and butterflies to your garden. I have these flowers growing near my front porch and just this week I counted 4 different varieties of bees on the few flowers that just started blooming.
Trying growing lacy phacelia near your vegetable garden to increase your yields.
Lacy phacelia also does well in containers. These containers can then be moved to different areas of the garden that need pollination. The benefits of Lacy phacelia as a cover crop are becoming more popular. It is widely used in Europe as it aggressively outcompetes weeds and absorbs excess nitrates and calcium from the soil. But it’s most important contribution is its pollinator-attracting power.
Lacy phacelia readily self sows so removing flower heads before they set seed helps limit any unwanted volunteers. Though when you see these beautiful flowers and how many pollinators they attract to the garden you might want to let a few of these wildflowers go to seed.
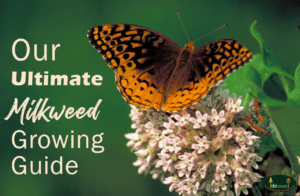
Tips for Planting and Growing Milkweed Successfully
by Sam Doll
Milkweeds are hardy, perennial wildflowers found throughout North America. Some species can grow up to six feet tall and they produce beautiful, fragrant flower clusters. Since they’re common ingredients in traditional medicine, their genus name, Asclepias, comes from the Greek god of medicine.
Milkweed has gotten a bad rap over the years. Allergies and perceptions of the wildflower as a weed have caused it to be wiped out throughout large portions of North America.
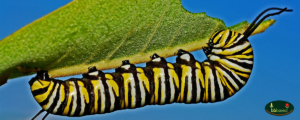
This is bad news for the Monarch Butterfly. Monarch mothers will only lay their eggs on milkweed plants (genus Asclepias) and, once hatched, their caterpillars exclusively live on and eat the leaves of those same plants. They cannot survive without them. The prevalence of pesticides has not helped and the loss of milkweed, wildflowers, and other floral resources has devastated the monarch butterfly population. However, by restoring Milkweed to urban and wild landscapes, we can begin the process of saving the Monarch Butterfly! And our Ultimate Milkweed Growing Guide is here to help.
Don’t have your seeds yet? Check out our Complete Milkweed Buying Guide for all you need to know about our Milkweed Products!
Milkweed Growing Guide Table of Contents
Prep
Planting
Transplanting
Why all these steps?
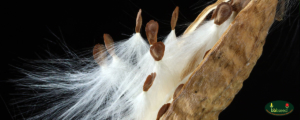
Milkweed seed has a high percentage of dormancy, which means many of the seeds won’t germinate without a little special treatment or might need to age for a season. Since we want to make sure you have complete success with our seeds, here are some tips!
Prep:
Milkweed seeds need to be exposed to cold temperatures that normally occur in winter to help break their natural dormancy and begin to soften their hard outer casing. If you are planning to start your Milkweeds indoors, you will need to do this cold stratification yourself.
You can do this by putting your Milkweed seed in a damp paper towel, folding it to fit into a sealed plastic bag, then placing the bag into the refrigerator. Keep it there for 4-6 weeks before planting.
Planting:
Plant your seeds in small 2-4″ peat pots (recommended) or tall plastic pots. Make sure to use ‘seed-starting’ soil or medium. Moisten the soil, place 1-2 seeds into each pot and cover with no more than 1/6″ damp soil or medium.
Place the pots where they can drain. Water gently or fill a tray with 1/2” of water to be absorbed from the bottom of the peat pots. Dump the excess water after absorption. Water when the top of the soil is dry and be mindful to not overwater.
Milkweed seeds germinate in warm conditions, so place your tray of pots in a warm spot like a sunny window, greenhouse, or under a grow light. Germination usually occurs after 10-15 days for cold-stratified seeds. To encourage sturdy stems, place your grow light bulb close to the soil. Sometimes a small fan blowing gently towards the new seedlings will encourage sturdier stems.
Other planting methods: Plant non-stratified seed into peat pots filled with seed-starting soil or medium. Moisten, and place in a greenhouse or under a grow light. Germination in this scenario might take several months.
If planting outside, seed in late fall. Let the Milkweed seed remain over the winter. This will accomplish the cold-stratification, needed. Germination should occur when the soil warms and the days are longer.
Oh, and while you’re at it, check out our Monarch Rescue Wildflower Mix. It has Butterfly Milkweed and a mix of other wildflower seeds to provide a nectar-rich place for Monarch Butterflies to fuel up and raise their young! Find it here!
Transplanting:
When the danger of frost is past and your plants reach 2-3″ tall, you can transplant outdoors. Choose a location in full sun if possible.
Milkweed produces a long taproot, so take care to not disturb the roots. Plant peat pots so that the top edge of the small pot is underground to avoid drying out. If your Milkweed seedlings were planted in plastic pots, be extremely careful with the roots. Continue to water after planting until plants become established. Once they are established, you can taper off your watering unless the season is extremely dry. The newly planted Milkweed seedlings may lose all their leaves due to transplant shock but should grow them back again.
Congratulations!
You’re now a proud Milkweed parent! Now just sit back and watch the Monarch Butterflies arrive!
P.S. – Save our Milkweed Growing Guide for next year by bookmarking this page on your browser.
*Note that all Milkweed contains cardiac glycosides, chemicals that are toxic when eaten. These chemicals, in turn, make the Monarch Butterflies toxic to any would-be predators. Avoid letting livestock and small children eat milkweed and wash any skin that comes in contact with the sap to avoid irritation.
Monarch Butterflies are amazing North American animals! Their iconic, colorful wings are actually warnings for potential predators. Those spots and strips are big caution signs saying: STOP; I TASTE BAD!
Every year, the Monarchs embark on one of nature’s most astonishing mass migrations. This incredible journey takes four generations and covers over 3000 miles through the United States, Mexico and Canada.
Monarch mothers will only lay their eggs on milkweed plants (genus Asclepias) and, once hatched, their caterpillars exclusively live on and eat the leaves of those same plants. They cannot survive without them.
The problem is that milkweed has gotten a bad rap over the years. Allergies and perceptions of the wildflower as a weed have caused it to be wiped out throughout large portions of North America. The prevalence of pesticides has not helped and the loss of milkweed, wildflowers, and other floral resources has devastated the monarch butterfly’s population.
It’s not without hope, though! Everyone can do their part to help. The most important thing you can do is to plant more milkweed on your property and in your community. This guide to purchasing milkweed seed will help you figure out which species of milkweed is best for you, and you can help Monarch Butterflies!
Oh, and while you’re at it, check out our Monarch Rescue Wildflower Mix. It has Butterfly Milkweed and a mix of other wildflower seeds to provide a nectar-rich place for Monarch Butterflies to fuel up and raise their young! Find it here!
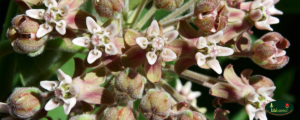
The Common Milkweed is a hardy perennial with fragrant, terminal blossoms made up of tiny dusty-pink blossoms on hairy stems. This milkweed is found throughout the Great Plains and is tough enough to tolerate most soil conditions. It does well in soils that are clay, sandy or rocky calcareous (high in calcium carbonate). These conditions occur naturally along stream banks, ponds, lakes, forest margins, and roadsides. Common Milkweed grows 2′ – 6′ tall and like areas with full sun. They bloom from June through September and will germinate between 65° and 85° F.
This milkweed is also a favorite of other butterflies, native bees and hummingbirds. The seeds will grow easily and do well when planted in the fall or when cold-treated for three months prior to planting. Common Milkweed will spread both through seed normal distribution and as well as through underground shoots. Common milkweed spread readily and may need to be controlled. Common milkweed is particularly good for wetland rehabilitation and as a component in wildlife seed mixtures.
Similar to the Common Milkweed, this hardy perennial is a favorite of butterflies. This species has traditionally provided food, medicine and fiber to indigenous peoples. The clusters of star-shaped flowers will range from dark-rose to white. The plant has tall woody stems with milky sap and with alternate, oval leaves that are velvety underneath. Showy Milkweed grows 24” – 36” tall and like areas with full sun. They bloom from May through July and will germinate between 65° and 85° F.
These plants grow well in a variety of locations from prairies and open woodlands to roadsides. The seeds are very easy to grow and do well when planted in the fall or when cold-treated for three months prior to planting. Showy Milkweed will spread through seed distribution and underground shoots
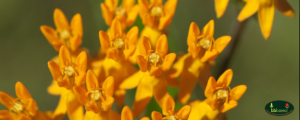
Also known as Butterflyweed, this hardy perennial. Unlike their cousins, this species lacks the milky sap that gives milkweed their namesake. The clusters of flowers will range from dark orange to white on tall woody stems with smooth shiny leaves that are velvety underneath. The blooms begin in May and will last through July. These plants will grow between 12”-24” and perform well in a variety of locations; from prairies and open woodlands to roadsides.
Butterfly Milkweed is only pollinated by large insects. This trait is common among fall wildflowers, many of which depend on specific pollinators to survive. Butterfly Milkweed pollen is contained in a heavy, sticky structure called pollinium. Since these pollinium structures are so large and sticky, only larger insect pollinators can fly with them. There are several nectaries per flower and multiple flowers per bloom, which makes these flowers great pollen and nectar resources
The seeds will grow well when planted in the fall or when cold-treated for three months prior to planting in the Spring. Butterfly Milkweed will spread through seed distribution and underground shoots.
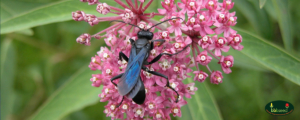
The Swamp Milkweed is widely distributed across the U.S. and Canada; from Quebec and Maine south to Florida and Texas and west to Nevada and Idaho. This species prefers neutral to slightly acidic soil, although it will tolerate a pH up to 8.0. It has high moisture requirements, and it is usually found in wet habitats such as meadows, riverbanks, pond shores, stream banks, wet woods, swamps, and marshes, although it will also grow in drier areas such as prairies, fields, and roadsides. Swamp milkweed needs full sun or partial shade to flourish.
The plant grows into a two=foot tall perennial with fragrant, terminal blossoms made up of tiny rosy-purple blossoms. This milkweed prefers average to very moist soils, will tolerate heavy clay soils and is easy to start from seed and deer resistant. Like most milkweed, Swamp Milkweed seeds are easy to grow and do well when planted in the fall or when cold-treated for three months prior to planting. Swamp Milkweed will spread through seed distribution and underground shoots.
Like the Common Milkweed, Swamp Milkweed is great for wetland rehabilitation and as a component in wildlife seed mixtures.
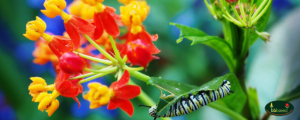
Bloodflower Milkweed, also known as Tropical Milkweed, is winter hardy in zones 9-11 and is easily grown from seed each year as an annual. It is great for attracting hummingbirds, butterflies and a wide variety of pollinators. Showy red-orange flowers with yellow hoods in rounded clusters grow on upright stems with medium-green, glossy, pointed leaves. Attractive foliage and flowers for beds, borders, cottage gardens, meadows and butterfly gardens. It is also a good cut flower. Dried seed pods are attractive in arrangements. Monarch Butterflies lay their eggs on the leaves and the larvae feed on the plants. Plant in rich, well-drained soil. These have a longer blooming period than most other milkweeds, ranging from June through October.
This milkweed is not native to North America and can potentially be invasive in warmer climates. If you’re one of our Southern friends, monitor your plantings and keep out of wild lands and ranches and cut the foliage to the ground in the winter to avoid luring Monarchs away from their migratory paths.
*Note that all milkweed contains cardiac glycosides, chemicals that are toxic when eaten. These chemicals, in turn, make the Monarch Butterflies toxic to any would-be predators. Avoid letting livestock and small children eat milkweed and wash any skin that comes in contact with the sap to avoid irritation.
This is the time of year when sources of honey and pollen are abundant and you can see the bees busily working in your flowerbeds.
It’s fun just to stand to the side and watch a beehive at this time of year as the bees fly in with full pollen bags and others leave to forage. The bees are not very defensive at this time of year but after the solstice, they start being more protective of honey stores. It’s an easy time for the colony and the beekeeper to enjoy the break from worrying about the colony having enough to eat. Inspections still must continue for the honeybee health, to be sure that everything is going well with the colony.
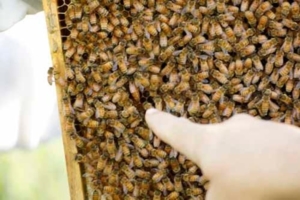
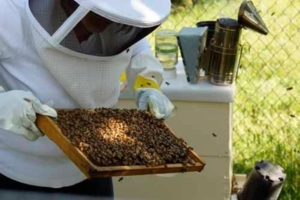
The first thing the beekeeper checks for when opening to the colony is the presence of eggs, larvae, newly born bees (these are called nurse bees and their first task is to foster newly hatching bees), stores of pollen and honey and room for the Queen to lay more eggs. If there is no room there are several options, including splitting the hive and leaving the Queen in one hive while allowing the new colony to raise another queen or installing a new queen. Another option is to shift frames around a bit so that there are some empty frames closer to the brood nest. The beekeeper also checks the “pattern”, or density of the capped brood. A good queen will lay in a dense pattern with very few empty cells. “Spotty brood” could indicate a problem varying from a young queen trying to get the hang of brood laying to an older queen in decline.
Another important task is to try and locate the queen. This can be tricky in large colonies of two deep boxes because the queen likes to run away and hide from the light into a deeper part of the colony. She can also be difficult to locate on a frame filled with hundreds of worker bees and drones. Here is a photo
https://bbbseed.com/wp-content/uploads/2023/11/BBB-Seed-logo-with-tagline-2023.png00Engrid Winslowhttps://bbbseed.com/wp-content/uploads/2023/11/BBB-Seed-logo-with-tagline-2023.pngEngrid Winslow2019-06-20 05:00:582021-03-17 18:29:06June Happenings in the Honeybee Hive
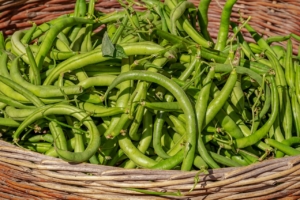
“How luscious lies the pea within the pod” – Emily Dickson wrote. I think most of us would agree that fresh peas are a hallmark of early summer produce and have us saying “please pass the peas”. The origin of peas is shrouded in mystery as it is a food plant so ancient that the earliest preserved specimens date from 9750 BCE in Thailand. Peas are legumes and of the family Fabaceae and is the third largest of the flowering plant families.
The ancient Greeks and Romans grew peas and hot pea soup was peddled in the streets of Athens while fried peas were sold to spectators instead of popcorn at the Coliseum in Rome. They were popular in England in the middle ages and there were to primary varieties – one was a field pea to be fed to animals and the other was called the “greene pea” and appeared often at the dinner table. The pea arrived in the Americas with Christopher Columbus and was part of the early colonist’s kitchen gardens.
Green Peas are easy to grow and can be succession planted to extend the harvest, they are delicious additions to salads, soups and eaten alone. The varieties are many, including shelling peas and sweet sugar snaps as well as the snow pea used in Asian cooking. “All the essentials of life,” according to Winston Churchill, are only four: hot baths, cold champagne, old brandy and new peas.
Here are a couple of classic recipes to help you enjoy the bounty of fresh peas and to make your family say “please pass the peas!”
CORNUCOPIA SALAD
Serves 4 as a Vegetarian Main Course
1 bunch torn arugula
1 bunch torn butterhead lettuce
½ lb sugar snap peas, string removed
1 cup cooked black beans
1 cup diced buffalo mozzarella
16-20 halved cherry tomatoes
Kernels from 2 ears of cooked corn
½ cup diced red bell pepper
For Vinaigrette:
2 TBL red wine vinegar 1 TBL Dijon mustard
2 TBL balsamic vinegar ½ tsp salt
2 TBL lime juice ½ tsp freshly ground black pepper
1 TBL lime zest 2 TBL chopped roasted red bell pepper
¼ cup minced red onion 6 TBL olive oil
2 TBL chopped fresh basil 6 TBL canola oil
1 TBL minced fresh parsley 2 TBL water
ENGLISH PEAS WITH PROSCIUTTO AND POTATOES
Serves 3 or 4
½ lb new potatoes, scrubbed and cut into ½ inch dice
3 oz. chopped prosciutto, pancetta or bacon
2 lbs shelled fresh English peas
½ small onion, finely chopped
1 small handful of fresh mint leaves
Extra virgin olive oil
Salt and freshly ground pepper, to taste
Put potatoes in a medium pot with water to cover by one inch and one tablespoon of salt. Bring to a boil and simmer gently for 10-12 minutes until potatoes are tender. Drain.
Heat a small glug of olive oil in a large skillet over medium heat and add onion and prosciutto and a pinch of salt. Sauté until onion is soft and fragrant and prosciutto has rendered some fat and is turning crisp around the edges, about 5 minutes.
Add the peas and potatoes and season generously with salt and pepper. Add 2 tablespoons of water to help steam cook the peas for another 4-5 minutes until they are tender and the flavors have come together.
Toss in the fresh mint and drizzle with a bit more olive oil and additional salt and pepper to taste. Then pass the peas!
https://bbbseed.com/wp-content/uploads/2023/11/BBB-Seed-logo-with-tagline-2023.png00Engrid Winslowhttps://bbbseed.com/wp-content/uploads/2023/11/BBB-Seed-logo-with-tagline-2023.pngEngrid Winslow2019-06-18 13:11:122021-03-17 18:09:56Please Pass The Peas
Here are some June garden chores to keep your veggies and flowers going strong.
Photo courtesy of pixabay
Cage or trellis any vining vegetables such as cucumbers, beans and tomatoes. By training these vegetables to grow up you are saving precious garden space and keeping the fruit off of the ground and away from critters. Click here for trellis ideas!
Continue watering your vegetable and perennial beds. Try to keep water close to the roots and off of leaves. Checked potted plants often, they tend to dry out faster.
Keep up with the weeds! This can start to feel like a never-ending battle at this time of year, but keeping the weeds under control means more nutrients, water and sunlight for your vegetables and flowers.
Mulch around vegetables to help conserve water.
Side dress with compost for a mid-season boost.
photo courtesy of pixabay
Begin replacing cool season crops that have begun to wind done or have bolted from heat.
Plant successive crops of summer greens like collards, kale, chard and lettuce (Protect them from hot afternoon sun).
Transplant any remaining warm season vegetable starts.
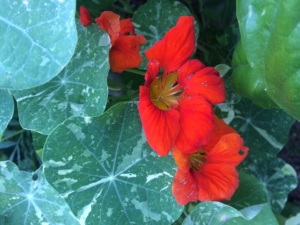
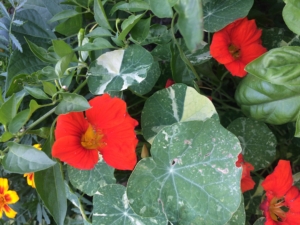
The bright, rich colors of nasturtium flowers make an impact along the edge of the border, in a pot or climbing a wall or trellis. Their gorgeous rounded leaves, much like a water lily, are a vibrant shade of green with a few varieties having variegated leaves. These easy to grow annuals deserve a place in any garden.
Growing Nasturtiums is easy from seed. Sow directly in the garden starting in late spring after all chances of frost have passed. If you want to get a head start you can plant seeds indoors 3-4 weeks before your last frost date. Plant the seeds ½- 1” deep and about 10” apart. Nasturtium seeds are large and germinate quickly (5-7 days) which makes them a great seed to plant with children. Nasturtiums can be grown in full sun or part shade. They prefer a leaner soil and do not need to be fertilized. Keep them watered during dry spells and remove spent blossoms to encourage prolonged blooming.
Flower colors range from orange to red to yellow, peach and even burgundy. Both the flowers and leaves of the nasturtium plant are edible. The flowers have a peppery flavor and make a bright addition to any salad. They are delicious stuffed with soft cheese or can be used to make an infused vinegar.
Nasturtiums make great edging plants. I especially like to use them along the edges in my vegetable garden where they spill over the sides of my raised beds and attract the bumblebees. They are also great tucked into bare spots in the garden. The climbing varieties can share space with roses and clematis in the perennial garden or beans and cucumbers in the vegetable garden.
Bring these gorgeous and tasty flowers to your garden by planting our Alaska Mix Nasturtium
We may request cookies to be set on your device. We use cookies to let us know when you visit our websites, how you interact with us, to enrich your user experience, and to customize your relationship with our website.
Click on the different category headings to find out more. You can also change some of your preferences. Note that blocking some types of cookies may impact your experience on our websites and the services we are able to offer.
Essential Website Cookies
These cookies are strictly necessary to provide you with services available through our website and to use some of its features.
Because these cookies are strictly necessary to deliver the website, refusing them will have impact how our site functions. You always can block or delete cookies by changing your browser settings and force blocking all cookies on this website. But this will always prompt you to accept/refuse cookies when revisiting our site.
We fully respect if you want to refuse cookies but to avoid asking you again and again kindly allow us to store a cookie for that. You are free to opt out any time or opt in for other cookies to get a better experience. If you refuse cookies we will remove all set cookies in our domain.
We provide you with a list of stored cookies on your computer in our domain so you can check what we stored. Due to security reasons we are not able to show or modify cookies from other domains. You can check these in your browser security settings.
Google Analytics Cookies
These cookies collect information that is used either in aggregate form to help us understand how our website is being used or how effective our marketing campaigns are, or to help us customize our website and application for you in order to enhance your experience.
If you do not want that we track your visit to our site you can disable tracking in your browser here:
Other external services
We also use different external services like Google Webfonts, Google Maps, and external Video providers. Since these providers may collect personal data like your IP address we allow you to block them here. Please be aware that this might heavily reduce the functionality and appearance of our site. Changes will take effect once you reload the page.
Google Webfont Settings:
Google Map Settings:
Google reCaptcha Settings:
Vimeo and Youtube video embeds:
Other cookies
The following cookies are also needed - You can choose if you want to allow them:
Privacy Policy
You can read about our cookies and privacy settings in detail on our Privacy Policy Page.


 Another important task is to try and locate the queen. This can be tricky in large colonies of two deep boxes because the queen likes to run away and hide from the light into a deeper part of the colony. She can also be difficult to locate on a frame filled with hundreds of worker bees and drones. Here is a photo