Great Techniques for a Weed-Free Garden

It is so easy to be discouraged when faced with a garden that is being overtaken by weeds.  Keep your garden productive and relatively weed-free by cleaning out the weeds every so often.  Cleaning your garden by weeding is one of the keys to keeping your crops productive and your enthusiasm strong. Here are some great weed-prevention strategies, and simple techniques for a relatively weed-free garden.
1. Starting at the beginning, don’t deeply-till the garden. Plowing or deep tilling buries weed seeds that are lying on the surface and then brings them back up. Let buried seeds stay buried. Most seeds germinate only in the top two inches of soil.  Before you plant a new garden, till the soil shallowly to encourage the surface weed seeds to sprout, then water the area if the soil is dry. The combination of air, moisture, and exposure to light will stimulate weed-seed germination. Wait a week after tilling and then hoe or till shallowly again to eradicate all the newly germinated weed seedlings before you plant. The more times you repeat this pre-plant weed-reduction technique, the fewer dormant weed seeds you will have lurking in your garden beds. Once the upper-layer weed seeds are exhausted (it takes a number of years, so be patient), very few new weeds will appear unless you bring them up from below… or let weeds mature and drop new seeds.
2. Don’t allow weeds to go to seed. Nature is prolific. Each plant can produce an enormous number of seeds. There is an old saying “One year’s seeding means seven years’ weeding” and it holds true. Weeds produce an abundance of seeds and the results of this carelessness are exponential.  The more seeds you have, the more weeds you will have. But the results of a little weed control also are cumulative.  If weed plants are removed from the garden before they go to, seed, their thousands of seeds won’t be added to the garden. No more seeds, no more weeds. And, as the years go by, fewer and fewer seeds will be left in the garden to germinate.
3. Eradicate weeds while they are small. Tiny, newly germinated weeds are the easiest to kill. A sharp hoe, lightly scraping the soil surface is the most effective way to control small weeds.  This allows you to work shallowly and not disturb the roots of the plants you want to thrive.  That minimum effort yields a maximum benefit, curing the weed problem, while making a tidy garden. And a well-kept garden may motivate you to spend more caretaking time there.  Larger weeds can be hand-pulled and left to dry out on the soil surface.  Any weeds that are going to seed should be destroyed or thrown away.  To make the job easier, pull weeds after a good rain or watering.  Try to keep the area surrounding your garden weed-free by tilling a path or mulching a path around the planting zones.
Keep your sharp hoe in or near the garden and use it for a few minutes each time you are there to keep your crops weed-free and your garden a place you will enjoy.

What’s Bugging Your Garden


Less Toxic Pests Remedies

By Engrid Winslow

Getting rid of garden pests.

Image by André Santana from Pixabay

What’s bugging your garden? Mysterious holes in the leaves of your favorite rose? Earwigs buried deep in the leaves of your lettuce? Flea beetles mangling your perennials and vegetables? Most people are averse to creepy crawlies in their gardens but, please, BEFORE you reach for the chemicals to blast them into the stratosphere, consider that all of the insects are essential to having a healthy garden and planet. So here are a few suggestions for less toxic remedies of getting rid of garden pests to try in your garden.

Slugs – small saucers of beer tucked under leaves will attract them and they will fall in and drown. Slugs aren’t picky so don’t waste a craft brew on them – Coors works just fine.

Earwigs – There are a couple of things you can try for these and one is a small saucer of soy sauce with a little bit of vegetable oil and you’ll get the same results as with the slugs, above. You can also roll up several sheets of newspaper and get them fairly wet. Slide them under your plants in the evening and throw them away in the morning.

Aphids – These are a very weak, soft-bodied insect that feed on tender new foliage and buds. You can bet that if you have aphids, you will soon have a host of ladybugs feasting on them. If you can’t wait, then use soapy water with a few drops of oil and spray or dab on the foliage. You can also use garlic spray.

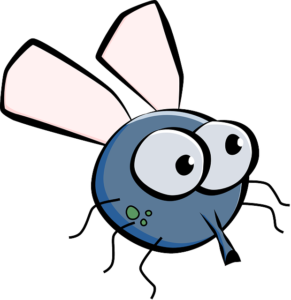
Cartoon drawing of an aphid.

Photo courtesy of pixabay.

Flea and other beetles – Diatomaceous earth is a mineral composed of the skeletal remains of tiny sea creatures. It has edges that are sharp and will pierce the bodies of beetles and cause them to dry out. It will harm beneficial insects and earthworms, so use sparingly. Also, don’t breathe it into your lungs.

Other insects – Use a lightweight row cover to protect young plants and the ones that are being chomped on the most.

There are other products available at most garden centers now that gardeners are more aware of the consequences of the use of most pesticides to insects, animals, fish and even people. Some of the best tools in your arsenal are: (1) creating biodiversity and selecting plants that attract pollinators and (2) nurturing the soil by using products such as compost and nettle teas. Recognize that most pests run their course if you are patient and wait for their predators to show up.

Name that Seedling

Wildflower Seeds

by Sandy Swegel

Everything’s greening up in your garden and there are so many interesting baby plants.  Can you recognize what’s a friend or a foe?  Here are some clues to help you identify little seedlings that may be coming up in your garden right now!


  1. I’m a weed, but I’m a nutritious and yummy green for salads or saute. Wait too long, and I may grow to four feet tall.
  2. I’m volunteering in your herb garden.  I look a lot like other herbs, flowers and weeds, but crush a leaf and smell it…and you’ll know exactly who I am.
  3. Did you plant your cool-season vegetable seeds recently? I’m always up the fastest!
  4. I don’t mind cold and snow.  A lot of people plant me on St., Patrick’s Day.
  5. Don’t I look healthy!  Let me grow and I’ll be in your garden FOREVER.
  6. Did you plant annual wildflowers last year?  I may have a hard time making a commitment, but I’ll be back every year.
  7. Nobody remembers planting me, but I love to grow in surprising places.  I may be all green now, but come back in a week and I’ll be jumping to see you.


Answer key to seedling clues

  1. lambs quarter
  2. cilantro
  3. radish
  4. pea
  5. bindweed
  6. bachelor’s button
  7. johnny jump up

Guide to Common Tomato Diseases

by Sam Doll

Nothing is better in mid to late summer than the taste of a garden-fresh tomato. However, it takes a lot of hard work and care to help your tomatoes survive their perilous journey from seed to fruit. Here are nine common tomato diseases and what you need to do to treat them.

Fungal Diseases

Many common tomato diseases are caused by fungi. These diseases often are caused by specific environmental conditions like high moisture and certain temperature ranges. They are most often spread by contaminated soil or water and are usually manageable with vigilant prevention techniques and various fungicides.

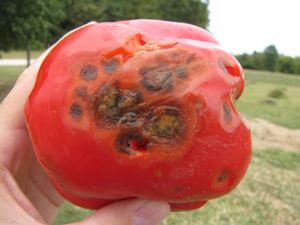
AnthracnoseRed tomato showing the fungal disease Anthracnose.

What is it?

Anthracnose (Colletotrichum coccodes) is a fungal disease that primarily attacks the tomato fruits. It will affect both green and ripe tomatoes and will appear as small, sunken water-soaked area on the outside of the tomato.

As the disease progresses, the spot will widen and turn dark and expand. Infected unripe tomatoes will not show symptoms until the fruit ripens and the disease progresses faster the closer the tomato is to maturity.

Septoria Leaf Spot

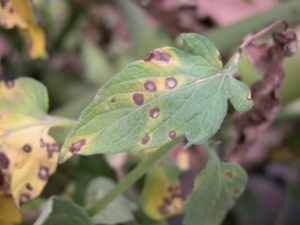
Tomato leaf showing the fungal disease Septoria Leaf Spot.

What is it?

Another fungal disease, Septoria Leaf Spot is caused by Septoria lycopersici. Unlike Anthracnose, Septoria attacks the leaves and stems of the plant but does not affect the fruit. The disease is more likely to appear on leaves closer to the ground and appears as the plant begins to fruit.

The primary symptoms are numerous round and small spots on the leaves that are dark on the outside and lighter in the center where the spore-producing bodies are. Highly infected leaves will yellow and fall off, which can expose the tomato fruit to the sun and cause sunscald.


Early Blight

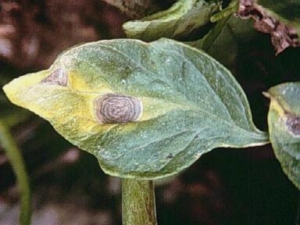
Tomato leaf showing the fungal disease Early Blight.

What is it?

Caused by the fungus Alternaria solani, Early blight affects older leaves and appears as a small brown spot with concentric rings. As it spreads throughout the leaf, it will cause it to yellow and wither. This can weaken the plant and expose the tomato fruit to sunscald and reduce yield.

The fungus can also attack the stem and fruit but is less common than in the leaves. It often progresses upward from the bottom of the plant.

Late Blight

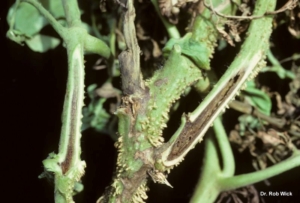
Tomato stems showing signs of Late Blight.

What is it?

Late Blight (Phytophthora infestans) is a disease found in tomatoes and potatoes and is most infamous for causing the Irish Potato Famine.

Late blight thrives in humid, cool weather ( >90% humidity and <80°). It appears on all parts of the plant, usually starting on older leaves and then spreading to fruit and stems. It appears as a dark, water-soaked patch that will soon enlarge and grow a white moldy substance.

Late Blight is a slightly different beast than the other fungal diseases. It can move quickly through the garden and is spread by both water and wind. You can do all the prevention in the world, but a nearby garden with infected plants can blow spores over into your yard!

Use the treatment prescribed bellow but be prepared to pull and destroy plants if it spreads too far to save to rest of your garden and your neighbors’ gardens as well.


Fusarium Wilt

Tomato plant showing signs of Fusarium Wilt.

What is it?

Fusarium Wilt (Fusarium oxysporum) is a warm-weather disease most common in southern regions. It appears as a wilting or drooping of the lower leaves, followed by the wilting and death of the entire plant. Oftentimes, leaves on one side of the plant will turn yellow.

The disease attacks the roots through the infected soil and will clog off the vascular system of the plant. It usually hits younger plants and there is no known treatment. The best way to prevent wilt to ensure that any soil or material you place in your bed is clean, including the soil from starts. There are also some disease-resistant hybrids.

The yellowing is a telltale sign, also check the soil. If the soil is dry, the wilt is most likely from lack of water. Water the plant to see if the wilting persists. If you are sure it is fungal wilt, the best thing to do is destroy the plant

Our blog on keeping tomatoes in hot weather will help you tell if your plants are sick or just thirsty!

How To Prevent and Treat Most Fungal Diseases

Fungi thrive in warm wet environments. The spores are transmitted primarily from splashing water, either from rain or irrigation. Poorly drained soil, overwatering, and lack of air circulation around the plant can all create conditions for the spread.

To prevent most fungal diseases, only purchase certified disease-free seeds and don’t replant seeds from afflicted plants. Make sure your bed or container is well drained, do not overwater, plant the tomatoes in full sun. Space and stake or support the plant with cages to make sure that the plant can air out properly after watering. Also, avoid overhead watering to limit water splash, which would spread the spores

If your seeds are healthy, you can save them for future use. Here is our blog on the subject.

If you do see Anthracnose in your tomatoes, make sure to harvest the fruits as soon as they are ripe. Copper-based fungicides and a few organic fungicides can be effective for treatment of infective plants.

If you see infected leaves, feel free to remove them to help slow the spread of the disease. Make sure to wash your hands and tools after handling infected plant material.

After seeing any fungal diseases in your garden (besides Late Blight, which does not overwinter), make sure rotate your planting sites on a three-year cycle with plants that are not from the Solanaceae family (i.e. tomatoes, eggplants, peppers), which are closely related to tomatoes. Make sure to remove all plant material at the end of the season and do your best to keep the site weed free. If you do not have another planting site to rotate with, switch to containers instead.

The best prevention possible is to keep the plants as healthy and vigorous as possible. Like us, unhealthy or weak plants are more likely to get sick

Check out the Clemson Cooperative Extension Tomato Disease Factsheet for more information on fungal diseases like Leaf Mold, Buckeye Rot, or Southern Blight

Bacterial Diseases

Unlike funguses, which are multicellular organisms with complex cells (eukaryotes), bacteria are simple, single-celled organisms (prokaryotes). Bacteria are the most common form of life on earth and are, for the most part, harmless.

However, there are some bacteria that specialize in infecting and living in other species. These can be harmless, like the natural bacteria in your gut that helps you digest things like cellulose, but are sometimes dangerous, or pathogenic. Just like you can get strep throat from bacteria, your tomatoes are susceptible to them as well.

Tomato Pith Necrosis

Tomato plant showing signs ofTomato Pith Necrosis.

What is it?

While mostly seen in greenhouse conditions, Tomato Pith Necrosis can occur during the early growing season in periods with cool temperatures and high humidity. Plants are especially susceptible in areas with high nitrogen levels, when the tomato starts are growing rapidly.

The first noticeable symptoms of this disease are usually wilted leaves followed by black lesions on the stems. As the disease progresses and the bacteria become more established in the stems, splits, cracks, shrinking, and other deformations are common.

If there are green fruit, the disease can cause a greasy, water-soaked spot on the blossom end of the fruit.

What do I do?

The best prevention of Tomato Pith Necrosis is to have control over your soil conditions. The main factor in pith necrosis is excess nitrogen in the soil. Don’t over fertilize early in the season and keep tabs on your soil quality.

Check out our Guide to Soil Management

Also, like with the fungal diseases, make sure your plants are properly spaced so they have room to breathe and dry out and avoid overhead watering.

If your plants do become infected, you can wait until warmer, dryer weather to see if they recover. If not, remove and dispose of them.

Make sure that you are rotating your plots on a three-year cycle and do not plant in plots that have had closely related plants like peppers. Do not put them in your compost because the bacteria can live on the diseased plant material for years.

Bacterial Spot

What is it?

Bacterial spot attacks the leaves and fruit of the tomato plant. It occurs during wet and warm conditions and can cause leave wilting, leaf and fruit spots, and defoliation. The leaves will show small and irregular spots as well as yellowing and browning as the disease persists. The fruit will have multiple dark specs that are dry and rough to the touch.

Fruit inflicted with Bacterial Spot, as with any diseased fruit, should not be consumed. While the disease itself isn’t dangerous to humans, it provides openings for dangerous pathogens to enter the fruit.

What do I do?

Spot often appears after heavy summer rainstorms. Make sure your plants are well spaced and pruned so they can air out effectively. Do not use overhead watering. If you are in an area where Spot has been seen, make sure you are cleaning your tools and rotating your plants. Preventative applications of copper-based fungicide can be effective in controlling spot.

If your plant does have Bacterial Spot, make sure that you immediately remove and dispose of it. Clean any tools you use with a 10% bleach solution or rubbing alcohol. Remove any plant debris.


Bacterial Canker

Tomato leaf showing signs of Bacterial Canker.

What is it?

Bacterial Canker is one of the most difficult to identify and control tomato diseases once it takes hold. It can affect plants of all ages and has a variety of symptoms that are easily confused with other diseases.

Early symptoms are spots, browning, and wilting of leaves. Later symptoms include raised spots on the stems and fruit, which often include a white “halo” around a brown spot in the center. On older plants. The stems will show cankers or open “sores”. Once this disease takes hold, the plant is essentially doomed.

What do I do?

Prevention is the best defense against bacterial canker. Buy only certified disease-free seeds. Avoid overhead watering and space plants appropriately. Copper-based fungicides can be effective in prevention.

If you notice this disease on your plant, make sure to remove it, any plant debris and its neighboring plants immediately. Bag the removed plant material and dispose of it. Clean your tools and do not plant tomatoes on the site for a few years as the disease can live in the soil.

Viral Diseases

Viruses are pathogens that are usually a piece of genetic material surrounded by a protein. Not technically alive, these diseases are usually spread by “vectors” or living things that carry the disease. Think mosquitoes carrying West Nile.

Since each virus is spread differently, each will need its own prevention plan. There is no treatment for viral infections and the best course of action is often to remove and destroy infected plant material.

Mosaic Virus

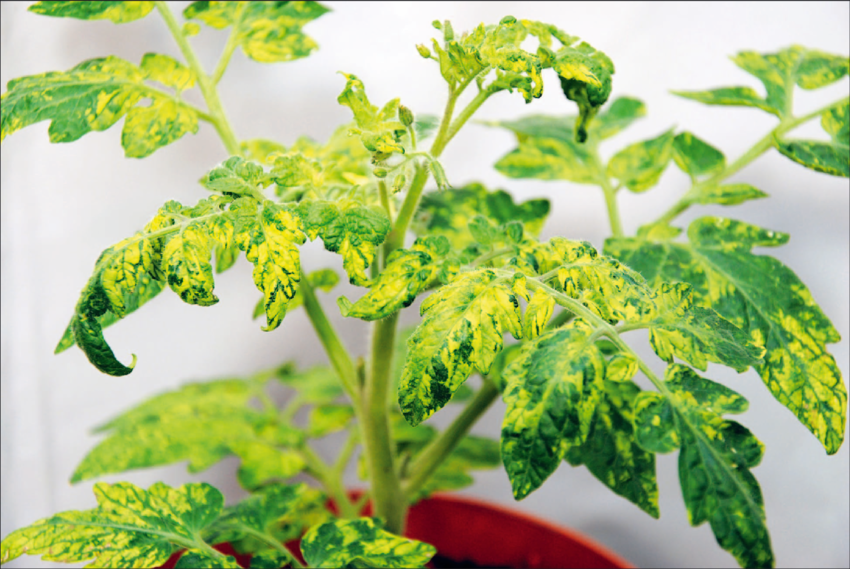
What is it?Tomato leaves showing signs of the common tomato disease, Mosaic Virus.

Mosaic Virus is a family of viruses that can affect tomatoes, peppers, and other plants in your garden. The most common one that might impact your tomatoes is the Tobacco Mosaic Virus (TMV), the Tomato Mosaic Virus (ToMV), and the Cucumber Mosaic Virus (CMV). Despite their names, all of these can seriously infect your plants.

The symptoms of both TMV and ToMV are varied and difficult to tell apart. The most common symptoms include irregular growth, strange leaf shapes, and mottled coloring in the leaves and fruit. You may still get yield from tomato plants infected with Mosaic Virus, but it will likely be stunted and fewer than you would have gotten normally.

CMV is spread by aphids and create a stunted, bushy, sometimes yellow plant with severe leaf malformation and mottling. Tomatoes with CMV produce very few fruits.

What do I do?

TMV and ToMV can be easily spread through touch and soil. Even handling tobacco products like cigarettes can contaminate your garden with TMV. Monitor seedlings closely for signs of the disease and make sure to remove any possibly infected plants.

If you are concerned at all, you can make a solution out of skim milk to spray the plants with. Proteins in the milk bind to the virus and make it unable to attack the plant. If you know you have handled any plants, wash your hands and tools with the same milk solution or soap and water to prevent transmission. The virus can live for over two years on surfaces and in the soil, so do not replant in soil that has been infected and make sure to remove all plant material from the site.

Since CMV is spread through aphids, the best prevention is to control the weeds in your garden to prevent aphids from jumping from plant to plant. Insecticides are not effective because new aphids can easily pick up the virus and spread it seconds from coming in contact with the plant. Surrounding the tomatoes with taller plants that are not attractive to the aphids can create a buffer and using aphid predators, like ladybugs, can keep the general population of aphids in check.


Tomato Spotted Wilt Virus (TSWV)

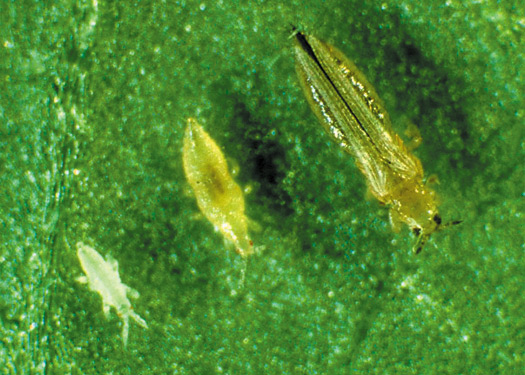
Photo of tomato thrips on a leaf.

Thrip

What is it?

Tomato Spotted Wilt Virus (TSWV) is a highly contagious pathogen that can infect over 1000 different species of weeds, native plants, and ornamentals. It is transmitted through an insect pest known as thrips, which will feed on a variety of different plants.

See this video on the Thrip lifecycle

The symptoms of TSWV vary from one variety of tomato to another, but often result in stunting and dead (or necrotic) spots on the leaves. They can also cause low plant yield, mottled fruit, and wilt.

What do I do?

Unless your garden is contained within a greenhouse, it will be difficult to control the spread of TSWV. The most effective management is to eliminate the weeds in your garden that can harbor thrips throughout the winter. Remove any remaining plant material and weeds, then till and mulch the garden for winter to remove any habitat for the thrips.

If you have plants that are infected with TSWV, you can remove it to prevent it from spreading the disease to nearby plants. Insecticides are relatively ineffective against thrips because applied insecticides are unlikely to come in contact with thrips on the plant and systematic pesticides are not fast enough to stop the thrip from infecting the plant. Insect predators like ladybugs, minute pirate bugs, and lacewings will all feed on thrips.


Tomato Yellow Leaf Curl Virus (TYLCV)

What is it?

Tomato Yellow Leaf Curl Virus (TYLCV) is a virus that is spread through seeds and whiteflies that causes yellowing and curling of leaves, stunting, flower drop, and severely reduced yield in tomatoes and peppers.

While TYLCV can be spread between seeds, the primary risk factor for your garden would be the spread of the virus through whitefly pests. Whiteflies are small, white flying insects that feed on the undersides of leaves.

What do I do?

Like TSWV, the best prevention is to keep whiteflies off of your plants. Do your best to keep weeds under control to limit available habitat for the whiteflies, till and mulch during the winter, and introduce natural predators.  Products that use canola oil or horticultural oil can act as a whitefly repellent. For how to make your own, check out this article.

Another option you may want to consider is to use reflective mulches. These mulches reflect light back up at the plant and disorient insect pests.

Learn more about reflective mulch here

If your plants do become infected with TYLCV you really only have two options. You can wait it out to see if you do get any harvest, and then remove all susceptible plants at the end of the season. The other option is to remove infected plants immediately to try to limit the spread of the virus.

When you do remove your plants, bag them as soon as you can to contain the whiteflies on the plant that are carriers for the virus.


Disease Prevention Checklist


  1. Buy only disease-free seeds
  2. Rotate your tomatoes and like crops on a three-year cycle
  3. Make sure the plants are properly spaced and pruned so they can dry out properly
  4. Avoid overhead watering
  5. Remove diseased plants
  6. Control weeds in and around the garden bed to prevent pests from harboring in them
  7. Do not compost infected plant material
  8. Sterilize your tools
  9. Keep vigilant
  10. If you are unsure about something, check with your local extension office


Are your tomatoes healthy and beautiful? Read this guide on how to tell when they are ready to pick!

How to Get Rid of Weeds

Tips for Weeding

by Sandy Swegel

That’s the question I hear most often in Spring.

The question comes most often from my friends who are very smart and successful in busy lives.  Their garden is one aspect of their beautiful complicated lives but it’s always a challenge because it’s not easy to make nature conform to what you want with one big weekend cleanup.

So there was an animated discussion about the best digging tools and homemade vinegar solutions. Everyone wants to protect the earth and the bees but frankly feel they have failed when the same weeds overwhelm their garden every season.  You know the weeds I mean, the ones that have grown very tall when you walk into your yard in late June and see that they just went to seed, making thousands of new baby weeds.

At some point, someone asks me what my tool is as a professional gardener.  My friends never find my answers very entertaining, so they usually return to a discussion of their latest internet surefire natural weed killer.  Nevertheless, here is my answer from years of experience of dealing with weeds.


The best tool is diligence.  Weeds have a strong will to live and procreate.  You have to be vigilant for them and keep after them.

After setting a firm determination about what weeds are permissible and which aren’t, then here are some techniques.

Get them when they are little.

Right now in your gardens, there are thousands of tiny weed seedlings you could control with one stroke of your hand hoe.  Off with their heads:  tiny seedlings don’t survive if they loose their leaves. Learn what young weeds look like.  Bindweed babies are cute little heart shapes.


Learn to love them. 

Dandelions are the best example of a “weed” you can learn to love.  In moderation of course.

They are very cute…children love them.  They are one of the first foods of hungry bees each Spring.  You will have more time and less frustration in your garden if you don’t have to eradicate all the dandelions.


If you do decide to get rid of perennial weeds…be smart and determined.  Don’t just hack it up in frustration every Spring and let it grow and strengthen the rest of the year.  You can’t get nasty perennials all at once….but you can wear it down and weaken it.  I have a sharp hori-hori knife and dig out at least four inches of root.  If the weed reappears, I recognize it and dig a little deeper the next time.  Soon it will exhaust itself and give up.


Finally, have a cup of tea.

Or at least get the electric kettle out.  Boiling water or hotter steam does an excellent job in rocks and walkways,  especially when weeds are young. And it is very satisfying.


Photocredits

https://weedecology.css.cornell.edu/weed/weed.php?id=6

http://www.blikk.hu/eletmod/tippek/elleptek-a-kertjet-a-gazok-igy-szabadulhat-meg-toluk/f38r539


YELLOWJACKET TRAPS, THEN PANSIES

Spring Solutions for Yellow Jackets

By: Sandy Swegel

Is Spring about to happen in your neighborhood? Before you start getting pansies or collecting daffodils, stop and put out your yellow jacket traps…if yellow jackets are a problem for you in the summer.

The yellow jacket life cycle is pretty simple. Almost all the yellow jackets die off in winter. Single queens that already “mated” go into winter hibernation…in the ground, or your shed, or woodpile. Once warm weather starts in the Spring the queen wakes up, builds a new nest and starts laying eggs for this year’s yellow jackets. One little queen easily lays 500 eggs. Conservatively, every queen you catch now means hundreds fewer yellow jackets gathering at your picnics in the yard this summer. It is so much easier to catch one queen now than to tackle nests full of angry yellow jackets under your picnic table in July.

A simple pheromone trap works great…it lures the queen to those yellow plastic hanging traps. This is no time for simple soapy water. You’ll be glad you spent the $5 for the pheromone lure refills. And the lure doesn’t affect honeybees.

Catching the queens isn’t always predictable. I put up more than one trap. Last year the trap by the BBQ grill caught ten queens. And a trap under a tree caught two. It seems to differ every year. But I will be grateful come summer.

It’s definitely the time in this warm March we’re having in Colorado. It was 80 degrees today…I got stung cleaning up debris in the perennial bed. The queen rolled over from her winter nap and sunk her stinger into me as revenge. Ouch. Yellow jackets hurt so much more than other wasps. If you don’t go outside in the summer, then let the yellow jackets live. But since they don’t play well with others, I believe in a strong birth prevention policy.

Photocredits:
www.rescue.com/bug/yellowjackets
greenbugpestandlawn.com/learning-center/flying-pest

Apples

All About Apples

by Sandy Swegel

Two things I learned about apples this year.

Reduce codling moths in your trees.

A few years ago, I started following the advice of a local organic farmer to pick up the bad apples under my apple trees. I’ve always left them there to compost in place or waited until they were all down to pick them up. My delicious McIntosh apple tree had lots of codling moths which left unappealing frass in the apples as well as the occasional worm. The tree was too tall to spray clay and I didn’t want to use anything toxic. So I did start religiously picking up the apples as they fell. Now, some five years later, I’ve noticed that while codling moths still attack the apples, they are MUCH fewer in number affecting maybe only 10-20% of the apples. What a difference sanitation made.


Bake awesomely easy gluten-free Apple Crisp

The second thing I learned came from the new “problem” of what to do with so many apples. If you pick up the apples soon after they fall from the tree, then you notice the apples are in pretty good shape if you cut out the bad parts right away. So now I had a surplus of apples. The freezer was full of sauce and still, the apples came. Fortunately, I gave the apples to a baker friend who made a gluten-free apple crisp that was better than anything I had ever had. And that’s when she taught me a professional secret. You have to bake the apples first before you put the crisp topping on. When you just layer apple pieces in a pan and sprinkle with your crisp mixture, you can end up with apples that are too crunchy and/or a burnt crisp top.

So here’s the basic recipe:

Cut up apples into pan. Bake until mostly soft.

Crisp topping:
Oats, cinnamon, nuts (almond meal, tiny pecan pieces) Optional: butter, brown sugar.
Sprinkle topping on baked apples. Put the pan back in the oven until the crisp is browned and crispy. Twice-baked apples melt in your mouth (without lots of extra sugar) and the topping is crispy delicious. The perfect foil for vanilla ice cream.

So now I spend more time working to clean up apples…..but am rewarded with more apple crisp!

Photos:

http://utahpests.usu.edu/ipm/htm/fruits/fruit-insect-disease/apple-pear-control03
http://allrecipes.com/recipe/229088/apple-crisp-with-oat-topping/

Stop the Powdery Mildew Cycle this Fall

Gardening Tips

by Sandy Swegel

Powdery mildew had a grand time in my garden this year. I often have a nonchalant attitude to it growing on a few leaves and don’t mind a little bit. But it started early this year on roses, then showed up on the bee balms and finished out the season inundating the sweet peas and squashes. By the time I paid attention, it was out of control.

But now it’s Fall and my inner lazy gardener says…ah well this season is over. Next year it will be different. But if we want to make progress against disease in our gardens, now is the time to act.


Do you Want Less Disease in your garden next year? Then take these steps now:

In the Vegetable Garden
As your squash and cucumbers and pea plants are dying back, remove those leaves and put them in the trash. Not in the compost pile. Don’t let them overwinter and deal with it in the Spring. Fungus and disease spores are sitting passively on the backs of those leaves, just waiting for rebirth next Spring. They do not reliably die in home compost piles. Powdery mildew will survive the winter by forming minute fruiting bodies called cleistothecia And tomatoes? I put the whole plants in the trash after frost. There are just too many diseases on them to risk.

In the perennial beds, leaves infected with powdery mildew like rose or phlox or bee balm often drop before Fall. Before the big tree leaf fall, I use the blower to blow the diseased leaves out of the bed and PUT THEM IN THE TRASH.

This vigorous sanitation is a good idea for all pests too. If you had bean beetles…get rid of those leaves that might have next year’s eggs.

But don’t be too clean.
That’s the important lesson here. In the non-diseased parts of the garden, ladybugs and lacewings and lots of beneficial insects are going to lay eggs and overwinter. We want them. I learned last year especially to let willow leaves be…there were dozens of beneficial babies at the base of willow plants last spring.


And next year…be attentive to the powdery mildew. I now promise to treat early and often with something gentle but effective such as horticultural oil or a baking soda. I lost a lot of production in my vegetables this year because I let the powdery mildew have its way. And the roses and phlox really took a hit. I’ll do better next year. I promise.

Photos:
ipm.ucanr.edu/PMG/PESTNOTES/pn7406.html
startorganic.org/tips-for-treating-powdery-mildew/

Bunnies in the Garden…What Works, What Doesn’t

Gardening Tips

by Sandy Swegel

We’ve had a bunny explosion the last few years. Population growth has been so pronounced that just walking around the neighborhood in the morning I see at least two bunnies per front yard. The problem with bunnies is that they make babies like crazy and each bunny eats a lot of plants. They particularly like young tender plants and flowers which is devastating for the garden.

If you are serious about protecting your garden from rabbits, you must be vigilant.

Strategies that Work

GET the rabbits out of your garden.

KEEP the rabbits out of your garden.


This is the only strategy that really works. And it takes a lot of vigilance to build an effective barrier and perseverance to get every bunny that comes into the yard out of there.

First, you have to have a really good fence that goes all the way into the ground. Wood is just another food for bunnies so you’re going to need supplemental chicken wire or a stone barrier at the base. Every time there is another rabbit in your garden you have to figure out how it got in and close that opening. And you have to remember to always keep the gate closed. I can remember the sneaky bunny that waited while I rolled the garbage can out to sneak in the yard.

Second, for the rabbits already in your garden, you have to trap them or dispatch them or even get the dog to chase them out an open gate which you quickly shut behind them.

I know people who live-trap the rabbits and bring them to rescue places, and I know people who sit in their gazebo in the evening with a beer and a shotgun. You have to determine your level of lethality. But you have to get rid of the bunnies.

Strategies that sorta work but don’t solve the problem

Repellents
An otherwise intelligent friend has strung soap across her yard because she read on the internet that Irish Spring works. It doesn’t. Bunnies are darn smart and aren’t kept from a succulent meal because something smells funny. They also don’t fall for the fox urine scent thing…They look around. They can see there is no fox. Repellents can work for the plant you spray them on….if you keep respraying. But you’ll go broke buying repellant for every plant in your yard.

Dogs
Dogs do keep down the number of rabbits, but dogs on the hunt for rabbits can dig holes and tear up your garden better than any rabbit can.

Trap crops
Some people try growing plants like clover the bunnies love to keep them off the good plants. This is marginally successful in the short term, but ultimately, you’re feeding the bunnies.

What bunnies have going for them is that they are incredibly cute and fertile. They also have the support of your neighbors who feed them. A neighborhood-wide eradication program might work, otherwise, you just have to build your fortress and keep it defended. If you’re lucky like a friend of mine is, a great horned owl will move into one of your trees and take care of the would-be intruders.

Photos:

https://en.wikipedia.org/wiki/Great_horned_owl
http://forums2.gardenweb.com/discussions/1386301/how-to-rabbit-proof-raised-beds
http://pestkill.org/other/rabbits/how-to-keep-out-of-garden/

Nurse Rock

Gardening Tips

by Sandy Swegel

Sometimes there’s a difficult spot in a garden when plants just keep failing. Or sometimes there’s a plant you really want in your garden (you know who you are butterfly weed) that keeps dying even though you think you are giving it perfect conditions. The easy thing to do is give up and plant a different plant or in a different place. But the determined gardener can reach into her magic toolbox of helpers for a Nurse Rock to give her plant the extra edge.

What is a nurse rock? Basically, it’s just a rock…most any old rock…that you strategically plant with your new plant. In hot arid Colorado, I usually plant on the north side of the rock so there’s just a bit more water and shade for the young plant. I learned about nurse rocks from a gardening friend who liked to grow the native plants she saw when she was out hiking. In nature, you’ll often see that plants are more likely to be growing near rocks rather than out in the open field. Even in your own suburban garden, you’ll see the edges of your beds or even your sidewalks have more robust plants.

There have been many scientific studies about why plants do better with nurse rocks. The obvious speculations are improved water, improved drainage, protection from sun, space from other plants, protection from wildlife, less evaporation, better soil nutrients under rocks and even more mycorrhizae. Old garden folklore highlights the image of the rock as a protector of the young plant from the big world.


I encourage you to give it a try. In the wild, nurse rocks are often large rocks a foot or more high. In the home garden, I’ve found even a small rock that fits easily in my hand gives a plant an edge. I’m trying this week with a spot in a narrow garden bed that just has had several different plants die out despite our ministrations. We’ve come up with reasons why the plants die…that one spot gets a little more sun and it a tiny bit higher than surrounding soil, or it’s a good hiding place for the bunny who ate the beautiful fall anemone down to stubs. We’re going to try again with an adorable small upright clematis, Sugar Bowl, and a good baseball sized nurse rock planted at its base. Thank you nurse rock.


Photos:
http://www.highcountrygardens.com/perennial-plants/unique-plants/clematis-scottii
http://www.laspilitas.com/classes/native_planting_guide.html
http://eachlittleworld.typepad.com/each_little_world/2008/12/