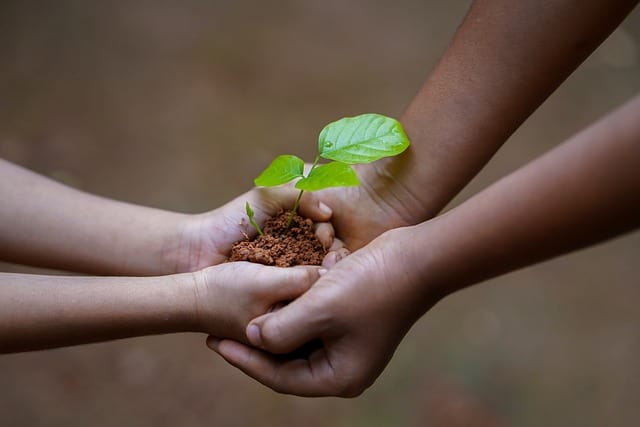
It is so easy to be discouraged when faced with a garden that is being overtaken by weeds. Keep your garden productive and relatively weed-free by cleaning out the weeds every so often. Cleaning your garden by weeding is one of the keys to keeping your crops productive and your enthusiasm strong. Here are some great weed-prevention strategies, and simple techniques for a relatively weed-free garden. 1. Starting at the beginning, don’t deeply-till the garden. Plowing or deep tilling buries weed seeds that are lying on the surface and then brings them back up. Let buried seeds stay buried. Most seeds germinate only in the top two inches of soil. Before you plant a new garden, till the soil shallowly to encourage the surface weed seeds to sprout, then water the area if the soil is dry. The combination of air, moisture, and exposure to light will stimulate weed-seed germination. Wait a week after tilling and then hoe or till shallowly again to eradicate all the newly germinated weed seedlings before you plant. The more times you repeat this pre-plant weed-reduction technique, the fewer dormant weed seeds you will have lurking in your garden beds. Once the upper-layer weed seeds are exhausted (it takes a number of years, so be patient), very few new weeds will appear unless you bring them up from below… or let weeds mature and drop new seeds. 2. Don’t allow weeds to go to seed. Nature is prolific. Each plant can produce an enormous number of seeds. There is an old saying “One year’s seeding means seven years’ weeding” and it holds true. Weeds produce an abundance of seeds and the results of this carelessness are exponential. The more seeds you have, the more weeds you will have. But the results of a little weed control also are cumulative. If weed plants are removed from the garden before they go to, seed, their thousands of seeds won’t be added to the garden. No more seeds, no more weeds. And, as the years go by, fewer and fewer seeds will be left in the garden to germinate. 3. Eradicate weeds while they are small. Tiny, newly germinated weeds are the easiest to kill. A sharp hoe, lightly scraping the soil surface is the most effective way to control small weeds. This allows you to work shallowly and not disturb the roots of the plants you want to thrive. That minimum effort yields a maximum benefit, curing the weed problem, while making a tidy garden. And a well-kept garden may motivate you to spend more caretaking time there. Larger weeds can be hand-pulled and left to dry out on the soil surface. Any weeds that are going to seed should be destroyed or thrown away. To make the job easier, pull weeds after a good rain or watering. Try to keep the area surrounding your garden weed-free by tilling a path or mulching a path around the planting zones.
Keep your sharp hoe in or near the garden and use it for a few minutes each time you are there to keep your crops weed-free and your garden a place you will enjoy.
https://bbbseed.com/wp-content/uploads/2026/01/47710_BBB_Logo_HiRes_Transparent_1023-01-removebg-preview.png00Mike Wadehttps://bbbseed.com/wp-content/uploads/2026/01/47710_BBB_Logo_HiRes_Transparent_1023-01-removebg-preview.pngMike Wade2023-11-10 14:04:462025-06-23 14:54:39Great Techniques for a Weed-Free Garden
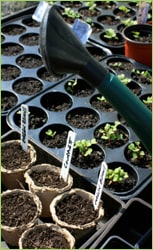
Starting your vegetables and herbs indoors from seed is easy and very rewarding. By starting indoors you give yourself a jump-start on the growing season and you will be ahead of the game when it is time to start planting outdoors! The back of your BBB seed packet will have the basic information you need to know to ensure you have successful germination.
Here are a few tips to remember to kick off your seed-starting efforts.
Plastic pots are best for starting seeds as they retain moisture more easily compared to terra cotta or other clay pots. If you don’t have traditional seed-starting containers available from your local garden center you can use recycled yogurt cartons, salad containers, or any other plastic container you find in your recycle bin! You can also make your own wood seed starting trays or your own newspaper pots. No matter what type of container you use make sure it is clean and sterile.
Proper drainage is essential. Make sure there are holes in the bottom of your seed starting container to allow for good drainage. If you are using a recycled plastic item you can drill or poke holes in the bottom by using a screwdriver or nail. Excessive moisture trapped in a pot can lead to damping off and other fungal diseases. Ew!
Soilless seed starting mix. Really we mean it! If you want good germination start your seed in a soilless mix. The key is that when your seeds germinate and have at least their first set of true leaves you must transplant them to the next pot size up and into regular potting soil. Or, you need to start feeding them with a half-strength fertilizer. The soilless mix is essentially sterile with minimal nutrition which is a perfect medium for your plants to germinate in. Less chance for contamination or other weird diseases to set in!
Moisten your mix. Pour your soilless mix into a bowl. Moisten it with water so that it isn’t soaked, but is nicely damp. Fill your seed starting pot or tray up ¾ of the way full with your damp soilless mix. Gently press the seed into the soil approximately two (2) times the depth of the diameter of the seed. Then lightly cover your seed with more of the soilless mix. Gently press the soil to ensure good seed-to-soil contact.
Identify each pot. Even if it is only 2 pots we highly recommend that you mark each pot with the name of the vegetable and the date planted. You can use wooden craft sticks, left-over popsicle sticks, or any other object that sticks up and beyond the soil that you can write on.
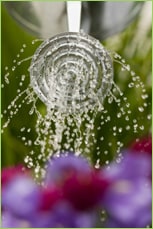
Water gently. We can’t tell you how many times we have washed away seeds and newly born seedlings by watering too hard! We recommend watering from the bottom by placing your seed starting container in a dish or basin filling it with water 2-3 inches and allowing the moisture to be drawn upward. If just the top has dried out use a spray bottle or a child’s watering can with small holes. And if you don’t have either, while pouring out the water (gently!) put your hand in between the water and the soil to break the fall of the water before it lands on the seeds or tender seedlings. Water daily and remember, gentle!
Cover! Immediately cover your pot with a piece of saran wrap or a plastic bag to help retain the moisture. If you have a garden dome then place the lid on top. Keeping your seed evenly moist until germination is essential.
Temperature. Most seeds require temperatures of 65° to 75°F to germinate. The back of your BBB Seed packet will tell you the preferred germination temperature for your seed. Place your seed containers near an existing heater, on top of the stove (pilot lights can be very warm at night!) or use a space heater with the proper precautions to raise the ambient temperature as needed. Heating pads designed specifically for plant use can also be placed directly under the seed containers which will encourage germination.
Good Light. Plants require at least 12 hours of daylight. If you are starting your seed where light is poor or during a time when there is less than 12 hours of light per day we recommend growing lights. If sowing your seed indoors, place your seed containers in a sunny, south-facing window and give the container a quarter turn each day to prevent the seedlings from overreaching toward the light and developing long and weak stems.
Acclimate Your Seedlings. Before you transplant your seedlings outdoors they need to be hardened off or acclimated to direct sunlight and fluctuating temperatures. It is best to do this over a three-to-five-day period by placing them in direct sunlight during the morning only on the first day, then increasing their time outside by a few hours each day until they are strong enough to be transplanted. Don’t feel rushed. If unexpected weather or wind arises, keep them indoors. Nothing is more disappointing than spending all of your time growing your precious seedlings to then having something go wrong when you put them outside.
If you have any questions at all about how to start your BBB Seed please do not hesitate to email us at info@bbbseed.com. We look forward to answering any questions you might have!
Download our E-Book here:
When mid-summer brings a bounty of produce from your garden and you are enjoying the fruits of your labor, it is time to start planting again. The prime planting time for late-season harvests is late summer. Success with fall vegetables requires proper timing. In the spring gardeners wait to plant outside until after the last spring frost, well, in the fall the race is against the season’s first frost. Many of the cool season crops can withstand a few light touches of frost and even become sweeter. Check with your local county extension service to find your area’s first expected frost date. Check the back of the seed packet to find the days to maturity. Take your frost date and count backward to find the best time to start your next round of seeds. Cooler fall growing temperatures may require an extra week or two for the plants to reach maturity. Many of your fall crops can be harvested when young and immature, too.
Which crops to plant for the Cool Season Planting?
Plants that do well in the early spring work for the cool fall temperatures. These will do well right up to the frost date and even beyond. Cabbage takes a long season to mature and many gardeners don’t even plant cabbage in the spring because it doesn’t have enough time to mature before the mid-summer’s heat stops growth. Start these seeds mid-summer, a good 3 months before the first frost date. Kale should be planted 85 – 90 days before the first frost. The leaves can handle a few light touches of frost and become sweeter each time. Carrots can be planted 80-85 days before frost. They can be harvested when young and tender. Even after the cold temperatures shrivel the tops, they can be dug, sweet and juicy, from the ground throughout the fall. Broccoli has the same problem as cabbage with a long time to mature as cabbages, so planting for a fall harvest is often best. Plant broccoli seed directly in the soil about 80-85 days before frost. Beets can do double duty with green tops for salads and tasty roots as well. Plant seeds about 65-70 days before frost, depending on the type you choose. Leafy greens such as spinach and leaf lettuces, rocket, and Swiss chard all do best in the cooler temperatures of fall. Plant seed about 50-60 days before frost depending on the type chosen. These can be harvested when young and immature for delicious baby greens. Radishes are always great to spice up salads. These are fast-growing and can be planted 30-35 days before the first frost. Pull them when young and tender.
If you have any questions at all about how to start your BBB Seed please do not hesitate to email us at info@bbbseed.com. We look forward to answering any questions you might have!
Download our E-Book here:
Find your Hardiness Zone
https://bbbseed.com/wp-content/uploads/2026/01/47710_BBB_Logo_HiRes_Transparent_1023-01-removebg-preview.png00Mike Wadehttps://bbbseed.com/wp-content/uploads/2026/01/47710_BBB_Logo_HiRes_Transparent_1023-01-removebg-preview.pngMike Wade2023-11-09 15:40:252025-06-23 14:54:40Cool Season Planting
Planning ahead-
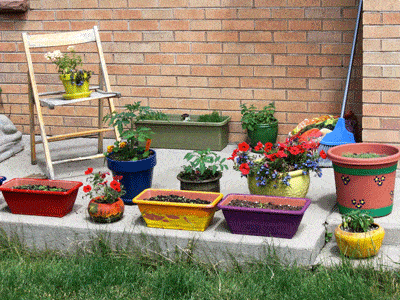
Take a moment to look at the locations where you want to place your containers. Consider such things as sunlight (strength and time) and wind. If you have pots with sun/heat-loving plants, arrange them to shade your pots with those plants that need less sun and heat. Tall plants or plants that vine can be trellised to grow vertically and provide a natural barrier for tender plants. Make sure to anchor trellises and containers with tall plants, to keep them from getting blown over. If you plan to place your containers on a covered porch or balcony or any place that receives limited sunshine, you should select vegetables and flowers that don’t require as much. Leafy greens, snap peas, Chinese mustards, and kale will do quite well in these conditions, but tomatoes, and peppers, probably not.
When growing your garden in containers rather than a garden plot, it is just as important to choose varieties that will be able to reach maturity in your growing season. If you have a short growing season, check the maturity dates on the packages and plan to start some seedlings in the warmth of the indoors to get a jump on the growing season.
These varieties are not practical for container gardening due to their size or length of growing season (At the end is a list of vegetables/plants that will do well in containers.):
Watermelon and most cantaloupes (although there are some midget varieties that can do well)
Large Pumpkins and winter squash
Corn
Head cabbage (except as microgreens)
Mammoth sunflowers (except as sprouts or micro greens)
Beefsteak type tomatoes
Garlic bulbs/full sized Onions
Make sure to prepare your containers and pots properly, to give your veggies the best chance possible. You will be surprised by how much those little seedlings will expand, and there is as much growth below the soil as there is above the soil, so don’t squeeze them into tiny containers. Any type of vessel can be used, just keep in mind the size of the plants and the location. Terra cotta pots are inexpensive but dry out more quickly than others, metal tends to get quite hot in the sun, and plastic is versatile and lightweight.
………………………………………………………………………………..
Getting started-
For Container Gardening, start your long-season varieties, indoors, in good quality starting soil or soilless mixture. Seedlings should be kept consistently moist (not wet) and exposed to fairly strong light, sunlight, or florescent, for at least 10 – 12 hours each day as soon as sprouts appear. This will keep them from getting leggy and looking for light. Seedlings that are sown more closely together can show more vigor as their roots symbiotically help each other extract nutrients from the soil. As the first true leaves appear, choose the strongest seedling starts that you will need for your containers and clip off the remaining which gives the strong ones some space to expand. Transplant to pots and containers shortly after the first true leaves appear. When transplanting to your containers and pots, make sure to space the seedlings according to the package directions for each type of vegetable.
Here are some plants that do not like to be transplanted. Instead, start them in individual moss starter cubes or use homemade newspaper pots or toilet paper tubes that can just be set into your containers at the appropriate spacing.
Beans Squash Burnet
Chinese Cabbage Borage Chervil
Cucumbers Caraway Pumpkins
Melons Coriander Dill
Root crops (except beets, turnips, and celeriac)
Make sure that your container has drainage holes in the bottom. Place a couple of layers of newspaper in the bottom of the pot to keep soil from falling through the holes, then place a 1-inch layer of moss on top of the newspaper. If you don’t have a source for sphagnum moss, coarse gravel will work. Fill the container with good, rich pre-moistened, potting soil, leaving room at the top. Pat it down firmly to fill in the spaces but do not pack hard. Take your young transplants (holding by the leaves or root ball, not the tender stem) or degradable seedling pots, one at a time, placing each on the top of the soil. Spread out the roots, and sprinkle more pre-moistened soil over the roots, covering them completely. Use enough soil to bring the level up to just under the first leaves for most seedlings. Do not cover the crown on plants such as lettuce. The plant’s first leaves should be at the level of the top of the container. Pat the soil gently, firming it over the roots and young stems. Water your containers when the soil feels dry in the top few inches. Continuously wet soil suffocates the roots and encourages bacteria and fungi to grow. Usually, we water when we have time or are home, but watering when needed instead of on a schedule is usually best. Avoid wetting the leaves as much as possible. Try to use tepid water and if you are using chlorinated tap water, allow it to sit overnight exposed to air to dissipate the chlorine which can damage plants and kill beneficial soil bacteria.
Fertilize with low doses of good quality organic fertilizer every 7-10 days.
Don’t be shy about removing plants that are past prime or are beginning to bolt. Removing these will leave spaces where you can plant another round of short-season varieties and ones that prefer to mature in the cooler weather of fall. Lettuces and other leafy greens are good for this, maybe another round of snap peas, beets or radishes, arugula, and bunching onions. Mustards and kales and fennel love the cool days of fall
……………………………………………………………………………….. Design – Container Gardening can be beautiful
Create groupings with your pots and experiment with variations in height, by placing some containers on concrete blocks or other empty containers turned upside down. This adds visual appeal and at the same time maximizes the space available. Groupings also help to make the job of watering a bit easier. Pick a particularly spectacular container plant to be the visual focus and arrange other not-so-pretty container plants around.
Make your containers a bit more decorative by planting different varieties together in one pot. Use the spaces under taller plants to place smaller herbs and leafy greens. Some vegetables live in harmony with one another, some are actually beneficial to each other and some hate each other. Mix colors and textures and think about including edible flowers tucked in around the edges. See the article, Flavorful Flowers. Check each variety on our website to see if your combinations will work together. Here are some examples:
• Lettuce does well with beets, bush beans, pole beans, cabbage, carrots, cucumbers, onions, radishes, and strawberries. You can also plant your lettuce at the base of young sunflowers for a little shade.
•Celery, dill, onions, and potatoes are great companion plants for cabbage. Planting clover with your cabbage will keep insects away and chamomile will improve the flavor. Cabbage does not like strawberries, tomatoes, peppers, eggplant, rue, grapes, or pole beans.
•Cauliflower is compatible with basil, beans, dill, garlic, hyssop, lettuce, mint, onion, rosemary, sage, and thyme. It does not like grapes and rue.
•Plant your peas with bush beans, pole beans, carrots, celery, cucumber, eggplant, parsley, radish, spinach, strawberry, sweet pepper, tomatoes and turnips. Keep your peas away from chives, and onions.
•Tomatoes grow well with asparagus, basil, beans, carrots, celery, chives, cucumber, garlic, head lettuce, marigold, mint, nasturtium, onion, parsley, peas, peppers and marigold. Basil will repel flies and mosquitoes from your tomato plants while also improving their growth and flavor. Beebalm, chives, and mint will improve the health and flavor of your tomatoes. Keep potatoes, fennel, dill, cabbage, and cauliflower away from your tomato plants.
………………………………………………………………………………..
VEGETABLES/PLANTS THAT DO WELL FOR CONTAINER GARDENING:
Beans (Pole and Bush types)
Direct sow into containers when night temperatures reach 60 degrees F, 6“ minimum soil depth, full sun, and harvest in mid-late summer, Provide a trellis or climbing structure Beets – Direct sow into containers in early spring and late summer, 6” minimum soil depth, full sun to partial shade, harvest early summer and again in fall Carrots (Nantes, Round, or Finger-type are best for containers) – Direct sow into containers when night temperatures reach 60 degrees F, 8” minimum soil depth, full sun, harvest in summer through fall. Cucumbers (vine or bush-types) – Direct sow into containers when the day temperatures reach 70 degrees F or start indoors and transplant, 10” minimum soil depth, full sun, harvest in summer, Provide a trellis or climbing structure for vine-types. Eggplant – Start inside 8 weeks before temperatures usually reach 80 degrees F for your area, then transplant to your container, 10” minimum soil depth, full sun, and harvest late summer. Leafy Greens (Swiss chards, Collards, Kales, Mustards, Asian Greens, Pak Choy) – Direct sow into containers when the nighttime temperatures are above freezing, or, start indoors 3-4 weeks before and transplant, 8” minimum soil depth, full sun to partial shade, harvest late spring through winter. Lettuces and Salad greens – Direct sow into containers after Spring’s last frost date, or start indoors 4 weeks before and transplant after hardening off when about 2 “ tall, sow seed again in early fall, 6” minimum soil depth, full sun to partial shade, harvest spring through early summer and again in fall. Onions, Garlic, Leeks – Direct sow into containers after Spring’s last frost date, 6” minimum soil depth for bunching onions and young (green) garlic, 8” for Leeks, full sun, harvest summer to fall. Mounding soil up around the base of bunching onions and leeks will encourage long white stalks. Grow garlic in containers to use the green shoots and any small bulb growth. Peas – Direct sow into containers when the soil is no longer frozen, Soaking the seeds overnight will speed up germination, use an inoculant (a beneficial bacteria that enables the roots to use the nitrogen pulled from the atmosphere and stored in nodules on the roots), especially when planting into containers with new potting soil. 8” minimum soil depth, full sun, harvest in late spring to early summer with secondary fall crops possible, Provide trellising for vine-types or cages to support bush-types. Peppers – Plant seeds indoors, keeping at 80 degrees F for about 2 weeks, starting 10 weeks before nighttime temperatures remain above 55 degrees and daytime temps reach at least 70 degrees. Transplant into containers after hardening off, 8” minimum soil depth, full sun, and harvest in late summer. Potatoes – Plant disease-free seed potatoes in a large container (30” deep, 20” across) filled 1/3 full of potting soil, 5-6 “ apart, and cover with 2 inches of soil, When plants are about 6” tall cover the bottom half with potting soil, continue doing this as the plant grows until reaching the top of the pot. Full sun, harvest summer to fall. Radishes – Direct sow into containers when the soil is no longer frozen and every other week till late spring, 4” minimum soil depth, full sun to light shade, harvest all spring and second harvest in fall. Spinach – Direct sow into containers when the soil is no longer frozen, replant first of August for fall, 6” minimum soil depth, full sun to partial shade, harvest in spring, early summer, and fall. Squash (zucchini, yellow summer, yellow crookneck, patty pan, mini pumpkins) – Plant seeds indoors 2-3 weeks before the spring last frost date, transplant into sunny, warm containers, and cover with a row cover for several days, 10” minimum soil depth, full sun, harvest summer to early fall, pick when young and small, provide trellis and support for vines. Tomatoes – Plant seeds indoors keeping them at 75 degrees F for about 2 weeks, starting 6-8 weeks before Spring’s last frost date, transplant at least once to another larger pot when they have 3 sets of true leaves burying them up to the first set of true leaves, keep in good light, 12” minimum soil depth, full sun, harvest late summer and fall. Herbs – Herbs are mostly perfect plants for container gardens, being small and not fussy.
Sharing plants is a simple joy in life. Sharing plants and making money, well that’s even better. Read on to learn how to share your plant starts for profit.
My happy group of gardening buddies first got to know each other because of our great avarice for more seeds. We had all joined a local gardening email list so we could talk more about plants and gardening, but the more we spoke with each other, the more seeds and plants we wanted. Every time someone mentioned a new variety of tomatoes or annual flowers or ground cover, we had to have one of those.
The first year, we decided to meet in person and share seed packets. Armed with dozens of recycled envelopes, we doled out tiny seeds to each other, taking home three Cherokee purple tomato seeds or six cosmos seeds. This quickly became confusing and chaotic and required so many tags in our seed trays. So the next year we decided to become more economical. We’d each buy a packet of seeds and grow out all the plants…and then swap our plant starts. We definitely got more plants than we would have grown on our own and we each had unusual varieties you can’t buy in stores.
But the third year of our avarice proved to be the year we figured out that we could get as many seeds as we wanted…and they practically paid for themselves. All we had to do was start our seeds and sell 2-month-old plant starts to each other and to the other greedy gardeners who envied our ever more diverse gardens. We learned that anyone can sell healthy organic heirloom tomato starts, especially if you have pictures of last year’s garden.
You can try your own mini plant exchange and sale. We price our seedlings cheap ($1 or $2 at most). I can afford all the heirloom tomato plants I want if I just sell three seedlings for $1 from each seed packet. Throw in some herbs and flowers and soon the plants barely fit in the car. Our little group now has a giant plant sale every May where everyone brings their plants to sell to each other, but thanks to free advertising on Craigslist and neighborhood electric poles, we also sell our humble little plants to the public.
Avarice never ends, of course, and now we have to grow more plants so we can make money so we can afford backyard greenhouses. Last year our small group of about 12 home gardeners sold some $4000 worth of plants that they started in closets and on top of refrigerators just two months before. Not enough to get rich, but enough to buy more seeds, build hoop houses and season extenders, and have a load of precious organic sheep manure delivered to our gardens.
So enjoy your seed shopping and think about swapping some of the plants you start with others. We learned that while there is no end to avarice among gardeners, there is also no end to generosity. It is a great joy to have an abundance of little plants to share with friends and strangers.
https://bbbseed.com/wp-content/uploads/2026/01/47710_BBB_Logo_HiRes_Transparent_1023-01-removebg-preview.png00konabirdhttps://bbbseed.com/wp-content/uploads/2026/01/47710_BBB_Logo_HiRes_Transparent_1023-01-removebg-preview.pngkonabird2022-11-18 18:14:002025-06-23 14:54:40How to Share Your Plant Starts for Profit
A cover crop is simply a dense planting of quick-growing plants that protect the soil and can provide many nutrients to the soil. The most common cover crops are grasses/grains such as Winter Rye. The other favorites are legumes such as clover, vetch, and peas that fix nitrogen in the soil. When the green cover crop plants are tilled into the soil it is called a “Green Manure” crop. These terms are used alternately. You can plant cover crops; during the growing season to keep weeds at bay, in the fall to overwinter adding nutrients and protecting the soil, or in the spring for areas where you will be planting later crops.
Why plant cover crops?
They hold the soil in place. Providing protection from wind and water erosion. The dense planting provides weed suppression. Winter Rye actually has allelopathic properties that inhibit other plant growth. Cover crops enrich the soil by nitrogen fixation from legume plant species and add organic material for helping the soil structure and providing food for beneficial microbes and worms. Cover crops help to reduce garden insect pests by attracting beneficial insects and bees and bumblebees are attracted to the early blooms of some of the species.
Soil Protection:
Protecting the soil is very important. Planting a cover crop is like a living mulch. The roots hold the soil in place and penetrate deeply into the earth, bringing moisture, nutrients, and airway down into the depths. The leaves shade the top of the soil keeping the top from desiccation from wind and sun, and allowing the microbes and earthworms to continue to enrich the soil. Allowing annual cover crop species to just die in place and cover the soil aids in this process and during the winter helps to hold the snow on the soil. It is important to mulch to cover the soil even if you are not using a cover crop. Just use leaves, newspaper, or cardboard covered with burlap or netting to hold it down. The worms love decaying leaves!
Weed suppression:
Cover crops help to combat weeds firstly by sheer numbers. Cover crops need to be planted thickly. Weeds love bare soil! Planting a cover crop in the fall to till under in the spring is a good way to get ahead of the spring weeds. Try to get a fall-planted cover crop for spring tilling in at least 1 month before killing frosts in the fall. Use a spring-planted cover crop to combat weeds in areas between rows of crops or in orchards. Cover crops are effective whether you till or not. They can just be mowed off and in cold winter areas, most annual cover crops die on their own and are a good mulch in place even when dead.
Soil enrichment:
Clovers and legumes enrich the soil by taking up atmospheric nitrogen in nodules in their roots. They are able to achieve this because they are a host to a bacterium, Rhizobium. The relationship between these plants and Rhizobium is symbiotic, meaning they are mutual beneficiaries. The bacteria are fed by the plant and the plant is fed by the bacteria. Plants cannot use nitrogen the way it exists in the atmosphere. Rhizobium converts atmospheric nitrogen into a useful form for plants and animals to utilize. Rhizobium takes up residence in the plant’s root system and forms nodules. Clover and other legumes are susceptible to this type of bacterial “infection” and that is why these plants are great fertilizing plants.!
What is a wildflower? Well, a wildflower is any flowering plant that has not been altered from its wild state. These plants have had no selective breeding, no genetic modification, and are all natural! These little beauties can be found in nearly any environment; from mountains to prairies, swamps to deserts! Wildflowers provide vital habitats and forage for wildlife, like our favorite butterflies and bees, and beautiful sights and scents for us lucky gardeners.
We take our favorite wildflower seeds and blend them into these mixes specially formulated for unique regions, conditions, and uses. We make sure to use fresh, high quality, open-pollinated, GMO-free seeds because you deserve to have a successful, healthy, and fun planting experience. Our mixes are all seed with none of the fillers that you might find in other mixes because we believe you should get what you’re paying for.
We love Annuals! This mix brings vibrant and long-lasting color to any site. This mix includes great wildflowers including Scarlet Flax, California Poppy, and Desert Bluebells that will add immediately to any drab or “worn out” spots on your property. This mix also reseeds well, so you can enjoy these annuals year after year!
Not every spot in your garden is going to replicate the open, sunny meadows most wildflowers are adapted to. We understand and think that every inch of your space deserves to be colorful and wild! That’s why we came up with our Wildflowers for Shade Mix! This mix is a blend of annuals and perennials that are tolerant to partial shade. This mix has over twenty annual and perennial seeds to ensure that you get great color and varied blooms for years after you first planted.
The Low-growing Wildflower Mix is the perfect mix for people who want the wildflowers but not the wild height! While some wildflowers can get up to three feet tall, this mix is designed to grow low and compact (6-12 inches). We really dig (pun intended) how manageable and controlled this mix grows. It includes poppies, clover, and flax for a great mix of color and shapes that will make your garden the talk of the town (in a good way)!
What’s better than waking up on a cool summer morning, walking outside, and being greeted by the smell of a field of beautiful wildflowers? How about a field of wildflower that you planted yourself! Sounds perfect to us! Our Fragrant Wildflower Mix is one of our personal favorites. We hand selected the flowers this mix of annuals, perennials, native and introduced wildflowers to grow well in many geographical regions and to smell wonderfully aromatic! Plant this mix around your patio and walkway and be greeted by its wonderful scent every time you stroll by.
Nothing is more frustrating than toiling in the garden, planting seeds and starts, caring for them, and proudly watching them grow than to come out one morning to see a family of deer happily munching away at your precious plants! We get it. That’s we created the Deer-Resistant Wildflower Mix to include species that deer and elk will usually avoid if another preferred forage is available. This mix includes perennials that will begin blooming during their second year. Now you can enjoy the beautiful deer (and elk) in your area without stressing out about your garden!
At BBB Seed, we are deeply committed to providing the highest quality grass, wildflower, and grass seeds to empower our customers to get out and grow! This list of our Most Popular Wildflower Seeds is intended to be a useful resource for you to see what products our customers and we are enjoying right now!
We also are incredibly concerned about providing sustainable and environmentally conscious products to you. We source seeds that are non-genetically engineered, tested, and grown sustainably. We hope these products will help you enjoy nature and learn about this wonderful world in the garden. We also strongly encourage you to visit our Pollinator Action Page to learn about the pollinators that make our natural world possible and learn more about what you can do to help them. Thank you!
Grow. Enjoy. Share…the beauty and the bounty!
https://bbbseed.com/wp-content/uploads/2026/01/47710_BBB_Logo_HiRes_Transparent_1023-01-removebg-preview.png00Sam Dollhttps://bbbseed.com/wp-content/uploads/2026/01/47710_BBB_Logo_HiRes_Transparent_1023-01-removebg-preview.pngSam Doll2019-04-23 12:25:332025-06-23 15:01:42Our Most Popular Wildflower Seed Mixes May 2019
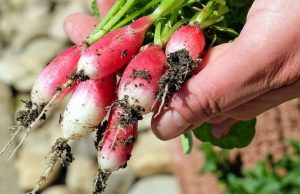
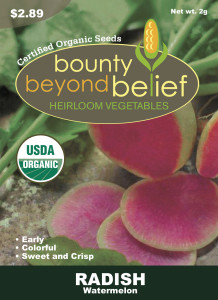
There are two primary types of radish – one hails from Asia (the most common ones are daikon which is large and white) but there is also the large sweet and remarkably pink Watermelon Radish.
Watermelon radishes are delicious raw and can be substituted for a cracker in crudités and they also make a crunchy addition to stir-fries. They are often used in Chinese cuisines with fish dishes because it adds sweetness and counteracts fishy tastes.
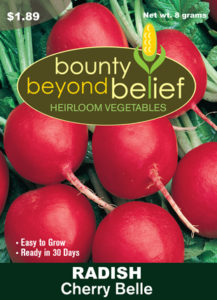
2. Radishes are very easy to grow and can be sown in the garden as soon as the ground can be worked. Cover the seeds with about 2 inches of soil and thin them out once they sprout. They germinate quickly and all at once so, to keep them from getting overly large and fibrous, they should be sown multiple times throughout the season. They grow well in cooler temperatures which makes them a good spring and fall crop. One that is delicious cooked or raw is Cherry Bell.
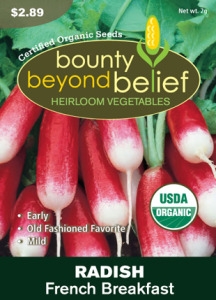
3. Do you want a taste of France in your radish? French Breakfast Radish is an heirloom variety dating back to the 1800s. It gets its name from a popular and delicious breakfast enjoyed throughout France. Want to give it a try? Just thinly slice the radishes lengthwise, grab a hunk of baguette and smear it with some sweet butter, top with radish slices and a sprinkle of salt. Close your eyes, take a bite and then say “Ooh, La, La!”
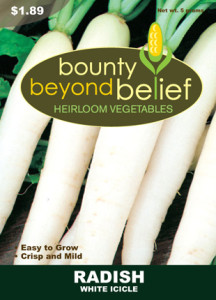
4. The White Icicle radish resembles small Japanese daikon but is sweet and tender. It is another heirloom variety that is easy to grow but is very versatile because it can tolerate warmer temperatures and grow well into summer weather.
Relish the radish in this recipe:
APPLE RADISH SALAD
2 Granny Smith Apples
1 bunch sliced or julienned White Icicle radishes
Dressing:
Juice from one orange (lemon is also good here)
2 tsp honey
1 tsp Dijon mustard
1 tsp fresh thyme leaves
¼ cup olive oil
Salt and ground black pepper to taste
5. Want to really add some color to your fish or other tacos? Shred this colorful blend from the Carnival Blend radishes and pile it on with a squeeze of lime and some chipotle mayo. All radishes are good in slaw but this one gets bonus points for the interesting colors.
Or relish the radish in this version of a vegetarian radish taco where the radish is the star of the dish. This version is modified from superstar chef Anita Lo’s book Solo.
ROASTED AND PICKLED RADISH TACOS
Serves 4
3-4 bunches of radishes washed (reserve the tops and 10 of the smallest radishes for later)
1/3 cup olive oil
4 smallish tomatillos, husk removed, cut in half
3-4 small jalapenos, cut lengthwise with stems and seeds removed
1 tsp cumin
One small onion, sliced thinly
3 garlic cloves, smashed (reserve 1 for later use)
6 Tbs cider vinegar
2/3 cup water, divided in half
¼ tsp cinnamon
Juice of one lime
1 Tbs chopped cilantro
8-12 corn or flour tortillas
¾ cup queso fresco, crumbled
Extra lime wedges for serving with tacos
Preheat oven to 400 degrees. Place all but the reserved radishes, their tops, the olive oil, the tomatillo and half the jalapeno in a bowl and toss with salt and pepper. Remove the tomatillo and jalapeno and place them on one side of a roasting pan. Add the cumin and cinnamon to the bowl of radishes and toss again. Place radish mixture (except for the tops) on the other side of the roasting pan. Bake until softened, about 12-15 minutes.
Make radish pickles: Cut the reserved radishes in thin rounds and place them in a bowl with the rest of the jalapenos and the onion. In a small sauté pan bring the vinegar, 1/3 cup water and two of the smashed garlic cloves to a boil and pour over radish rounds. Set aside to cool to room temperature and drain.
When the roasting vegetables are soft, remove the tomatillo and jalapeno and blend with an immersion blender. Add tops of radishes to roasting pan and roast until wilted. Place the remaining third garlic clove in with the tomatillo, cilantro, lime juice, 1/3 cup water and blend to make a salsa.
Serve roasted radishes in warm tortillas garnished with salsa, pickled radishes and queso fresco. Serve with lime wedg1es.
https://bbbseed.com/wp-content/uploads/2026/01/47710_BBB_Logo_HiRes_Transparent_1023-01-removebg-preview.png00Mike Wadehttps://bbbseed.com/wp-content/uploads/2026/01/47710_BBB_Logo_HiRes_Transparent_1023-01-removebg-preview.pngMike Wade2019-02-26 05:00:362025-06-23 15:01:43FIVE REASONS TO RELISH THE RADISH
 garden by weeding is one of the keys to keeping your crops productive and your enthusiasm strong. Here are some great weed-prevention strategies, and simple techniques for a relatively weed-free garden.