Growing for Chickens

What to grow for your chickens

By Sandy Swegel

Reading our Facebook posts lately on how yummy eggs from backyard chickens are got me thinking about what makes homegrown eggs taste so much better than store eggs.

A varied diet helps a lot. Commercial chickens pretty much get a straight corn-based diet with vitamins and minerals added in. Happy home chickens can still eat commercial food, but they usually get lots of food scraps too. That’s when the eggs start tasting better. When the chickens get lots of protein like bugs and worms, that’s when the eggs get really good.

Here’s what my chickens love:

Kitchen Scraps

Any and all scraps go to the chicken. Even meat if it is cooked. (The shocking secret I learned about chickens is that their favorite food is chicken….especially the scraps from fried chicken.) Chickens aren’t terribly smart in general, but they are savvy about food. If something is moldy or too full of pungent foods like onions, they just scratch it aside looking for bits of fruit or tomatoes or meat. Their favorite foods are things kids like. Noodles are a big hit. So are cherry tomatoes.

Weeds and Garden Waste

All the crab grass, dandelions, seed heads, dock leaves, grass clippings, etc go into the chicken run. They go for the greens and seeds first and push the other stuff around. Grass is apparently yummier in the Spring than in mid-summer when they just look at me and say “Meh.”

Bugs

This is the best secret to having delicious eggs….lots of proteins especially from living crawling things. All those kitchen scraps and weeds that don’t get eaten get raked into the corner and turn into compost with lots of earthworms. At some point in their random scratching, the chickens figure this out and turn the compost pile with great delight. Somehow plenty of earthworms manage to survive. I throw in extra bugs too: slugs, cabbage worms, box elder bugs, maggots, anything I don’t want in the garden. One other icky-to-think-about critter they really love to eat are mice.

Spent beer grains

Our local breweries put out their spent grains and hops for farmers and gardeners to recycle. These grains are usually a bit fermented which makes the chickens very very happy. The fermentation adds extra nutrition, happy, slightly drunken chickens make delicious eggs.

More greens

My chickens have to stay in a fenced run because of the large number of foxes and coyotes in our area. So I plant food all around the edges of the run so they can reach their heads through the fence to nibble but not actually destroy the plants by pulling them up. Currently growing are comfrey, chard (their favorite, I think they like the salt), kale, and wild grasses and dandelions (they like the flowers).

So plant for your chickens and they will reward you with the best-tasting eggs and lots of entertainment.

Photo credits:
http://www.urbanfoodgarden.org/main/composting/composting—compost-bins-in-chicken-run.htm

Kelp: A Gardener’s Best Friend

Why to Use Kelp in Your Garden

by Sandy Swegel

Our local garden club invited a rose expert from Jackson and Perkins to give us some winter inspiration this week. Rose growers are like tomato growers….they have their own little secrets and rituals to make their roses the best and the biggest. Our expert showed us pictures from his own garden that made me a believer in kelp. His plants treated with kelp and fertilizer were bigger and more robust than plants treated with just fertilizer If you are going to use soil amendments in your garden, kelp should be at the top of the list right after organic fertilizer.

So what does kelp offer?

Sea Minerals.
Kelp and other seaweeds are good sources of trace minerals that are often deficient in ordinary garden soil. So kelp is a good ingredient as a fertilizer…but not a substitute for your regular fertilizer.

Plant Growth Hormones.
OK, this is the real reason gardeners love kelp. Its natural plant growth hormones (cytokinins) stimulate extra growth in our plants and in our soil microbes. This is the “secret weapon” part of using kelp in your garden. Kelp stimulates roots, plant growth, flower production by virtue of the hormones even more than because of the vitamins and minerals.

Plant Health and Resilience.
Plants treated with kelp showed more drought resistance and bug resistance. Aphids, in particular, don’t like the taste of kelp and avoided kelp sprayed leaves. Anecdotally, I have found that a kelp foliage spray reduces powdery mildew.

How to Use Kelp

Kelp comes as kelp meal and as a liquid. An interesting thing about kelp is that when you apply kelp changes what kelp does for your plant. If you want sturdier roots, add kelp meal when planting to stimulate root growth. If you want more flowers on roses or tomatoes, apply it as a spray when your plants were budding. (Thanks researchers from the marijuana industry for these studies.) Some tomato growers use kelp weekly once tomatoes start to flower. If you are trying to improve your soil, apply meal or liquid to the soil once soil temperatures are above 60 or so when soil microbes are active. I like to use a weak kelp liquid spray weekly during hot spells in summer and spray all over the tops and undersides of leaves. It perks the plants up and gives the garden a lovely ocean smell. Plants absorb kelp better through leaves than through roots.

How Not to Use Kelp

More kelp isn’t better than small amounts of kelp. Don’t just throw it on your garden thinking more is better. Think about what effect you want. Do you want more tomatoes? Then applying kelp when the tomato is growing leaves but not making flowers yet will give you more leafy growth, not more tomatoes. On the other hand, a little kelp spray on your greens will increase the number and vitality of leaves.

Do Your Own Experiment
If you are going to add kelp to your repertoire, try a science experiment. Select a plant that you give kelp to and one a little further away that doesn’t get kelp. Do they behave differently?

Cabbage and Clover Husbandry

Cover Crop Seeds

by Sandy Swegel

St Patrick’s Day is this week…a traditional day for planting peas. But you know that….so get ready to plant your peas. This year I’m thinking about Ireland and two plants usually associated with Ireland: cabbage and clover (not necessarily the four-leaf variety.) A little internet browsing led to an interesting connection to these two plants. One…they both like to grow in cool humidity like Spring and Fall. Cabbage is a cool season crop. Two… old country wisdom and modern science show that cabbage and clover are excellent companion crops.

Books in England dating back to the 1700s recommend cabbage “Husbandry” the old word for farming. Cabbage was highly regarded because it lasted well as a stored food for winter and because cows and sheep that ate cabbage in the winter made sweeter milk than those that ate turnips. Standard practice in England in the olden days was to plant a clover cover crop and follow that with cabbage or potatoes. Turns out that cabbage that grows in clover or where clover had been grown and tilled under are larger and have significantly fewer pests included the cabbage looper. Cabbage moths are still the bane of cabbage growers. Modern no-till farmers have adopted this centuries-old wisdom to plant cabbage right into a field of clover.


Besides being good for cows and sheep, cabbage is healthy for us and a staple in many cuisines. I am particularly fond of the red cabbages because they are pretty! Here are a few tips to grow cabbage:

It’s a cool season crop.
That means you have to get it in early. Or plant it in mid-summer for fall harvest.

They do well from transplants.
Start seeds indoors or in a cold frame 8 weeks before last Spring frost. Then transplant it about 2-4 weeks before last Spring frost. Cabbage is a “heavy feeder” so you need good soil or extra fertilization and regular irrigation.

Watch out for pests.
Cutworms and cabbage loopers love cabbage too…but they are pretty easy to pick off if you stay after them. Little paper collars protect transplants from the cutworms. If you don’t like to pick off the worms, it is good organic control.

Cabbage makes great microgreens.

Cabbage germinates in about two days in your warm kitchen. Another superfood from the brassica family.


For more on the science of winter-sowing clover and cabbage and other brassicas
http://www.ctahr.hawaii.edu/oc/freepubs/pdf/IP-27.pdf
http://www.modernvictorygarden.com/apps/blog/show/2015631-in-praise-of-cabbages
http://microgardening.newearthmicrogreens.com/red-cabbage-microgreens-vitamins/

Aphids Q&A

Gardening TipsImage by <a href="https://pixabay.com/users/mabelamber-1377835/?utm_source=link-attribution&utm_medium=referral&utm_campaign=image&utm_content=4243855">???? Mabel Amber, who will one day</a> from <a href="https://pixabay.com/?utm_source=link-attribution&utm_medium=referral&utm_campaign=image&utm_content=4243855">Pixabay</a>

By Sandy Swegel

We got a great question from a customer this week about controlling aphids. Her frustration resonates with most of us who garden.


Q. Aphids are terrible, tiny creatures and I fight them every year. I’ve been looking for the best ways to make sure they don’t screw with my garden this time. I thought I had a good way; planting garlic around the plants. “Aphids don’t like garlic,” one link said.  “Aphids love garlic leaves, said another one. Soap mixture, Neem oil, rubbing alcohol mixed with soap and water, importing good bugs that love to eat the aphids. I refuse to use chemicals that poison everything, it makes growing organic pretty pointless. Does anyone have any SURE FIRE, tried, and true methods?

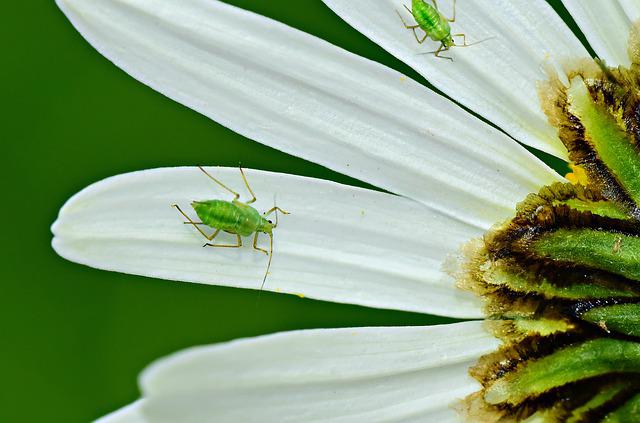
A. The key to reducing aphids in your garden is to understand their lifestyle. Controlling them is like cleaning the house. You can’t just clean a house full of people once and expect the house to still be clean a week later if you didn’t keep picking up stuff all week. When you use any treatment you might kill most of the adult aphids that day. But the ones you missed or who were eggs that wouldn’t hatch for another day, are still eating and reproducing. Reproduction is the key to aphid success. They reproduce both sexually and asexually. They lay eggs to survive the winter. And they have live births in warm weather. Each one can create up to 100 new aphids per month.


My best sure-fire, tried and true method (or as close to that as one can get) is this:

Accept that you are going to have some aphids. To kill them all, even if possible, means you would also kill all the beneficial insect pollinators and you don’t want to do this.


Understand how aphids die. Warning: graphic content ahead.
It is super easy to kill aphids, which is why plain water spray works great. Aphids feed by attaching to the plant with their mouths. When you spray water on the aphids, the force of the water tears the aphid off the plant. The head and mouthparts stay attached to the plant, instantly killing the aphid. Even just brushing off all the aphids on a leaf with your finger decapitates and kills all those aphids. That’s why you don’t have to poison them…if you can just mechanically remove them.

Be vigilant (every few days) about checking for aphids.
New aphids are hatching in leaf litter or being birthed by the aphids who were hiding out in the weeds next door. You have to spray the aphids every time you see them in large numbers. Each aphid can have dozens of generations…They are baby-making machines. You have to keep after them at least until you see you are no longer getting infestations.

Be careful not to eliminate beneficial insects.  There’s yet another reason not to try to kill off aphids outside, even with “safe” organic treatments like soapy water. If you kill the aphids, the aphid-eating wasps, another of those native beneficial insects, won’t have anything to eat and they’ll leave your garden.  They are eaten by so many beneficial insects that it’s rather amazing that we see any at all. Yet there are so many on our plants at times.

This week I’m seeing thousands of them on the new growth of roses. And while my first instinct is to kill them in some way, I have finally learned to just watch them. I know what I am seeing is a mini-population explosion that will usually be followed in a week or so by mini-population explosions of predators that eat aphids. If we try to kill off the aphids which are at the bottom of the beneficial insect food chain, then the beneficials will fly away to another garden.

I knew about many of the predators of aphids like ladybugs and lacewings, but I learned yesterday that tiny native aphid-eating wasps eat a LOT of them. In addition to wasps that just eat the aphids, there are parasitic wasps that lay their eggs inside of them. When the eggs hatch the tiny larvae eat their way out of the aphid. A bit gory, but effective in guaranteeing enough food for baby wasps.

So I challenge you to a two-week experiment. Let the aphids be when they show up and just watch the plants for a few days. See who shows up to dine on them. Some possibilities include wasps, both large and small, hoverflies, ladybugs, and lacewings. It will be a fascinating discovery of how many small beings live in your garden, there to help you keep everything in balance.
Nature does provide a natural balance if you have a healthy garden that supports beneficial insects. If you are aggressively treating aphids with garlic or neem sprays, you are also killing all the other insects that eat aphids.

Alter the conditions in your garden that reduce the number of aphids.Fighting Aphids on Organic Lacinato Kale

Don’t over-fertilize. Aphids love nitrogen. You will get a little aphid bloom every time you add nitrogen to your plants. Reduce the nitrogen and you don’t have so many of them.

Encourage earthworms and use earthworm castings. Earthworms produce an enzyme chitinase to help digest their food. Aphids are repelled by chitinase. Unfortunately, the chitinase doesn’t last long enough to be the only deterrent.

Encourage good environmental conditions like airflow and temperature. This works really well indoors. In my greenhouse, I can reduce aphids by keeping a fan going and shading the plants from the really hot afternoon sun. They are often in greater numbers on plants that are stressed.

Finally, if you do want to use “organic” sprays, simple soapy water works well. (1 teaspoon per gallon). Some people use the kitchen spray with garlic and Tabasco sauce. I think the science is not clear on neem. It definitely works but it works by disrupting insects’ hormonal systems and I’m not convinced it doesn’t adversely affect beneficial insects. Some studies say Neem only kills sucking insects. I would try gentler methods first before turning to Neem.

More about gardening and aphid control

More about interactions between predators of aphids


Photo credits:
https://en.wikipedia.org/wiki/Aphid


Feed the Tomatoes and Veggies

Heirloom Vegetable Seeds

By Sandy Swegel

So more of them will feed you.  Last week we talked about being on the home stretch for the vegetable garden (at least here in Zone 5.)  Lots of plants are super stressed this year by early rains and now intense heat.  In Colorado, some farmers are only now getting their first tomatoes.  But unless your tomato plants already have too many tomatoes on them, this is a great time to feed the tomatoes and veggies by boosting their final production with a good liquid organic fertilizer…either a balanced nitrogen-phosphorus mix, a bloom, or kelp.  There’s still time to get more tomatoes and bigger tomatoes, so give the plants a reward for making it so far. I even fertilized the zucchini…our delayed season means even the zucchini are slow.

We’ve had blistering heat that has sun-scalded our basil and some greens.  I’m doing a light feed to these plants too as compensation for all the suffering they’ve had to go through this year.  Some people throw some row cover over greens when the sun is intense to give a little protection.

But tomatoes don’t need any protection from the sun as long as they have consistent water.


One other tomato season task:  Do a taste test while the tomatoes are at their peak.  It’s amazing how differently the same variety will taste from year to year….and sometimes you’re the one who has changed and you find you like some flavors more than others.  Organize a testing with friends who bring their varieties, and you’ll have a fine summer party.  So far Black Krim is still my favorite (in big tomatoes; Red Cherries are still my favorite eat off the vine taste.


Photo credit

https://goingtoseed.files.wordpress.com/

http://centerofthewebb.ecrater.com/

When are your tomatoes ready to pick?

Tips for Picking Tomatoes

by Sandy Swegel

You might think this is a completely obvious question. You pick tomatoes when they are red and falling off the vine ready to eat. But I asked a few gardening friends how they decided when to harvest tomatoes and as always, with gardeners, there are more opinions than people.

The basics:
Tomatoes ripen from the inside out, so if they look ripe they are. General characteristics of a ripe tomato are good bright even color, firm with a little give (not too hard and not soft and mushy.) Several people claim the tomato pulls easily off the vine when it’s ready and doesn’t need to be cut.

If you’re going to make a mistake in picking, pick when the tomatoes are slightly under-ripe They do not have to be on the vine to finish ripening. You might pick early because you won’t have time to harvest tomorrow, or because it’s about to rain and excess moisture often makes tomatoes split open. Hot temperatures in the 90s are a good reason to pick a little early…the tomato will ripen more evenly on your counter than in the blistering sun.


To finish ripening tomatoes inside, you know the rule. Never put tomatoes in the refrigerator. Makes them mushy. They also don’t need light as much as they need warmth. So skip the hot sunny window sill and put them on a kitchen counter.

Heirlooms. Tomatoes used to be red and it was kinda easy to tell when the red was the right color. But now tomatoes are pink and green and yellow, or green on the neck or mostly black. The “firm but not squishy rule works”. Also, there’s an esoteric description of the color: the color just “brightens up” and you can tell it’s ready.

I recommend lots of sampling and fine-tuning your picking strategy.

I also recommend eating at least one tomato completely ripe in the hot afternoon sun. Take a big mouthful and let all the juices and seeds run down your face and shirt as you savor the awesome tomatoey flavor of summer. My neighbor used to take a salt shaker with him out to the garden and salt each bite!


Photocredit:
http://www.heirloomtomatoplants.com


Wildflower Mixes

Grass Mixes

Organic Heirloom Vegetables

Why Won’t my Garden do What I Say?

Tips for Garden Frustration

by Sandy Swegel

That’s the kind of questions I’m hearing these days.  Why won’t my plant bloom?  Why aren’t my tomatoes red? Why does my garden look so bad? Why is my tree dying?  Let’s tackle a few of these questions so you can figure out why it seems your garden is disobedient?

Why won’t my pineapple sage bloom?  It’s so beautiful in the magazines. Salvia elegans or pineapple sage smells deliciously of pineapple and hummingbirds flock to it.  Alas, what I discovered after a season of coaxing and fertilizing is that it will never look so beautiful in Colorado as it does in the Sunset magazine pictures of California.  It’s one of those plants that bloom according to day length and short days to stimulate blooming.  So no matter what we do, it simply is not going to put out blooms till late August.  Since our first frost can be in September, this is a very unsatisfying plant to grow in a northern area with long summer days.

The second part of this question is “Why did all the other fancy hybrid flowers I bought in Spring quit blooming?”  Some may be day length sensitive like the pineapple sage.  Most have issues with our hot dry summer heat.  If you keep deadheading as soon as the weather starts to cool, the blooms will restart.  And there’s no changing Nature’s mind with more fertilizer or water.

“Why won’t my watermelon plants get big?” a friend asked over afternoon tea.  The answer to most questions is to put my finger in the soil. It was dry, dry, dry.  There was one drip tube on the plant but that’s not nearly enough for a watermelon which needs lots of water.  I looked up. The garden was right next to a big spruce tree. The tree was on the north side so the plant had lots of sun, but the sneaky tree roots ran all through the garden sucking up irrigation water. If you’re going to grow a plant with a name like “water” melon…you have to put a lot of water in the system.

The second most-asked question is “Why do I have so many weeds?” The answer is, alas, because you didn’t spend enough time in July keeping after them.  Who wants to weed in the heat of summer?  And summer weeds grow really fast and tall.  You can’t even blink.

The most-asked question, of course, is “Why won’t my tomatoes turn red?”  This year everybody has lots of green tomatoes but not nearly enough red tomatoes. The truthful answer is “D***d if I know. I wish mine would turn red.”  A Google search shows thousands of people ask this question.  People who answer have all kinds of pet theories about leaves and fertilizer and pruning the plant etc. I’m just learning to wait and making a note to grow more early tomatoes next year.

Nature just doesn’t work the way we want sometimes.

Photo Credit: http://eugenebirds.blogspot.com/2010_11_01_archive.html

Straw in the Garden: Be Careful!

Straw May Be Killing Your Crops

by Sandy Swegel

Straw bales are one of my favorite garden tools.  They are useful to the gardener in so many ways.  All nicely tied up, straw bales are like giant Lego blocks that can be stacked to make so many things. I’m using the term “straw” bale, but old “hay” bales have the same great features.  Three bales make a great compost bin.  A row of bales makes excellent walls that double as sitting places.  Open the bales up and you have the perfect mulch to keep strawberries or squash off the ground or to make a path protected from mud.  Give the chickens one bale and an hour later they have spread it evenly over the coop floor in their pursuit of worms or food in the bale.  A square of bales with some plastic thrown over is an excellent cold frame.  And I haven’t even begun to touch on the usefulness of bales as a fort.

So it was distressing this week to be reminded that we can no longer just trust the wonderful bales that we scavenged in the past because modern agriculture has rendered hay, straw, and even the gardener’s best friend, manure, unsafe for growing food.

This conversation came up because tomatoes are very sensitive to herbicide damage.  The most common cause of herbicide damage extension agents used to see was from “herbicide drift” where chemicals sprayed nearby go airborne and are spread by the wind onto your garden.  But my experience this week was with tomato plants, a very susceptible plant – sort of the canary in the mine.  After considering dozens of diseases from virus and fungus and bacteria that might be stunting a friend’s tomatoes and keeping them from setting fruit, we had to face the likelihood that the culprit was last year’s straw that was liberally mulched throughout the garden.

Hay and straw become hidden poison bombs in the garden when farmers use the new generation of weed killers (that are very effective on weeds) like Milestone or Forefront or Curtail.  Milestone is aminopyralid it is a very persistent killer of broad-leaf plants.  Farmers like it because it kills weeds and because unlike other weedkillers, they can feed treated pasture to their animals without any waiting time.  The label says clearly that while animals can still feed on the pasture, the herbicide survives being eaten by the animals, and it survives composting.  So even year old hay that you’ve composted or nice old manure from free-range animals on pasture still has enough herbicide in it to kill your tomato crop.

The bottom line is you can’t just get straw at the feed store or old hay or manure from a neighbor’s barn to use in your garden unless you know how the original pasture was treated this year and last year.  It’s another sad but true example of the destructive environmental impact even small actions such as applying some weedkiller can have. And it’s not even just the farmer who has to take care.  Grass clippings are a gardener’s favorite mulch…and some of the new weed killers or weed and feed products contain these long-lasting poison time bombs.  It’s easy to want to kill some thistle…but you have to read the very tiny small print to see if you are destroying your own garden by using the organic practices of mulching with grass or hay or straw that generations of gardeners have sworn by.  It’s not your father’s straw bale anymore.

http://www.ces.ncsu.edu/fletcher/programs/ncorganic/special-pubs/herbicide_carryover.pdf
http://www.motherearthnews.com/Grow-It/Milestone-Herbicide-Contamination-Creates-Dangerous-Toxic-Compost.aspx

Carrot Love

Heirloom Vegetable Seeds

By Sandy Swegel


I was noticing very happy pollinators this week: honey bees and native bees, tiny flies, lacewings.

And the air was abuzz with hummingbirds and their look-a-likes sphinx moth. Noticing that pollinators were all around is the first step. Then I looked for where they were gathered….because that meant I had somehow (accidentally) created a habitat that they loved.

The best habitat of the day was a patch of carrots abandoned last year in the back of the garden which had entirely gone to seed. There were dozens of different kinds of happy flying beneficials on it. It was at a slightly wet end of the row so that helped. I’ll never pull the last carrot again. What I didn’t know until this week is that carrot flowers are pale pink. Very sweet in a big patch.


I like to leave carrots in the ground in winter. I eat them until the ground freezes because they get sweeter and sweeter each day. Then I’m happy for them to get frozen solid because many of them turn to mush and by the time I dig them in early spring, there are writhing masses of earthworms feast. But the carrots that don’t turn to mush, make beautiful flowers their second year.

There was another surprise areas abuzz yesterday. I headed out to a patch of fallen lambs ear that looked spent. From a distance, the flowers were all brown. Lambs ear are beautiful and drought tolerant, but they will seed everywhere. I was about to pull out fifty or so plants that barely had any flowers left…but the bees had a strong opinion that they wanted the last of those flowers. So one more week for the lamb’s ears. I know they’ll drop seeds. But the bees had the final say. Everything for our bee overlords.


Photo Credits:

blog.growingwithscience.com/wp-content/uploads/2010/10/carrot-flower-pollinators.jpg
www.craftsy.com/blog/2015/07/texture-plants/

It’s Time to Divide Iris

Wildflower Seeds

by Sandy Swegel

Bearded Iris meet many of my criteria for a flower garden.  Their flowers are big and colorful.  They are sturdy and withstand hail. Here in Colorado they are virtually disease free.

One of the best and the worst things about iris is that they reproduce like crazy.  Especially in rainy years like we’ve had the last couple of years.  You can ignore the massive clump of green blades, but if you want more flowers, you have to divide iris every few years.

A few facts:

July to September is iris dividing season. After bloom but give the roots some time to reestablish.

The roots of iris are called rhizomes…big clunky and ginger-like.  Photosynthesis occurs in the rhizome.  If the rhizome doesn’t get some light, the plant rarely blooms.

The fan (the leaves) that bloomed this year will never bloom again. So you can cut it off and throw it away.  Two buds on either side of this fan will send up their own leaves and bloom next year.   Those are what you’ll be replanting.

Giving away iris is like giving away zucchini in August. Some gardeners are thrilled but others run when they see you coming.

The two most important things to remember when replanting iris:

Good drainage.  Iris will handle drought and bad soil, but standing water rots them.

The rhizome needs to be slightly above soil level.

Now iris come in many colors and there are definitely fads.  This year no one can give away purple iris.  They’ve somehow become commonplace.  But I  brought a huge clump of white iris to a garden meeting and grown women were fighting over single rhizomes.  Go figure.  Fortunately, before digging from the mixed iris bed, we had used a permanent marker to write on the leaves the color of the flower.

It’s a bit of work but there is one awesome secret about iris that means you have to grow them.  They smell just like their color.  Purple iris smell like grape snowballs.  Yellow iris smell exactly as you’d think yellow should smell.  Apricot iris have a delicate sweet aroma. What a delight to plant a walkway with irises.


Photo credit txmg.org/elpaso/event/farmers-market-series-2014-07-26/

Art by Nancy Baker www.hear2heal.com/bearded-ladies-limited-edition-fine-art-iris-garden-nancy-baker-p-756.html