Great Techniques for a Weed-Free Garden

It is so easy to be discouraged when faced with a garden that is being overtaken by weeds.  Keep your garden productive and relatively weed-free by cleaning out the weeds every so often.  Cleaning your garden by weeding is one of the keys to keeping your crops productive and your enthusiasm strong. Here are some great weed-prevention strategies, and simple techniques for a relatively weed-free garden.
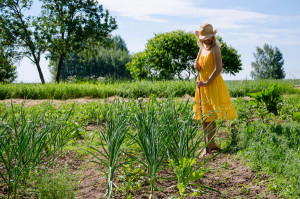
1. Starting at the beginning, don’t deeply-till the garden. Plowing or deep tilling buries weed seeds that are lying on the surface and then brings them back up. Let buried seeds stay buried. Most seeds germinate only in the top two inches of soil.  Before you plant a new garden, till the soil shallowly to encourage the surface weed seeds to sprout, then water the area if the soil is dry. The combination of air, moisture, and exposure to light will stimulate weed-seed germination. Wait a week after tilling and then hoe or till shallowly again to eradicate all the newly germinated weed seedlings before you plant. The more times you repeat this pre-plant weed-reduction technique, the fewer dormant weed seeds you will have lurking in your garden beds. Once the upper-layer weed seeds are exhausted (it takes a number of years, so be patient), very few new weeds will appear unless you bring them up from below… or let weeds mature and drop new seeds.
2. Don’t allow weeds to go to seed. Nature is prolific. Each plant can produce an enormous number of seeds. There is an old saying “One year’s seeding means seven years’ weeding” and it holds true. Weeds produce an abundance of seeds and the results of this carelessness are exponential.  The more seeds you have, the more weeds you will have. But the results of a little weed control also are cumulative.  If weed plants are removed from the garden before they go to, seed, their thousands of seeds won’t be added to the garden. No more seeds, no more weeds. And, as the years go by, fewer and fewer seeds will be left in the garden to germinate.
3. Eradicate weeds while they are small. Tiny, newly germinated weeds are the easiest to kill. A sharp hoe, lightly scraping the soil surface is the most effective way to control small weeds.  This allows you to work shallowly and not disturb the roots of the plants you want to thrive.  That minimum effort yields a maximum benefit, curing the weed problem, while making a tidy garden. And a well-kept garden may motivate you to spend more caretaking time there.  Larger weeds can be hand-pulled and left to dry out on the soil surface.  Any weeds that are going to seed should be destroyed or thrown away.  To make the job easier, pull weeds after a good rain or watering.  Try to keep the area surrounding your garden weed-free by tilling a path or mulching a path around the planting zones.
Keep your sharp hoe in or near the garden and use it for a few minutes each time you are there to keep your crops weed-free and your garden a place you will enjoy.

Vegetable Seed Starting

tips_seedstarting2 Starting your vegetables and herbs indoors from seed is easy and very rewarding. By starting indoors you give yourself a jump-start on the growing season and you will be ahead of the game when it is time to start planting outdoors! The back of your BBB seed packet will have the basic information you need to know to ensure you have successful germination.
Here are a few tips to remember to kick off your seed-starting efforts.

  1. Plastic pots are best for starting seeds as they retain moisture more easily compared to terra cotta or other clay pots. If you don’t have traditional seed-starting containers available from your local garden center you can use recycled yogurt cartons, salad containers, or any other plastic container you find in your recycle bin! You can also make your own wood seed starting trays or your own newspaper pots. No matter what type of container you use make sure it is clean and sterile.
  2. Proper drainage is essential. Make sure there are holes in the bottom of your seed starting container to allow for good drainage. If you are using a recycled plastic item you can drill or poke holes in the bottom by using a screwdriver or nail. Excessive moisture trapped in a pot can lead to damping off and other fungal diseases. Ew!
  3. Soilless seed starting mix. Really we mean it! If you want good germination start your seed in a soilless mix. The key is that when your seeds germinate and have at least their first set of true leaves you must transplant them to the next pot size up and into regular potting soil. Or, you need to start feeding them with a half-strength fertilizer.  The soilless mix is essentially sterile with minimal nutrition which is a perfect medium for your plants to germinate in. Less chance for contamination or other weird diseases to set in!
  4. Moisten your mix. Pour your soilless mix into a bowl. Moisten it with water so that it isn’t soaked, but is nicely damp. Fill your seed starting pot or tray up ¾ of the way full with your damp soilless mix. Gently press the seed into the soil approximately two (2) times the depth of the diameter of the seed. Then lightly cover your seed with more of the soilless mix. Gently press the soil to ensure good seed-to-soil contact.
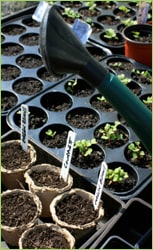
  5. Identify each pot. Even if it is only 2 pots we highly recommend that you mark each pot with the name of the vegetable and the date planted. You can use wooden craft sticks, left-over popsicle sticks, or any other object that sticks up and beyond the soil that you can write on.
  6. tips_seedstarting4 Water gently. We can’t tell you how many times we have washed away seeds and newly born seedlings by watering too hard! We recommend watering from the bottom by placing your seed starting container in a dish or basin filling it with water 2-3 inches and allowing the moisture to be drawn upward. If just the top has dried out use a spray bottle or a child’s watering can with small holes. And if you don’t have either, while pouring out the water (gently!) put your hand in between the water and the soil to break the fall of the water before it lands on the seeds or tender seedlings. Water daily and remember, gentle!
  7. Cover! Immediately cover your pot with a piece of saran wrap or a plastic bag to help retain the moisture. If you have a garden dome then place the lid on top.  Keeping your seed evenly moist until germination is essential.
  8. Temperature. Most seeds require temperatures of 65° to 75°F to germinate. The back of your BBB Seed packet will tell you the preferred germination temperature for your seed. Place your seed containers near an existing heater, on top of the stove (pilot lights can be very warm at night!) or use a space heater with the proper precautions to raise the ambient temperature as needed. Heating pads designed specifically for plant use can also be placed directly under the seed containers which will encourage germination.
  9. Good Light. Plants require at least 12 hours of daylight. If you are starting your seed where light is poor or during a time when there is less than 12 hours of light per day we recommend growing lights. If sowing your seed indoors, place your seed containers in a sunny, south-facing window and give the container a quarter turn each day to prevent the seedlings from overreaching toward the light and developing long and weak stems.
  10. Acclimate Your Seedlings. Before you transplant your seedlings outdoors they need to be hardened off or acclimated to direct sunlight and fluctuating temperatures. It is best to do this over a three-to-five-day period by placing them in direct sunlight during the morning only on the first day, then increasing their time outside by a few hours each day until they are strong enough to be transplanted. Don’t feel rushed. If unexpected weather or wind arises, keep them indoors. Nothing is more disappointing than spending all of your time growing your precious seedlings to then having something go wrong when you put them outside.

If you have any questions at all about how to start your BBB Seed please do not hesitate to email us at info@bbbseed.com. We look forward to answering any questions you might have!
Download our E-Book here:
CTA_BBBSeed

How to Share Your Plant Starts for Profit

Plant Starts

Image by Shameer Pk from Pixabay

by Sandy Swegel

Sharing plants is a simple joy in life. Sharing plants and making money, well that’s even better. Read on to learn how to share your plant starts for profit.

My happy group of gardening buddies first got to know each other because of our great avarice for more seeds. We had all joined a local gardening email list so we could talk more about plants and gardening, but the more we spoke with each other, the more seeds and plants we wanted. Every time someone mentioned a new variety of tomatoes or annual flowers or ground cover, we had to have one of those.

The first year, we decided to meet in person and share seed packets. Armed with dozens of recycled envelopes, we doled out tiny seeds to each other, taking home three Cherokee purple tomato seeds or six cosmos seeds. This quickly became confusing and chaotic and required so many tags in our seed trays. So the next year we decided to become more economical. We’d each buy a packet of seeds and grow out all the plants…and then swap our plant starts. We definitely got more plants than we would have grown on our own and we each had unusual varieties you can’t buy in stores.

But the third year of our avarice proved to be the year we figured out that we could get as many seeds as we wanted…and they practically paid for themselves.  All we had to do was start our seeds and sell 2-month-old plant starts to each other and to the other greedy gardeners who envied our ever more diverse gardens. We learned that anyone can sell healthy organic heirloom tomato starts, especially if you have pictures of last year’s garden.

You can try your own mini plant exchange and sale. We price our seedlings cheap ($1 or $2 at most). I can afford all the heirloom tomato plants I want if I just sell three seedlings for $1 from each seed packet. Throw in some herbs and flowers and soon the plants barely fit in the car. Our little group now has a giant plant sale every May where everyone brings their plants to sell to each other, but thanks to free advertising on Craigslist and neighborhood electric poles, we also sell our humble little plants to the public.

Avarice never ends, of course, and now we have to grow more plants so we can make money so we can afford backyard greenhouses. Last year our small group of about 12 home gardeners sold some $4000 worth of plants that they started in closets and on top of refrigerators just two months before. Not enough to get rich, but enough to buy more seeds, build hoop houses and season extenders, and have a load of precious organic sheep manure delivered to our gardens.

So enjoy your seed shopping and think about swapping some of the plants you start with others. We learned that while there is no end to avarice among gardeners, there is also no end to generosity. It is a great joy to have an abundance of little plants to share with friends and strangers.

Responsibility

Musings on Responsibility

by Rebecca HansenBBB Seed's "Never GMO's!" carrot man.

Here at BBB Seed, we are fortunate for the opportunity to talk with so many interesting people and to hear their philosophies on life, living, and gardening.  As we have learned from our customers, there are many different but equally valid views on sustainable agriculture, organic versus non-organic gardening, uses for wildflowers, and just about everything else. The BBB Seed staff is no exception – our opinions are just as varied as those of our customers.

Some people think that using plant species that are native to a specific area is the best way to re-create the way life used to be.  Others just want to grow a beautiful bed of flowers or the perfect heirloom tomato.   Some are excited by the simple emergence of a green shoot above a moist bed of soil, regardless of what lies below.  Some come from farming families while others have been born and raised in an urban environment.  The varied ideas and ideals in our workplace and of our customers help to make our work both fun and interesting.

Responsibility and the safe seed pledge

Though we celebrate these diverse views and thoughts, we at BBB Seed have one goal that brings us together: to take personal responsibility for providing a high-quality product which, to the very best of our knowledge, is environmentally sound.  We make our choices based on seed test information that is provided by the growers and collectors of our wildflower seeds as required by law.  We only purchase seed that, by the results of testing, has a noxious weed content of 0 (zero).  We carefully follow the ever-expanding list of noxious and invasive species lists to ensure that we don’t knowingly distribute varieties to areas where they might be considered invasive.  BBB Seed provides quality products and information to any and all of our customers that they may use for their own purposes.  We cannot control how our seeds are used once they leave the shop, but we hope that our products are put to use in an environmentally sound, agriculturally sustainable manner.  Given the discussions we have had with our customers, we are confident that this will be the case.  After all, in the end, we all have personal responsibility for our own actions. Hence the statement on our packages:

“Beauty Beyond Belief Wildflower seeds, Heirloom Vegetable Seeds, and seed mixes are of superior quality and are carefully chosen based on purity and viability standards, essential elements for a successful, beautiful and self-sufficient landscape. Our seed mixes include no fillers or inert materials.”


The Windy Garden

Building a Wind Resistant Garden

By: Sandy Swegel

This could be a perfectly beautiful early Spring. We’ve had a week of warm sunny weather that is waking up the daffodils and tulips. Birds are flitting about and energetically singing out mating calls. It’s a joyful break from dark winter days. But then there’s the wind. Chinook winds. Or as they were called the year I lived in the Alps, “scheiss foen.” Everyone understood if the foen had arrived that you could be in a foul mood because of the irritability and headaches from the air pressure changes these mountain-made winds caused.

Wind can have devastating effects on a garden. Sure the strong winds can break stems and tree branches, but the greatest stressors comes from the drying effects of the winds. Plants close their stomata (leaf pores) to reduce water loss, but that slows the plants’ ability to grow. The winds desiccate the plant tissue and dry out the top inches of the soil meaning the plants need more water. Even plants under snow cover can get very drought stressed because the winds evaporate the snow before it can melt.

If it’s going to be a windy season, I make a few mental changes in my garden plans. Here’s things to consider if you have a windy garden:

Use more drought tolerant plants.
Increase your watering after the winds die down.
Grow shorter plants.
Grow plants like lavender with thinner leaves that won’t desiccate so easily.
Plant some tall ornamental grasses through the flower garden. They look beautiful in the wind and provide some wind break protection.
Plant evergreens as windbreaks.
Consider a garden wall.

And take an aspirin for your sinus headache.


Photocredits:

http://clarenbridgegardencentre.ie/
Top Tips for Windy Gardens
http://www.pc.gc.ca/pn-np/ab/waterton/ne/ne-galerie-gallery-2.aspx?a=1&photo=%7Bdfae32e8-4d1e-47e4-a909-08c9ea68dd13%7D

Fall Berries

Certified Organic Seeds

We think of maple leaves when we think of Fall color, but berries that ripen in the Fall offer vivid color that lasts well into winter.  They also provide food for birds and small mammals when there’s not much else to eat in winter.  Words cannot adequately describe the wild colors you’ll enjoy once all those showy leaves fall.  All these plants grow in Zone 5 with some irrigation.  (Some are quite xeric but then stay small.)

Orange and red berries
Pyracantha, mountain ash, cotoneaster, hawthorn


Blues and purples and blacks

Chokecherries, viburnum, juniper


And finally, the outrageous pinks!!!

Beauty berry


Photos:

http://extension.illinois.edu/ShrubSelector/detail_plant.cfm?PlantID=421

http://www.sunset.com/garden/flowers-plants/plants-with-beautiful-fall-berries

http://www.onlinenurseryco.com/mountain-ash-trees/

https://commons.wikimedia.org/wiki/File:Juniper_berries_lush.jpg

http://lathamsnursery.com/?product=viburnum-blue-muffin-3g-viburnum-dentatum-christom

http://www.onlyfoods.net/chokecherry.html


Bumblebees Love Purple

Why Do Bees Have a Favorite Color?

by Sandy Swegel


I visited one of my favorite suburban lawn alternative gardens yesterday.  It’s a true pollinator’s heaven of nectar and pollen, right on a neighborhood street. Full of perennial gaillardia and rudbeckia, and reseeding annual larkspur, cleome and sunflower, the garden uses about the same amount of water as your average lawn.

Bees were everywhere.  Neighbors stop by in wonder at what can be done with a front yard instead of plain old grass.  In the median strips in front of the flowers, kales and lettuces produced greens for the neighbors. This time of year, gaillardia and rudbeckia are dominant with their yellows, oranges and reds.  But something different this year was a plethora of purple larkspur.  Curious, I  asked community urban farmers Scott and Wendy about the variation.  They and the landowner are all careful gardeners, unlikely to throw in something different without a reason.  Scott explained matter-of-factly, “Well it’s for the bumblebees. They prefer purple.”  I was skeptical since I see bumblebees all day on different colored flowers.  He assured me they had watched the field the last couple of years. The bumblebees always went for the purple flowers.  And walking on the path, huge fat bumblebees were on the purple larkspur, gorging away.


I couldn’t resist a little more research and sure enough, studies in Germany showed that baby bumblebees love purple flowers. Purple flowers are thought to contain more nectar than other colors and that baby bumblebees who chose purple flowers had a better chance of survival…they then passed the purple preference onto their offspring.

I’m not sure what most piqued my curiosity this day…I loved learning that bumblebees like purple flowers best.  But I think I was more intrigued by Wendy and Scott just noticing all season that the bumblebees liked one particular color.  In the end, though, I’m most impressed with the bumblebees who somehow got the humans to plant their favorite food.  Very clever bees.

Photo credits:
http://phenomena.nationalgeographic.com/2013/02/21/bees-can-sense-the-electric-fields-of-flowers/


Stalking the Wild Monarch

All About the Monarch Butterfly

by Sandy Swegel

It’s Show and Tell time.
It’s time to take the kids or some curious adults outside and prove your superior knowledge of the ways of nature and introduce them to butterfly eggs.  It’s been a good milkweed year in the wild this year. Lots of spring rains followed by warm days have made the perfect home for milkweed plants.  Milkweeds are growing in my garden and along roadsides and ditches.  If milkweed plants are fully grown…mine are in tight bud about to bloom…you can walk up to almost any plant and look under the leaves and find little tiny white monarch butterfly eggs.

Milkweed plants, Asclepias, as you probably know are the ONLY host plant for the monarch butterfly.  The butterfly lays her eggs on the underside of the leaves. The eggs hatch hungry little larvae that chew up the leaves.

The larvae get big and fat and eventually form pupae, also on the underneath side of a milkweed plant.

Finally, “ta-da” a monarch butterfly emerges.

I have two favorite kinds of milkweed plants in my garden.  The “showy milkweed” Asclepias speciosa with the big pink seed head you’ve seen in fields, and “Butterfly weed” Asclepias tuberosa which is my favorite because it’s bright orange and looks good in the dry August garden next to the Black-eyed Susans.  It also makes a great picture to see a Monarch butterfly on one of the orange flowers.

Monarchs are happy to choose either of these two “milkweeds” or any of the other more than 100 different species of milkweeds around the world. So you can pick the flower you like and grow it in your own garden. Grow it and the monarchs WILL come.  I’ve had good luck with fall or winter direct sowing of the seeds that easily grow into blooming plants the next year.  After that, they reseed themselves gently.

Video links
http://www.youtube.com/watch?feature=player_profilepage&v=9Q2eORu1hP8

http://www1.teachertube.com/viewVideo.php?title=Monarch_butterfly_laying_eggs_on_milkweed&video_id=51640

And, just in case there are any monarch butterflies out there that don’t know how to do this, here is an instructable!

http://www.instructables.com/id/Monarch-Butterflies-Egg-to-Butterfly/


Communicating with Plants

Use Your Own Intuition to Garden

by Sandy Swegel

Reading through all the garden porn…uh I mean seed catalogs…I found myself quite transported this morning.  Looking at the beautiful pictures in the catalogs, I realized that when I considered getting seeds for a certain plant, my mind was quite filled with images of what the full-grown plant in bloom would look like.  Thinking about what tomatoes to grow, my mouth began to salivate.  For gardeners, seeds aren’t just a tiny bit of hard matter, but a world of potential realized.  Somehow, I think the plants actually manage to communicate that to us.  We sit reading our catalogs and the seeds themselves seem to be shouting from the page, “Pick me!” Pick me!”  As I always tell people when I teach seed starting classes,  seed starting is easy….the plants want to grow.

I don’t think we need to be psychic to start communicating with plants.  Human-plant communication is something humans have done since the beginning. In a world with so many plants, how else did we figure out which ones are good for medicine and which ones are good for food?

So do a little experiment when you sit with your seed catalog or favorite seed website.  Settle yourself into a quiet place alone with your catalog and set the mental intention that you’d like to understand which plants you should grow this year.  Then calmly flip through the catalog and see what really gets your attention.  Or sometimes thoughts of a certain plant pop into your head.  Close your eyes for a moment and really see the plant. Use your imagination to smell the plant or feel its leaves.  Let an image come to your mind of where the plant might be physically in your garden.  Imagine it growing in that spot next June and notice if the plant looks healthy or weak when you think about it there.  If it doesn’t look strong, try to imagine it in a different place.  How’s it look there?  How do you feel when you see the plant there?

Whether we are accessing our own intuition or really communicating with the plant itself, I think we are tapping into our own inner gardener who knows exactly what plants we should grow to make both the plant and the gardener happy!

Photo Credit: http://homeguides.sfgate.com/can-talk-flowers-make-grow-76408.html