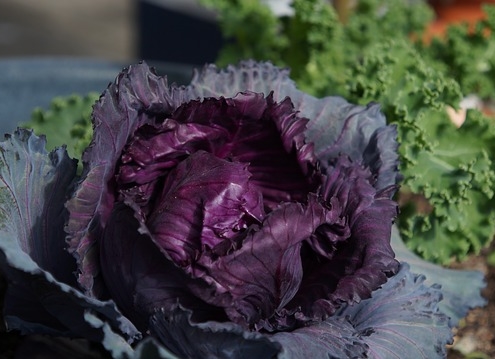
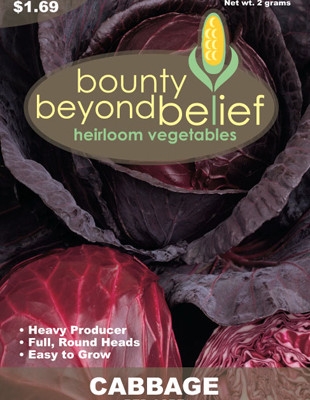
BRING THE THREE COLORS OF MARDI GRAS TO YOUR TABLE

Mardi Gras Bean Blend

by Engrid WinslowFront of the Mardi Gras Bean Blend seed packet.

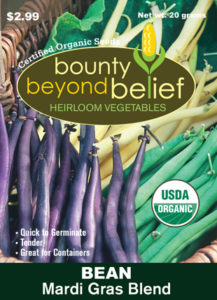
Have you ever wondered about the history of the official Mardi Gras colors? Well, we have answers for you. According to mardigrasneworleans.com, the Krewe of Rex selected the official Mardi Gras colors in 1872. In 1892 the Krewe of Rex Parade theme “Symbolism of Colors” gave meaning to the colors. Purple Represents Justice. Green Represents Faith. And Gold Represents Power. According to the website, Mardi Gras colors influenced the choice of school colors for arch-rivals Louisiana State University (located in Baton Rouge) and Tulane University New Orleans is the home for this school). They say when LSU was deciding on its colors, the shops in New Orleans had stocked up on purple, green, and gold material for the Mardi Gras season. LSU decided upon purple and gold, and bought much of it. Tulane bought much of the only remaining color — green!

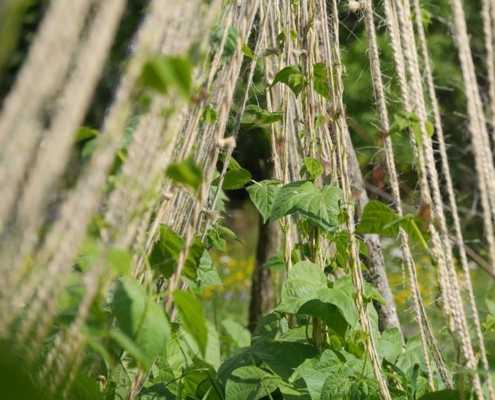
You can grow our Mardi Gras Bean Blend easily in your garden. They grow best when planted in the early spring (just like peas, many gardeners chose St. Patrick’s Day as the date of planting). For better germination, purchase new bean and pea inoculant every year from your local garden center and sprinkle it in with your bean seeds. They are vigorous climbers so plan on providing some support as they grow. They are also referred to as snap beans and should be harvested when young before the beans inside develop. No matter what alchemy you try, the purple beans will turn green when cooked. They usually only need the stems snipped off before cooking. Beans are best eaten as soon as they are harvested but will keep in brown paper bags in the vegetable drawer of your refrigerator for up as long as two weeks.

GREEN BEANS WITH GARLIC              Serves 4-6

Place one lb. of Mardi Gras beans in steamer basket over one inch of boiling water, cover, and steam until crisp-tender (5-7 minutes).

In a small saucepan heat 1 cup of water, 2 cloves of unpeeled garlic to a boil. After simmering the garlic for 5 minutes, remove from the water, peel and mince.

Shock beans in cold water and then drain and set aside. Don’t chill them, but cover to keep them warm.

In a large bowl combine the garlic with one TBL. Red wine vinegar, one TBL olive or (better yet) walnut oil, salt and pepper to taste and toss in the green beans. You can serve at room temperature or warm them briefly in a microwave.


You can also use Mardi Gras Blend beans in this classic pot-luck and picnic salad:

MARDI GRAS BEAN SALAD        Serves 8-10

Over low heat in a medium saucepan combine ¾ cup sugar, 1/3 cup olive oil, 2/3 cup red wine or apple cider vinegar (white balsamic is also delicious in this), ½ tsp fresh ground pepper and 1 tsp. salt to a very low simmer.

Prepare 2-3 lbs of green beans as directed in the recipe, above. Also, rinse and drain one can of red beans and one can of garbanzo beans. Mix the beans together and pour heated dressing over them. Let marinate for at least 24 hours before serving. This bean salad keeps in the refrigerator for several days.

FIVE REASONS TO RELISH THE RADISH

Different Types of Radishes and How to Use Them

By Engrid Winslow

  1. There are two primary types of radish – one hails from Asia (the most common ones are daikon which is large and white) but there is also the large sweet and remarkably pink Watermelon Radish.Photo of Watermelon Radish packet.

Watermelon radishes are delicious raw and can be substituted for a cracker in crudités and they also make a crunchy addition to stir-fries. They are often used in Chinese cuisines with fish dishes because it adds sweetness and counteracts fishy tastes.

2. Radishes are very easy to grow and can be sown in the garden as soon as the ground can be worked. Cover the seeds with about 2 inches of soil and thin them out once they sprout. They germinate quickly and all at once so, to keep them from getting overly large and fibrous, they should be sown multiple times throughout the season.  They grow well in cooler temperatures which makes them a good spring and fall crop. One that is delicious cooked or raw is Cherry Bell.

Front of the Cherry Belle Radish seed packet.


3. Do you want a taste of France in your radish? French Breakfast Radish is an heirloom variety dating back to the 1800s. It gets its name from a popular and delicious breakfast enjoyed throughout France. Want to give it a try? Just thinly slice the radishes lengthwise, grab a hunk of baguette and smear it with some sweet butter, top with radish slices and a sprinkle of salt. Close your eyes, take a bite and then say “Ooh, La, La!”Relish the radish with this french breakfast type.


4. The White Icicle radish resembles small Japanese daikon but is sweet and tender. It is another heirloom variety that is easy to grow but is very versatile because it can tolerate warmer temperatures and grow well into summer weather.

Relish the radish with this White Icicle Radish.


Relish the radish in this recipe:

APPLE RADISH SALADRelish the radish with the Carnival Radish Blend.

2 Granny Smith Apples

1 bunch sliced or julienned White Icicle radishes

Dressing:

Juice from one orange (lemon is also good here)

2 tsp honey

1 tsp Dijon mustard

1 tsp fresh thyme leaves

¼ cup olive oil

Salt and ground black pepper to taste


5. Want to really add some color to your fish or other tacos? Shred this colorful blend from the Carnival Blend radishes and pile it on with a squeeze of lime and some chipotle mayo. All radishes are good in slaw but this one gets bonus points for the interesting colors.


Or relish the radish in this version of a vegetarian radish taco where the radish is the star of the dish. This version is modified from superstar chef Anita Lo’s book Solo.

ROASTED AND PICKLED RADISH TACOS                

Serves 4

3-4 bunches of radishes washed (reserve the tops and 10 of the smallest radishes for later)

1/3 cup olive oil

4 smallish tomatillos, husk removed, cut in half

3-4 small jalapenos, cut lengthwise with stems and seeds removed

1 tsp cumin

One small onion, sliced thinly

3 garlic cloves, smashed (reserve 1 for later use)

6 Tbs cider vinegar

2/3 cup water, divided in half

¼ tsp cinnamon

Juice of one lime

1 Tbs chopped cilantro

8-12 corn or flour tortillas

¾ cup queso fresco, crumbled

Extra lime wedges for serving with tacos

Preheat oven to 400 degrees. Place all but the reserved radishes, their tops, the olive oil, the tomatillo and half the jalapeno in a bowl and toss with salt and pepper. Remove the tomatillo and jalapeno and place them on one side of a roasting pan. Add the cumin and cinnamon to the bowl of radishes and toss again. Place radish mixture (except for the tops) on the other side of the roasting pan. Bake until softened, about 12-15 minutes.

Make radish pickles: Cut the reserved radishes in thin rounds and place them in a bowl with the rest of the jalapenos and the onion. In a small sauté pan bring the vinegar, 1/3 cup water and two of the smashed garlic cloves to a boil and pour over radish rounds. Set aside to cool to room temperature and drain.

When the roasting vegetables are soft, remove the tomatillo and jalapeno and blend with an immersion blender. Add tops of radishes to roasting pan and roast until wilted. Place the remaining third garlic clove in with the tomatillo, cilantro, lime juice, 1/3 cup water and blend to make a salsa.

Serve roasted radishes in warm tortillas garnished with salsa, pickled radishes and queso fresco. Serve with lime wedg1es.

https://bbbseed.com/product-category/store/heirloom-vegetable-seeds/


TOP 10 VEGETABLES FOR PART SHADE

Gardening Tips

by Heather StoneShady Gardens Plants

Do you have a garden that gets more shade than sun, but you still want to grow vegetables? No problem! There are plenty of vegetables that will grow well with partial sun. We’ve put together a list for you of vegetables that perform well with 6 hours or less of direct sunlight. Read on to find out how to keep yourself in fresh veggies all season by making the most of your shady spots.


Partial Shade Plants

  1. Mesclun Greens (Needs 3 hours of sun)

Mesclun is simply a “mix” of various greens. All of them doing well with just a few hours of sunlight. They germinate quick and reach maturity in a matter of weeks. Try our Mesclun Mix– a great combo of arugula, mustard greens and Chinese cabbage.

  1. Arugula 3-4 hours

This delicious peppery green is one of the easy-to-grow vegetables for shade and loves the cool weather. Plant in early spring about 1 month before the last frost and continue sowing every 20-30 days until mid-summer. Grows well in containers. Try our Wild Arugula!

  1. Lettuce 3-4 hours

Lettuce is a cool-season green that isn’t a big fan of direct sun. The varieties are endless and so easy to grow in the ground or in containers. Plant in early spring and again every two weeks for a continuous supply of lettuce. Make sure to provide shade for the late spring and summer plantings.

  1. Spinach 3-4 hours

The nutrient-packed leaves of spinach love cool weather and protection from the full sun. Spinach is an easy to grow and productive crop that every garden should find a spot for. Like lettuce and arugula plant in early spring and sow successively every 2 weeks for a continuous supply of spinach. Try our Bloomsdale or Nobel Giant varieties.

  1. Kale 3-4 hours

A powerhouse of nutrition, kale is easy to grow in the ground or in containers. The young tender leaves of kale are great in salads. The mature leaves are excellent sauteed or added to soups and stews. Start in early spring and continue you to sow for fresh greens all season long.

  1. Swiss Chard 4-5 hours

Easy to grow from seed and looks fabulous all season long Swiss Chard’s beautiful leaves are great shady gardens plants that are easily planted in the perennial garden as well as the vegetable patch.

  1. Radish 4-5 hours

There’s nothing like a fresh spring radish. They are quick to germinate, fast to mature and come in a rainbow of colors. We carry 5 different varieties! No garden should be without radishes.

  1. Peas 4-5 hours

Other partial shade plants are Peas, in either the garden or the container. They are pretty quick to germinate and prefer cool weather. So get them in the ground early and you’ll have peas to snack on in early summer.

  1. Beets 4-5 hours

Beets can thrive along the shady edge of the garden. The roots might not get quite as big, but if you keep them well watered they will produce excellent tasting greens and sweet, tender roots.

  1. Bok Choy 4 hours

This cool-season vegetable germinates in a few days and can be eaten raw or cooked.  Bok Choy is an excellent addition to the part shade garden.


AN EASY WINDOWSILL HERB GARDEN

Graphic of herbs in pots.

photo courtesy of pixabay

At Home Gardening Tips

by Heather Stone

Are you are itching to get your hands in the dirt, but outside the ground is covered in snow? Well, a windowsill herb garden might be just the thing to get you through until spring finally arrives. Every kitchen and every cook deserves fresh herbs. They will help liven up not only your cooking but your gardening spirit too. Check out our herb collections here and here!


To get started make sure you have a sunny windowsill that gets at least 6 hours of sunlight. If you get less than that you will want to provide some additional lightening or your herbs will struggle.

Photo of basil growing in a pot on the windowsill.

photo courtesy of pixabay

Next, purchase some small starter plants from your local nursery or garden center or try starting your herbs from seed. Starting from seed may take a little longer, but it’s less expensive. When choosing plants or seeds pick herbs you know you like to cook with. Some great herbs for containers include thyme, basil, cilantro, parsley, chives, oregano, dill, sage, mint and savory.


Whether you are purchasing plants or starting from seed you will need containers and quality, lightweight potting mix. If you are starting with plants make sure your container(s) have a drainage hole(s) and are roughly 6-10” in diameter. Start by adding some potting mix to the bottom of your container. Next, place your plant in the pot and gently fill in and around it with more potting mix, leaving around an inch of room at the top for watering. Gently press the soil down and water well. Most herbs don’t like their soil too wet so make sure to test your new herb plants for water by sticking your finger an inch or two below the soil surface. If you find the soil is dry, it’s time to water. Fertilize your new herb garden once a month with a ½ strength liquid fertilizer. Be sure to give your plants some time to get established before you start harvesting.

Photo of Cilantro sprigs in a cup.

photo courtesy of pixabay

If you are starting from seed, you can plant in smaller containers to start and pot up as your plants get bigger. Fill your containers with a damp potting mix. Sprinkle 4-6 seeds on top of the surface. Gently press them in and cover lightly with more potting mix. Cover with a plastic bag or plastic wrap and place them in a warm, sunny windowsill making sure the soil surface stays moist. Once your seeds start to sprout, remove the plastic. Keep your new sprouts watered whenever the soil surface feels dry and watch them grow.


Here are some herbs that are easy to start from seed:


Basil

The dried version is no comparison to fresh basil. With so many uses and so many varieties to choose from basil is an easy choice for the indoor herb garden.


Cilantro

Cilantro is easy to start from seed and germinates in 7-14 days. Use the fresh leaves in salads, sauces and to garnish a wide array of dishes.


Parsley

Parsley is both productive and attractive when container-grown. It takes a bit longer to germinate, 12-28 days, but it’s worth the wait. Harvest leaves as you need them once the plant is growing strong.


Chives

Chives are another plant easily grown in a pot. The slender grass-like leaves are delicious and make an excellent flavoring in soups, stews, dips and salads. Sprouting in just 10-14 days you will have fresh chives in no time.


Recipes

IT’S BUMBLEBEE BONANZA TIME

Bumblebee Conservation

By: Engrid Winslow

Bumblebees pollinate many of our food crops and garden flowers which means the conservation of the species is vital to our ecology. Some species of Bumblebees are true American natives and are most commonly found in northern climates and higher elevations. Nearly all of the estimated 250 species live in the Northern Hemisphere although there are a few species that pollinate flowers in tropical rainforests in warmer climates. They are social insects that form colonies of around 50 bees with one Queen although only the Queen survives the winter. They commonly build their nest in the ground or in crevices of rocks and are quite good at hiding their entrance.

They are capable of flying (and pollinating) at cooler temperatures and lower light conditions than other bees which makes them important pollinators for plants growing in higher elevations and colder climates that are beyond the reach of other bees. Their plump, fuzzy bodies are a welcome sight that spring is on its way at last. It’s usually the super-sized Queen out and about in early spring as she starts to build a nest and raise brood.

Bumblebees are peaceful insects and will only sting when they feel cornered or when their hive is disturbed. When a bumblebee stings, it injects a venom but unlike a honeybee sting, the bumblebee sting has no barbs. This means that a bumblebee can pull back its sting without the sting detaching from its abdomen and can sting several times. Only female bumblebees (queens and workers) have a sting; male bumblebees (drones) do not. Justin O. Schmidt, author of The Sting of the Wild and the creator of The Schmidt Pain Index rates a bumblebee’s sting at a 2 on the index which starts at 0 and ends at 4. https://en.wikipedia.org/wiki/Schmidt_sting_pain_index.com.

Here at BBB, we specialize in pollinator mixes and our newest one is designed with bumblebee conservation in mind. It is our mission to help you provide nectar and pollen because “the more flowers a garden can offer throughout the year, the greater the number of bees and other pollinating insects it will attract and support.”

Bumblebee Bonanza includes Siberian Wallflower, Rocket Larkspur, Balsam, Yellow Lupine, Arroyo Lupine, Purple Coneflower, Dahlia-flowered Zinnia Mix, Dwarf Mixed Cosmos, Gayfeather, Rocky Mountain Penstemon, Blue Sage, Northern Lights Snapdragon, Purple Prairie Clover, Lacy Phacelia and Beebalm.

Bumblebees are unique because their long tongues can reach the nectar in flowers that other bees avoid, such as penstemons, lupines, larkspur and snapdragons. They collect large amounts of pollen because they have so many hairs covering their little bodies and thrive on daisy-type flowers such as Zinnias, wallflower, cosmos and coneflower. There is a wealth of information available about bumblebees and what you can do to help them. Some of our favorites are info@thebeeswaggle.com and https://xerces.org/bumblebees/.

Remember that the use of synthetic insecticides, particularly the ones that contain neonicotinoids are harmful to all bees. Please avoid using them in your garden, lawns and talk to your neighbors and friends about the perils of using these chemicals.  Neonicotinoids are sold under many different  names such as:

  • Acetamiprid
  • Clothianidin
  • Dinotefuran
  • Imidacloprid
  • Nitenpyram
  • Thiacloprid
  • Thiamethoxam

Let’s all do our part for bumblebee conservation!

Three Types of Vegetable Trellises You Can Build Yourself

Vegetable trellises. Plants climbing up a trellis of twine.

Vegetable Trellises

by Sam Doll

Spring is just around the corner. That means that it is time to start getting your garden prepped for the growing season! You’re probably busy cleaning, ordering, and planning your garden before you need to worry about getting those seeds in the ground.

One DIY project you should consider is building your own vegetable trellises! Here are three types of trellises that your plants will love, and you can make yourself.

1.    Teepee Trellis

This is probably the simplest and cheapest type of trellis to make yourself. All you need to make this trellis are three bamboo poles and some twine.

Using the bamboo poles, make a teepee shape and push them into the ground until they are relatively deep and stable. Then, using the twine, lash the bamboo poles together where they meet. Wind the twine around and down the structure until you reach the bottom. To secure the twine, you can twist the twine around the poles where they meet and knot it. You can also use staples or zip-ties if you want.

This type of trellis is perfect for growing climbing squash and cucumbers. We love planting our Organic Delicata Squash under these trellises. The base of each pole should be used as a planting site.

2.    A-Frame Trellis

Another trellis that is perfect for your vegetable garden is an A-frame style trellis. There are many methods to building these. This is a little more involved than the Teepee trellis and will require some woodworking.

As with any garden project, we don’t recommend for splurging on the nicest wood you can find. This will be outside and exposed to the elements, so don’t get too attached to it. You can still seal or paint it to get more life out of it, but these projects won’t last forever.

For this trellis, all you need are some boards, screws or nails, hinges, and a climbing surface. Create a frame using your lumber. We like using 2X4’s because they are sturdy and easy to find, but any flat boards will work. Screw or nail the board together by putting the horizontal boards on the “inside” of the vertical boards. You can complicate this project by making the boards flush or adding other embellishments, but this is the simple and dirty version.

The final dimensions of your frames will depend on the size of your space and how tall you need the trellis to be. The important thing is to make them identical. Once you’ve assembled your frames, it’s time to attach the climbing surface. The most affordable route here would be to create a grid using twine or string and create a grid that attaches to the sides of the frame. If you have a bit more budget, we recommend a chicken wire or metal fencing that you can just staple onto the frame. This saves a lot of time and will last a little longer.

Finally, attach the two frames with the hinges and place them in your garden. These style frames are great for peas and beans. Our Mardi Gras Blend of beans are a great and colorful way to show off this project.

3.    Row Cover Trellis

Many of you use row covers to get your garden through the early and late part of the season. Well, why not make a multi-functional row cover. Our version of this is rather simple. Cut even segments of a light metal fencing and make an arch out of them that covers your row or planter. Stake those into the ground and continue the length of the plot. This is a great easy trellis that can be covered with a floating row cover if needed!

Let’s Celebrate Pumpkins!

Year of the Pumpkin

by Heather Stone

Year of the Pumpkin. Fall orange pumpkins sitting on straw.

photo courtesy of Pexels – 160662

When you hear the word pumpkin what comes to mind first? Is it autumn, Halloween, jack-o-lanterns, pumpkin pie or pumpkin spice latte perhaps. There are so many things to love about pumpkins. They are fun to grow and fun to eat. This year the National Garden Bureau named 2019 The Year of the Pumpkin, so let’s celebrate the pumpkin. https://ngb.org/year-of-the-Pumpkin/

Pumpkins are part of the Cucurbitaceae family along with squash, cucumbers and melons. There are a wide selection of pumpkin varieties ranging in size from as little as 4 oz to some weighing over several thousand pounds. Just this past fall a New Hampshire man grew the largest pumpkin on record weighing in at 2,528 lbs. Now, that would make a lot of pumpkin pie.

Pumpkins are easy to grow. They can be started indoors or directly sown into warm (70 degrees), rich, fertile soil when all danger of frost has passed. Sow the seed into “hills” of 4-6 seeds and thin to the 2 strongest plants per hill. Make sure to give your pumpkins plenty of room to grow to get the best fruit. Depending on the variety you are growing, pumpkins need anywhere from 12 sq.ft. to 48 sq.ft. of growing space. Water your pumpkin seedlings regularly and fertilize throughout the growing season. When it comes time to harvest make sure to cut the pumpkins from the vine when the skin is hard and leave a 3” piece of the stem attached to decrease the chances of decay.

Photo of a jar of pumpkin soup on a green placemat with wooden spoon.

Photo courtesy of Pixabay -congerdesign


Pumpkins aren’t just fun to grow. They are fun to eat too! We use pumpkins to make soups, breads and pies. We put pumpkin in smoothies, yogurt and even pancakes. Check out some of these great pumpkin recipes. But the flesh of the pumpkin isn’t the only tasty part. Roasted pumpkin seeds make a great snack too. Pumpkin flesh is rich in vitamin A, potassium and beta carotene. The seeds are a good source of protein and are rich in minerals such as manganese, phosphorous, magnesium and zinc. Not all pumpkins are created equal. There are pumpkins for carving and decorating and there are pumpkins for eating.  Look for pie pumpkins and cooking pumpkins for the best taste. Two of my favorites are Cinderella and Long Island Cheese, but there are countless choices.

So what kind of pumpkin will you grow this year?


PRAISE FOR THE LOWLY CABBAGE

Heirloom Vegetable Seeds

by Engrid Winslow

Photo of a growing head of purple cabbage.

photo courtesy of pixabay – angelsover

Pity the lowly cabbage, which doesn’t get the love of its sexier brassica brothers and sisters such as Brussels sprouts, broccoli, cauliflower or kale. But this overlooked vegetable is plentiful and inexpensive at this type of year. Cabbage is also a breeze to grow and does great in cool spring and fall temperatures. They actually taste sweeter when exposed to light frosts as do other cool-season brassicas.

It comes in two types: European and Asian. The European types are white or green cabbage, red cabbage and savoy. The most popular Asian types are bok choy and Napa. Napa is an excellent choice for summer slaw when combined with grated carrots, red bell peppers and simple soy and rice-wine vinegar dressing with a touch of honey. Toss in some peanuts for crunch and/or cooked chicken to make it a complete meal. But today we are focusing on a couple of winter cabbage recipes.

If the taste of cabbage doesn’t convince you then maybe this will: cabbage is full of vitamin K and anthocyanins that help with mental function and concentration. These nutrients also prevent nerve damage, improving your defense against Alzheimer’s disease and dementia. Red cabbage has the highest amount of these power nutrients. Cabbage is an excellent source of vitamins C, B1, B2 and B6. It is also a very good source of manganese, dietary fiber, potassium, folate and copper. Additionally, cabbage is a good source of choline, phosphorus, magnesium, calcium, selenium, iron, pantothenic acid, protein and niacin.

This soup is adapted slightly from the wonderful cookbook: Six Seasons – A New Way with vegetables by Joshua McFadden which you might want to add to your cookbook library. https://www.amazon.com/Six-Seasons-New-Way-Vegetables

The red coleslaw is a family Easter favorite that is great as a side with ham and scalloped potatoes.

Two other favorite cookbooks for you to also consider are Brassicas by Laura B. Russell https://www.amazon.com/Brassicas-Healthiest-Vegetables-Cauliflower-Broccoli and The Book of Greens by Jenn Louis https://www.amazon.com/s?k=the+book+of+greens+by+jenn+louis&crid

Cabbage Recipes

COZY CABBAGE and FARRO SOUPFront of the Flat Dutch Cabbage seed packet. Cabbage recipes

Serves 4

Notes: If you use savoy cabbage it will not take as long as green cabbage once it is added to the pot to steam.

  • 1 pound cabbage, savoy or green
  • Olive oil
  • 1 medium onion, thinly sliced
  • Kosher salt and freshly ground black pepper
  • 3 garlic cloves, peeled and chopped finely
  • 1 sprig of rosemary or thyme
  • 1 tablespoon red wine or white wine vinegar
  • 2/3 cup uncooked farro
  • About 4 cups chicken or vegetable stock
  • 1 tablespoon fresh lemon juice
  • Shaved parmesan, to finish
  • Cut out the cabbage core and finely chop it. Cut the leaves into fine shreds or about 1/8-inch ribbons. Heat 1/4 cup olive oil in a large pot or Dutch oven over medium heat. Add the onion and cabbage core, some salt and pepper, and cook, stirring frequently, until the onion starts to soften but is not yet browned, about 5 to 7 minutes. Add the garlic and cook another 3 to 5 minutes, until the garlic softens too. Add the shredded cabbage leaves and herb sprig. Reduce the heat to medium-low and cover the pot and let it steam a bit to soften the leaves, then toss the cabbage to combine with other ingredients. Cook, covered, until the cabbage is very sweet and tender, which may take 30 minutes or as little as 15 to 20 minutes, stirring occasionally.

Meanwhile, in a small skillet, heat 2 Tablespoons of olive oil over medium and add the uncooked farro. Toast it, stirring, for a few minutes, until half a shade darker.

When the cabbage is ready, stir in the vinegar. Taste and season with more salt and pepper. Add toasted farro and stock. Bring mixture to a low simmer and cook for 25 to 35 minutes, until farro is tender and all the flavors are married. The soup will be very thick, but if you’d prefer more liquid, add another 1/2 cup stock. Taste and adjust seasoning again. Stir in lemon juice.

Ladle into bowls and finish each with a drizzle of olive oil and a shower of parmesan, with more parmesan passed at the table.

Soup keeps well in the fridge for 3 days and for much longer in the freezer.


RED CABBAGE COLESLAWPhoto of the Red Drumhead Cabbage seed packet.

Serves 4

Vinaigrette:

  • ¼ cup extra virgin olive oil
  • 2 teaspoons chopped, fresh tarragon
  • ½ cup tarragon or apple cider vinegar
  • 1 tsp dry white wine
  • 1 tsp Dijon mustard
  • 1 TBL honey
  • Salt and pepper to taste

Put all in a blender and blend for 1 minute.

Toss with:

  • 1 head shredded purple cabbage
  • 1 cup golden raisins
  • 1 tsp caraway seeds

The vinaigrette will keep for 5 days and after prepared, the salad will keep for two days in an airtight container.


Here is a recipe from our blog “The Dirt” for Spicy Tofu Tacos with Cabbage Slaw from the kitchen of Michael Scott

and more on planting Cabbage and other uses, here.