Oh, Welcome Happy Spring! After our snow dump of 15 inches this weekend and now 60 degrees of sunshine today, Spring flowers are erupting everywhere. Cutting a few flowering branches to bring indoors is always a favorite Spring thing to do, but this week I am inspired by UK garden blogger Cathy at Rambling in the Garden who has inspired many across the internet with her habit of gathering natural materials from outdoors for a vase in her home every Monday.
“In a Vase on Monday” fits in well with what I call the spiritual practices of gardening. It’s another way Nature entices us to slow down and notice what wonders are going on around us. In the scurry of the busy lives of getting to work or school or the distraction of worrying about the week, we can get disconnected with nature. A ritual like a Monday vase helps you practice noticing. Sort of mindfulness before mindfulness was the in thing. If your Mondays are too hectic you can prepare your vase on Sunday. What I find is that once you start a practice like this, you’ll start noticing good candidates for your Monday vase all week. It also helps me get in that needed pruning and garden work on Saturday…just so I can have more material for the Monday vase.
Take a quick walk in your yard (or neighborhood) to gather what might be in bloom. Here’s what I have to work with today:
Plum branches, little grape hyacinths, wild violets, daffodils, forsythia, some early pussy willows, catkins from a birch, euonymous branches.
Here are some pictures this week from people who practice this habit in March of “In a Vase on Monday!” Be inspired.
https://bbbseed.com/wp-content/uploads/2026/01/47710_BBB_Logo_HiRes_Transparent_1023-01-removebg-preview.png00Sandy Swegelhttps://bbbseed.com/wp-content/uploads/2026/01/47710_BBB_Logo_HiRes_Transparent_1023-01-removebg-preview.pngSandy Swegel2016-03-21 14:59:092025-06-23 14:59:14In a Vase on Monday
Our local garden club invited a rose expert from Jackson and Perkins to give us some winter inspiration this week. Rose growers are like tomato growers….they have their own little secrets and rituals to make their roses the best and the biggest. Our expert showed us pictures from his own garden that made me a believer in kelp. His plants treated with kelp and fertilizer were bigger and more robust than plants treated with just fertilizer If you are going to use soil amendments in your garden, kelp should be at the top of the list right after organic fertilizer.
So what does kelp offer?
Sea Minerals.
Kelp and other seaweeds are good sources of trace minerals that are often deficient in ordinary garden soil. So kelp is a good ingredient as a fertilizer…but not a substitute for your regular fertilizer.
Plant Growth Hormones.
OK, this is the real reason gardeners love kelp. Its natural plant growth hormones (cytokinins) stimulate extra growth in our plants and in our soil microbes. This is the “secret weapon” part of using kelp in your garden. Kelp stimulates roots, plant growth, flower production by virtue of the hormones even more than because of the vitamins and minerals.
Plant Health and Resilience.
Plants treated with kelp showed more drought resistance and bug resistance. Aphids, in particular, don’t like the taste of kelp and avoided kelp sprayed leaves. Anecdotally, I have found that a kelp foliage spray reduces powdery mildew.
How to Use Kelp
Kelp comes as kelp meal and as a liquid. An interesting thing about kelp is that when you apply kelp changes what kelp does for your plant. If you want sturdier roots, add kelp meal when planting to stimulate root growth. If you want more flowers on roses or tomatoes, apply it as a spray when your plants were budding. (Thanks researchers from the marijuana industry for these studies.) Some tomato growers use kelp weekly once tomatoes start to flower. If you are trying to improve your soil, apply meal or liquid to the soil once soil temperatures are above 60 or so when soil microbes are active. I like to use a weak kelp liquid spray weekly during hot spells in summer and spray all over the tops and undersides of leaves. It perks the plants up and gives the garden a lovely ocean smell. Plants absorb kelp better through leaves than through roots.
How Not to Use Kelp
More kelp isn’t better than small amounts of kelp. Don’t just throw it on your garden thinking more is better. Think about what effect you want. Do you want more tomatoes? Then applying kelp when the tomato is growing leaves but not making flowers yet will give you more leafy growth, not more tomatoes. On the other hand, a little kelp spray on your greens will increase the number and vitality of leaves.
Do Your Own Experiment
If you are going to add kelp to your repertoire, try a science experiment. Select a plant that you give kelp to and one a little further away that doesn’t get kelp. Do they behave differently?
https://bbbseed.com/wp-content/uploads/2026/01/47710_BBB_Logo_HiRes_Transparent_1023-01-removebg-preview.png00Mike Wadehttps://bbbseed.com/wp-content/uploads/2026/01/47710_BBB_Logo_HiRes_Transparent_1023-01-removebg-preview.pngMike Wade2016-03-18 14:36:202025-06-23 14:59:14Kelp: A Gardener’s Best Friend
St Patrick’s Day is this week…a traditional day for planting peas. But you know that….so get ready to plant your peas. This year I’m thinking about Ireland and two plants usually associated with Ireland: cabbage and clover (not necessarily the four-leaf variety.) A little internet browsing led to an interesting connection to these two plants. One…they both like to grow in cool humidity like Spring and Fall. Cabbage is a cool season crop. Two… old country wisdom and modern science show that cabbage and clover are excellent companion crops.
Books in England dating back to the 1700s recommend cabbage “Husbandry” the old word for farming. Cabbage was highly regarded because it lasted well as a stored food for winter and because cows and sheep that ate cabbage in the winter made sweeter milk than those that ate turnips. Standard practice in England in the olden days was to plant a clover cover crop and follow that with cabbage or potatoes. Turns out that cabbage that grows in clover or where clover had been grown and tilled under are larger and have significantly fewer pests included the cabbage looper. Cabbage moths are still the bane of cabbage growers. Modern no-till farmers have adopted this centuries-old wisdom to plant cabbage right into a field of clover.
Besides being good for cows and sheep, cabbage is healthy for us and a staple in many cuisines. I am particularly fond of the red cabbages because they are pretty! Here are a few tips to grow cabbage:
It’s a cool season crop.
That means you have to get it in early. Or plant it in mid-summer for fall harvest.
They do well from transplants.
Start seeds indoors or in a cold frame 8 weeks before last Spring frost. Then transplant it about 2-4 weeks before last Spring frost. Cabbage is a “heavy feeder” so you need good soil or extra fertilization and regular irrigation.
Watch out for pests.
Cutworms and cabbage loopers love cabbage too…but they are pretty easy to pick off if you stay after them. Little paper collars protect transplants from the cutworms. If you don’t like to pick off the worms, it is good organic control.
Cabbage makes great microgreens.
Cabbage germinates in about two days in your warm kitchen. Another superfood from the brassica family.
For more on the science of winter-sowing clover and cabbage and other brassicas
http://www.ctahr.hawaii.edu/oc/freepubs/pdf/IP-27.pdf
http://www.modernvictorygarden.com/apps/blog/show/2015631-in-praise-of-cabbages
http://microgardening.newearthmicrogreens.com/red-cabbage-microgreens-vitamins/
http://www.gardeningknowhow.com/edible/vegetables/cabbage/protecting-your-cabbages-from-cabbage-maggot-cabbageworm-and-cabbage-moth.htm
https://bbbseed.com/wp-content/uploads/2026/01/47710_BBB_Logo_HiRes_Transparent_1023-01-removebg-preview.png00Sandy Swegelhttps://bbbseed.com/wp-content/uploads/2026/01/47710_BBB_Logo_HiRes_Transparent_1023-01-removebg-preview.pngSandy Swegel2016-03-14 13:39:122025-06-23 14:59:14Cabbage and Clover Husbandry
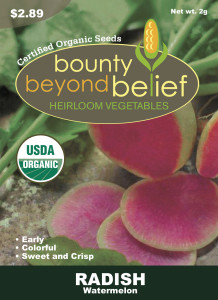
Words barely do the watermelon radish justice.
Virant. Brilliant fuchsia. Magic.
We just started carrying the watermelon radish seed this year and it is one of the first seed packets I snagged this Spring. I’m not a big radish eater although I like them eaten raw with breakfast eggs as is common in some Persian cooking. I’ve always liked to grow them because they germinate so fast. I’ve done the old trick of seeding them with carrot seed because the radishes mark where the row is while you wait a long time for the carrots to germinate.
Watermelon radishes are a game changer. Yeah, sure they are super nutritious, full of lutein and beta-carotene. Broccoli family. Good for hydration. Low in fat. Etc. etc. But they are stunningly beautiful and fun to eat.
These pictures are the reason I’m growing watermelon radish this year. Seed them and in only 50 days you can be having these great meals.
https://bbbseed.com/wp-content/uploads/2026/01/47710_BBB_Logo_HiRes_Transparent_1023-01-removebg-preview.png00Mike Wadehttps://bbbseed.com/wp-content/uploads/2026/01/47710_BBB_Logo_HiRes_Transparent_1023-01-removebg-preview.pngMike Wade2016-03-07 17:03:082025-06-23 14:59:14Why You HAVE to Grow Watermelon Radishes this Year
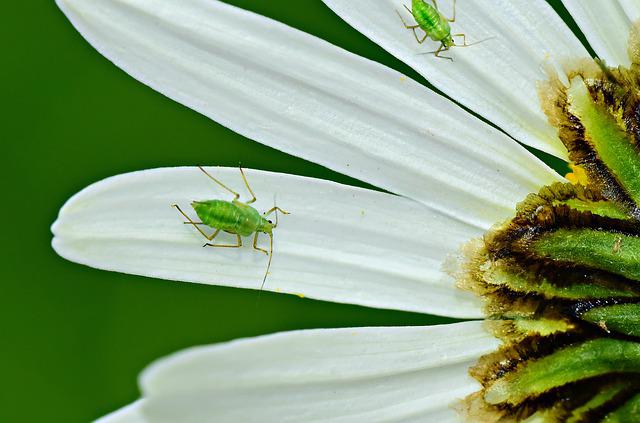
We got a great question from a customer this week about controlling aphids. Her frustration resonates with most of us who garden.
Q. Aphids are terrible, tiny creatures and I fight them every year. I’ve been looking for the best ways to make sure they don’t screw with my garden this time. I thought I had a good way; planting garlic around the plants. “Aphids don’t like garlic,” one link said. “Aphids love garlic leaves, said another one. Soap mixture, Neem oil, rubbing alcohol mixed with soap and water, importing good bugs that love to eat the aphids. I refuse to use chemicals that poison everything, it makes growing organic pretty pointless. Does anyone have any SURE FIRE, tried, and true methods?
A. The key to reducing aphids in your garden is to understand their lifestyle. Controlling them is like cleaning the house. You can’t just clean a house full of people once and expect the house to still be clean a week later if you didn’t keep picking up stuff all week. When you use any treatment you might kill most of the adult aphids that day. But the ones you missed or who were eggs that wouldn’t hatch for another day, are still eating and reproducing. Reproduction is the key to aphid success. They reproduce both sexually and asexually. They lay eggs to survive the winter. And they have live births in warm weather. Each one can create up to 100 new aphids per month.
My best sure-fire, tried and true method (or as close to that as one can get) is this:
Accept that you are going to have some aphids. To kill them all, even if possible, means you would also kill all the beneficial insect pollinators and you don’t want to do this.
Understand how aphids die. Warning: graphic content ahead.
It is super easy to kill aphids, which is why plain water spray works great. Aphids feed by attaching to the plant with their mouths. When you spray water on the aphids, the force of the water tears the aphid off the plant. The head and mouthparts stay attached to the plant, instantly killing the aphid. Even just brushing off all the aphids on a leaf with your finger decapitates and kills all those aphids. That’s why you don’t have to poison them…if you can just mechanically remove them.
Be vigilant (every few days) about checking for aphids.
New aphids are hatching in leaf litter or being birthed by the aphids who were hiding out in the weeds next door. You have to spray the aphids every time you see them in large numbers. Each aphid can have dozens of generations…They are baby-making machines. You have to keep after them at least until you see you are no longer getting infestations.
Be careful not to eliminate beneficial insects. There’s yet another reason not to try to kill off aphids outside, even with “safe” organic treatments like soapy water. If you kill the aphids, the aphid-eating wasps, another of those native beneficial insects, won’t have anything to eat and they’ll leave your garden. They are eaten by so many beneficial insects that it’s rather amazing that we see any at all. Yet there are so many on our plants at times.
This week I’m seeing thousands of them on the new growth of roses. And while my first instinct is to kill them in some way, I have finally learned to just watch them. I know what I am seeing is a mini-population explosion that will usually be followed in a week or so by mini-population explosions of predators that eat aphids. If we try to kill off the aphids which are at the bottom of the beneficial insect food chain, then the beneficials will fly away to another garden.
I knew about many of the predators of aphids like ladybugs and lacewings, but I learned yesterday that tiny native aphid-eating wasps eat a LOT of them. In addition to wasps that just eat the aphids, there are parasitic wasps that lay their eggs inside of them. When the eggs hatch the tiny larvae eat their way out of the aphid. A bit gory, but effective in guaranteeing enough food for baby wasps.
So I challenge you to a two-week experiment. Let the aphids be when they show up and just watch the plants for a few days. See who shows up to dine on them. Some possibilities include wasps, both large and small, hoverflies, ladybugs, and lacewings. It will be a fascinating discovery of how many small beings live in your garden, there to help you keep everything in balance.
Nature does provide a natural balance if you have a healthy garden that supports beneficial insects. If you are aggressively treating aphids with garlic or neem sprays, you are also killing all the other insects that eat aphids.
Alter the conditions in your garden that reduce the number of aphids.
Don’t over-fertilize. Aphids love nitrogen. You will get a little aphid bloom every time you add nitrogen to your plants. Reduce the nitrogen and you don’t have so many of them.
Encourage earthworms and use earthworm castings. Earthworms produce an enzyme chitinase to help digest their food. Aphids are repelled by chitinase. Unfortunately, the chitinase doesn’t last long enough to be the only deterrent.
Encourage good environmental conditions like airflow and temperature. This works really well indoors. In my greenhouse, I can reduce aphids by keeping a fan going and shading the plants from the really hot afternoon sun. They are often in greater numbers on plants that are stressed.
Finally, if you do want to use “organic” sprays, simple soapy water works well. (1 teaspoon per gallon). Some people use the kitchen spray with garlic and Tabasco sauce. I think the science is not clear on neem. It definitely works but it works by disrupting insects’ hormonal systems and I’m not convinced it doesn’t adversely affect beneficial insects. Some studies say Neem only kills sucking insects. I would try gentler methods first before turning to Neem.
Our new tricolor blend of romaine lettuces has me itching to get my salad garden started. I like Romaines because they are especially nutritious, comparable to kale. And I like this blend because it’s shiny and colorful. There’s a lovely gloss to the colorful Romaines that looks beautiful in the garden and on the plate. I want my food pretty!
It’s pretty easy to get lettuce ready to eat earlier than your standard growing season. If you’re either busy or lazy (or both as I often am) there are some almost no work ways to get your salad growing.
Almost No Extra Work: Row Cover
Direct seed as usual into your garden. Put a layer of row cover loosely over the area. Secure with anchors or with heavy rocks which will also capture a tiny bit of extra heat. The row cover alone will speed germinate the seeds if you have a spell of warmer weather. The row cover then will protect it if the warm weather is followed by frigid temps.
A Little Bit of Extra Work: Pots
Want to have lettuce even sooner? My friend Cathy seeds her lettuce in lightweight pots and brings them inside at night or when the weather is extreme. It’s easy for her because she has a south-facing sliding glass door and moving the pots in means sliding open the door and moving the pots two feet in or out. She has the extra satisfaction of going to the Farmer’s Market in April where market farmers are selling similar pots for $25.
Invest Work for the Future: Cold Frames
Cold frames are an awesome way of having more of your own fresh food. They do take some time and money….but you will quickly make up that investment with what you save on fresh greens.
Work like a Farmer for Lots of Lettuce: Plugs
Growing your own lettuce plugs is one way to get a garden of lettuce without thinning or empty spots. Start your seeds under lights in plug trays that you can plant out when it’s a bit warmer. Very satisfying to have a full evenly-space plot of lettuce plants in the hour or so it will take you to plant out the entire plug tray (100-200 plants).
This blog post is for anyone who wants to grow wildflowers. It is especially dedicated to BBB Seeds’ friends at the Rockies Audubon Society who have an awesome program called Habitat Heroes that encourages “wildscaping” your garden with native plants that attract pollinators and birds and support wildlife even in an urban area.
Deciding What and Where to Grow
Look at the site where you want to grow a wildflower meadow or patch. An ideal site would have sun and good drainage and not too many weeds. Nature seldom provides what we consider ideal. So the next step is choosing the right mix of wildflowers. We help by providing mixes for unique conditions such as sites that are dry or sites that shady.
Prepare the Soil
Some don’ts:
Don’t deep till!
That’s the number one rule….unless you are planning a year ahead of time. There are enormous numbers of weed seeds in any soil and tilling up the soil brings up all those weed seeds to the light and they start to grow. You do have to deal with weeds and you will lightly till/scratch in a shallowly. But this is time to leave the tiller in the garage.
Don’t use weed killer
Especially don’t use the weed killers for your lawn or those with pre-emergents that stop new seeds from germinating. Those will have long-lasting effects that will thwart your wildflower growing efforts.
Weeds:
You will have to deal with weeds especially if you have an area that is pretty barren of other vegetation. People have good success with putting down black fabric or cardboard weeks ahead of time to suffocate the weeds. For big hunkin’ weeds like dock, it’s good to get the shovel out. You can’t get all the weeds, but after you put your seeds out, you won’t be doing any weed-pulling for a while because you’ll accidentally pull the new wildflowers or disturb their young roots. Replacing weeds with wildflowers will be an ongoing process.
Scratch and Rake
You do need to break the soil and rake it smooth, but not more than 2-3 inches deep. You want little crevices for the seeds to slip into so they have a cozy home. I’ve had the best success by loosening that top couple inches of soil and waiting a couple of weeks for all the weeds to germinate. I then scratch up those weeds, rake again, and then put the wildflower seed out.
How Much To Plant
One ounce of seed (a small packet) plants about 100-150 square feet. (eg 10 feet by 15 feet.) Follow this rule of thumb. Planting more than this makes the plants choke each other out. Planting less gives weeds free run.
Expert Tip: Mix some sand with the wildflower seed to make it easier to spread the tiny wildflower seeds evenly. About four parts sand to one part seed.
When to Plant
If you live someplace mild and humid, you can plant almost anytime. The rest of us either plant in the Spring (about one month before last frost date) or Fall.
Water
That’s the biggest challenge for many. If you aren’t living in the above mentioned mild and humid area, you need to be sure the wildflowers get enough water. One gardening buddy said her secret was to go out and seed the night before a big snowstorm and let the melting snow help. I personally use row cover over the area to keep water from evaporating. I also use a soft rain nozzle to hand water over everything.
It doesn’t take much effort to convince us we should grow Walla Walla sweet onions. Think about thick slices hot from the grill. Or cold on our hot cheeseburger. Dream of oven-roasted whole onions. Or be one of those brave people who bite into the Walla Walla like it’s an apple.
Onions are really easy to grow so when I heard the Walla Walla Sweet Onion seed had arrived at BBB Seed for the first time, I rushed over. There’s only one problem for me with Walla Walls….their growing season is 125 days…a little longer than I can count on in Colorado. So I start the seeds indoors in February and transplant the seedlings in April.
The most important rule of growing onions is you have to use fresh seed. After a year or so, germination rates drop down to “almost none” so you do need new seeds each year.
Onions grow happily in decent soil. They can handle hot sun and they’ve forgiven me letting the weeds get a little overrun. There’s not too much guesswork as to when they are ripe…their tops fall over. So you can grow onions off in a corner of your garden without too much extra effort. Although quite labor intensive for farmers, onions are pretty cheap at the grocery so we don’t grow them so much to save money as to capture the awesome flavor of fresh homegrown Walla Wallas.
For more pictures and recipes, go to the website of the annual Walla Walla festival!
OR go to the festival in June!
Indoor Seed starting is really easy and cheap. You get so many more plants by starting your own seeds. My mantra in my seed starting classes is “Seeds Wanna Grow.” You just have to give them a little help to mimic outdoor conditions.
All seed-starting setups are pretty simple, once you know the basics. I just finished designing a new setup for myself this year because BBB Seed Head Honcho Mike added so many new varieties of seeds this year, that I need more space to try them all.
Design your own setup by remembering these basics.
Light
You need long hours of bright light. I run the lights for at least 14 hours a day. I used a timer because I’m forgetful. For seed starting, you don’t need special full-spectrum lights…simple fluorescents or LEDs will do. The full-spectrum is needed for adult plants that you want to bloom. I like the new T-5 fluorescents that use less energy, but my old shop lights worked great for many a year.
Warmth
Temps need to be in the 70-degree zone for most seeds to germinate quickly and evenly. In the bookshelf setup I’ve used, the lights themselves made enough heat. In my cold basement, I put a heat mat under the seed tray.
Soil and container
Seeds will germinate happily anywhere, but to develop their root system they need some kind of substrate. I used new germinating soil to avoid fungal problems. Containers can be anything. Last year’s pots, egg cartons, yogurt containers, etc. It just needs to drain.
Water
Even watering is the key. I water from the bottom by filling a container underneath my seed starting tray. Humidity helps. The most important thing to avoid is the surface of the soil drying out during germination or early growth. That is death to the new baby plants.
Air
I always have a fan near my seedlings. You don’t often see air mentioned, but the gentle movement of the air reduces mold and stimulates growth. You can get by without moving air, but I get sturdier plants and less disease.
Watercress is another one of those unassuming, almost weedy, plants that is a superfood for humans. In the brassica family of heirloom vegetables, watercress (Nasturtium officianale) is rich in vitamins, minerals (especially calcium) and sulfides. It’s not just for watercress sandwiches and tea. It is a great addition to salads as either sprouts or leaves, excellent juiced or added to juices and makes a lovely pureed spring soup. And pretty yummy just for nibbling.
Watercress is a great plant to start at the beginning of the growing season, but you can also grow watercress indoors during winter. We’ll teach you how.
Sprouts
Watercress sprouts easily and you can grow it in a jar just like you do alfalfa seeds. Its spicy kick is great on sandwiches and salads.
Plants
Seeds are pretty easy to germinate. The biggest challenge to grow watercress indoors is that it needs to always be moist, especially during germination. You can accomplish this by starting the seeds in a small pot of clean potting mix and then setting the pot in a saucer of water. Misting is great or put a plastic cover over the seed mix if your air is dry. Someplace slightly warm like the top of the frig is a great germination spot. They don’t need light to germinate.
Once the seeds are growing, you just need to be sure the plants are moist with fresh water. Think about their ideal natural habitat in Europe: slow-moving creek edges in bright shade. Some people grow them in water tanks with aerators if you want to get fancy.
One secret to tasty watercress is to keep the growing plant cool and out of hot sun and to harvest it before it flowers. After flowering, the leaves become more bitter.
To grow watercress indoors in late winter is such a promise of Spring. But it doesn’t need to be an indoor plant. After your weather warms to above freezing, you can plant your watercress outside if you have a place that stays pretty moist. (Learn more about Zones and Frost Dates). If you have a pond or fountain the watercress is thrilled living in a pot in about an inch or two of water along the edge. I’ve seen it in a shade pot with impatiens and it was pretty happy.
And once you have nice succulent leaves, watercress, slivers of cold cucumber and butter on thin white bread is actually pretty awesome.
Not sure what heirloom vegetables are or why you should grow them? Read more from Gardening Know How.