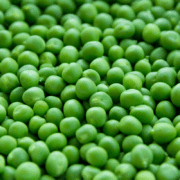
Plant more peas

Plant more peas!

All About Planting Peas

by Sandy Swegel

Rev your garden engines folks.  Today is St. Patrick’s Day and the official start of pea season and there’s no need to wait.  You have jobs to do today — it’s time to plant more peas!

Make sure beds are weeded. Those mallows from last year are easy to spot….they’re the only green thing in parts of the beds.  But they weed easily this time of year. I lightly cultivate the top inch of the soil if I see lots of annual seeds starting. In my garden, every last larkspur seed that fell last year has germinated.  Cute…but not in the pea bed, please.

Put the Peas to Soak.  If your climate is high humidity, you may not need this step, but here in the arid foothills, I soak my peas overnight, rinse them tomorrow and then plant them.  Sometimes I even pre-sprout them (just like making mung bean sprouts) and plant them with the big white root already fattening up.

Put your trellis in place if you’re growing the kind of peas that need support.

Think about row cover. Decide if you want to use it to warm the peas and speed their growth.

Think about inoculant.  I’ve written about this before. Gardens that have grown happy peas before may not need inoculant but new raw beds with less than optimal soil would probably benefit.  If you forgot to buy it, you can always plant anyway and sprinkle the inoculant over the soil and water it in later.

Remember the flowers.  I’m so fond of peas for eating whether they are oriental peas  or snap peas or plain old shelling peas, that I forget about how beautiful and fragrant sweet peas are.  My neighbor plants sweet peas on trellises along the fence, at the base of vines, in a circle in the middle of the lettuce garden.  Her garden is so beautiful and fragrant come June that I get very jealous.  Time for me to plant more peas!

How to Grow Baby Kale

The Ins and Outs of Growing Kale

by Sandy Swegel

Mixed baby kales are the current darlings of the produce section…and in my refrigerator are Lacinato Kale, Organic Lacinato Kale, and Organic Red Russian Kale. Several companies now sell thrice-washed baby kales that are ready to use in salads, stir-fries, soups or juices.  As cute as these greens are, their prices are pretty steep…we pay $4 for five ounces and then there’s all that wasteful packaging.

You can easily grow your own baby kales (or any mixed greens). Here’s how market farmers do it:

The key is succession planting. 

About every three weeks, you should seed a patch of kale seeds fairly close together in intensive planting style. 

First Cutting
Once the leaves are about 4 inches high, use scissors or knife to cut them off about an inch above soil level.

Second Cutting
Let the patch you just cut off continue to grow as regular kale and you can harvest again in a month. Cut those off again about an inch above soil. The second cutting isn’t as tender as the first but still great for braising.

Third Cutting
Let the patch keep growing for the third cutting of mature kale. Fertilize lightly. The third cutting usually leaves the plant depleted and it’s time to pull those plants and reseed.

Because you kept making a new planting of kale every three weeks in a different section of your garden, you will regularly have both the tender young greens and mature leaves.

It’s that easy. Each packet of kale has over 200 seeds so this is a really thrifty way to get a lot of kale. You can plant one kind of kale at a time, or mix red russian and lacinto together for a colorful mixture.

Eat more Kale! Yum.


Mommies Who Garden

Different Ways to Garden

by Sandy Swegel

So we were hanging out at BBB Seed amid giant sacks of seeds waiting to be shipped all over the US this week talking about how many different kinds of people bought our seeds and how they all gardened in their own unique way. One definite trend we see is a joyful kind of gardening practice by moms with young kids.  I spend the evening googling “mommies who garden” and found myself by moms all over the country who garden and who make time to write about it!

Naturally, there is no one “mommy” way to garden since there are moms who work outside the home, moms who homestead, moms who use the garden as a classroom and babysitter, and moms who garden as a personal respite from the chaos that being a mommy can be.  But I saw two trends I want my own inner gardener to reconnect with:

Mommies who garden:
Don’t worry so much about having the picture-perfect garden but about whether the garden is a source of joy and fun for the family.  There’s a lot of mulch to keep the weeds down because moms don’t have so much time for weeding.  There are signs of home-made art projects everywhere: hand-painted rocks, cute makeshift fences, bowls with puddles of mud.   The garden isn’t just growing vegetables or flowers. It’s having fun and growing kids.

Mommies (and Daddies) who garden:
are totally psyched about the fact that they have planted seeds and fed their family yummy wholesome food from their own garden. It isn’t just about saving money or growing organic food, it’s about all the love that went into the garden and the joy about having provided for the whole family and shared the harvest together.

So that’s our inspiration this week as Spring is struggling to return.  Let us create gardens that are fun and playful. And let’s grow some amazing food to share with family and friends and strangers.  Go, Mommies!

Photo Credit: http://www.sheknows.com/parenting/articles/815245/a-mom-s-guide-to-gardening-with-toddlers-and-preschoolers-1
http://www.sheknows.com/parenting/articles/815245/a-mom-s-guide-to-gardening-with-toddlers-and-preschoolers-1

Keeping Drought Tolerant Plants Happy

Taking Care of Your Wildflower Seeds When it’s Dry

by Sandy Swegel

One of the most popular mixes of wildflower seeds that we sell is the Drought Tolerant Mix.  It’s a good combination of both perennial and annual flowers that can handle some stressful situations and still make beautiful flowers.

Growing drought-tolerant plants may be different than gardening the way most of us are used to.  While supplemental water is helpful during germination and the early growth of the plant, too much water will most often cause the plants to have too much fast green growth that is weak. A heavily watered drought-tolerant plant will often produce few flowers and in rich moist garden soil can simply rot and die.

Understanding what it is that makes plants “drought tolerant” may help you understand better how to care for the plants.  Even drought-tolerant wildflowers still need water to thrive, (they are drought “tolerant” not drought “loving”), but they have adapted to drought conditions in several clever ways.

Some plants, especially ones that thrive in the prairie, grow very long tap roots that seek out water deep below the surface.  Coneflower and butterfly weed are two plants that have taproots. Dandelions too, that’s one reason they are so tough to get rid of.

Other plants learn to store water.  Cacti and yucca come to mind first, but other plants that store water in the leaves are succulents like sedums or hen and chicks.  Break open a leaf and gel-like water oozes out. Some sturdy wildflowers save water in their roots.  The tubers that Liatris makes are a good example.Tag for Drought-Tolerant Wildflower Mix packet.

A common adaptation to drought has been to conserve water by limiting the amount of water the plants lose to the air.   Plants typically lose water through their leaves, so drought-tolerant plants will have leaves that conserve water…by having narrow leaves like penstemon, or hairy leaves such as lamb’s ear. Other plants have silver or bluish leaves that reflect back the sunlight. Desert marigolds conserve water this way.

Once you understand how the plants are holding onto water, it makes sense that lots of water would stress drought-tolerant wildflowers.  They would have no way to get rid of the extra water.

Photo credit: http://www.geograph.org.uk/photo/473362


Expand Your Vegetable Garden the Easy Way

Heirloom Vegetable Seeds

by Sandy Swegel

Two forces collided around the kitchen table this week.  First I was oogling our seed catalog and indulging in winter snow day daydreams about summer gardens and how I might turn my tiny urban yard into a farm so I could grow one of everything. At that moment I wanted to be surrounded by beautiful shiny vegetables. Then the second force came.  I went grocery shopping for my favorite winter recipe:  a very simple roasted winter vegetable dish with squash and sweet potatoes and beets, marinated in olive oil and rosemary. Yum. The winter squash was even on sale.  Then sticker shock hit. A single large winter squash was $5, even on sale!

The force of wanting to buy more seed collided with the force of not wanting to pay retail prices for food.  The only natural outcome is I have to find more space to garden so I can plant more squash.

It’s too late for any of the summer or fall garden expansion methods of either tilling in land or doing some lasagna gardening.  So I will use the easy method my urban farmer friend Barbara taught me.  Out in a neglected corner of the yard where there’s just some old grass, I’ll dig a shallow hole next May and fill it to an overflowing mound with a bucket of compost.  I’ll plant squash seeds there and cover the surrounding grass with cardboard.  The squash plants will grow over the cardboard as it takes another year to make good garden soil underneath.  I can drape the burgeoning squash plants over the fence and maybe up an old ladder onto the shed roof. (I did mention the tiny yard, didn’t I?)  But the key to expanding my garden this way is that I’m not doing all the heavy work of putting in a new 10 x 10 garden bed for squash.  The squash roots and cardboard are going to help do that.  My yield won’t be as high this year as a full amended composted garden, but then the work will be almost nothing to grow a lot of $5 squash for the price of $1.89 seed packet.

The key to baking yummy winter vegetables is to cut them in 1-1/2 inch pieces, marinate them in olive oil, salt and rosemary, and bake them on flat cookie sheets.  The flat baking sheet is crucial to the outcome because then the sides of the vegetable get a nice crisp roasted texture.  Here’s a more formal recipe:

Recipe:  http://www.foodnetwork.com/recipes/ina-garten/roasted-winter-vegetables-recipe/index.html

Season Extenders

Season Extenders – Protection for the Garden


Here in October in zone 5, we have had a couple of snows now so it’s hard to pretend the garden season isn’t over for most of us.  The daytime temperatures are still well above freezing and downright balmy in the 60s at times.  But nighttime temps dip down to the 30s and can ruin vegetables and fruits still on the vine that otherwise might keep growing in warm daytime weather.  It’s too late to sow late-season crops now but there are ways to stretch the growing season for the fall and the spring.

For Spring:

Mini hoop houses are super easy and there are hundreds of DIY plans available.  These make a pocket of air around the new seedlings and keep the soil and air a bit warmer.  These mini hoop houses or low tunnels can give you an extra month of the growing season.  Your seeds will germinate better, you’ll have fewer pests, and vegetables that require less watering.


Here is a simple, inexpensive, easy hoop house plan:

  • 6 sections of 2 ft. rebar
  • 6 5 ft. sections of ¾” irrigation hosing
  • Any kind of large plastic covering. (painter’s plastic, opened-up large trash bags, wrapping from a mattress)
  • Bricks or rocks to hold the cover down around the edges.

Here are some super simple designs to inspire you:

http://www.motherearthnews.com/organic-gardening/low-tunnel-construction-mini-hoop-house.aspx

http://growingthehomegarden.com/2014/03/how-to-build-mini-hoop-house-early-start-garden.html

http://www.leereich.com/2012/01/cold-has-yet-to-throw-wrench-into.html

The best part about the popularity of mini hoop houses or low tunnels is that you can now buy pre-made, fold-up tunnels for less than $25 at garden centers, hardware stores, or online


For Fall:

Other than hoop houses, here are some ideas of commonly found items to use for protection against frosts and critters.

Old worn bed sheets (love the flannel ones with cartoon characters)can be lightly laid over anything that might be hurt by freezing.  This includes vegetables like green beans and squashes and herbs.

Plastic bags of leaves.  Just quickly throw the bags over and around root vegetables as temperatures keep dropping to keep the ground from freezing.  If you can still work in the soil, your carrots and turnips and beets are still edible and yummy!  Two bags of leaves snuggled around the basil patch will keep basil alive for a bit longer.

Upside down garbage cans.  I can keep a pepper plant going in cold temperatures until they turn red by putting clean garbage cans upside down over them at night.  It doesn’t take much to protect against 29 degrees…just a pocket of warmer air.

One of the biggest struggles in the fall is to protect pumpkins and squashes from the nibbling critters hunting for food before the cold sets in.  The squirrels and raccoons love nothing better than to sit down to dinner on my pumpkins and gnaw holes through them to get to the seeds.  A barrier of chicken wire, hooped and secured over the ripening fruit has proven successful in keeping them out.

Plants, at this time in the fall, aren’t growing much, but they are still alive and producing nutrients, which is better than their fate in the back of my refrigerator.

Primping for Winter Interest

How to Prepare the Garden For Winter

by Sandy Swegel

As Fall proceeds at full speed, our tasks in the garden take a new direction as we start primping for winter interest.  There’s no longer time for flowers to set new buds to bloom before frost.  There won’t be any tomatoes that aren’t already on the vine.  A killing frost will come soon and kill off many of the annual flowers. So it’s time to start getting the garden ready to look good this winter.  Now instead of thinking about colorful flower displays, we turn our thoughts to structure and texture in the garden.  We want to leave tall flower seedheads to dramatically collect snow in winter as well as feed the birds.  There’s no more deadheading roses – now you want to see the rose hips mature and redden as the air gets cooler. Tall ornamental grasses will sway dramatically in winter winds.

In short, here are the things you don’t need to do anymore this year.

Stop deadheading flowers.

You want to see stately stems of echinacea and rudbeckia in the winter garden. Blooms of butterfly bush frozen in place will give a hint of color into the winter.  Small plants you thought were finished like scabiosa or dianthus will throw out a few final blooms that provide some late bee nectar.

Let dying foliage stay in place.

Earlier in the season, I’d pull off dead leaves from daylilies, so things would look their best.  Now, brown and golden foliage against green leaves is part of the vibrancy of Fall.

Let vines wander where they may.

I spend a good part of the summer garden season trying to prevent aggressive Virginia Creeper from pulling down branches of the wild plum and apple trees. Now the crisp red color of the Virginia Creeper delights me and I love seeing its leaves vining all throughout the garden.  Even the weedy self-sowing morning glories have beautiful golden tones as they twine up and down flower stalks.

Let your flowers reseed. 

The easiest way to garden is to let your flowers reseed themselves.  Bachelor Buttons and Mexican Hat and California Poppies are all dispersing their seeds to soak in the winter moisture and cold so they can burst forth again next Spring.  Some seeds I’ll collect for starting in pots next Spring, but it’s nicest when they just seed themselves in place.

Let the annual weeds be.

It’s always time to keep after perennial weeds like thistles and dandelions, but annual weeds that crop up now won’t usually have time to make flowers much less set seed before killing frost.  It’s usually safe to just leave them alone.

Let your vegetable garden reseed itself.

I’ve left the leek flower stalks in place.  Big seed heads of dill and parsley and anise are allowed to stand in the vegetable garden.  Even the lettuce and spinach and chard that bolted in summer heat now remain and drop their seeds to return next Spring.  I usually absentmindedly forget some of the garlic and potatoes….that will all return next year to be vigorous new plants.  Arugula has already multiplied itself a thousandfold in my lettuce bed.

The one task still to do?  WATER if needed.  The dry low humidity days of Fall can desiccate the garden.  If you don’t have rain, be sure to do some supplemental watering so that your perennial plants go into Winter well-watered.  Desiccation from dry air and winds is responsible for more winterkill than mere dry soil.  So give everything a good drink now before all the leaves fall.  You may have to water again in November and throughout the winter if it’s dry, but a well-watered Fall garden has an excellent chance of surviving even brutal winter conditions.

Watermelon Crop Circles

Spotting these Unique Looking Viruses

by Sandy Swegel

Nature is so darn weird some days.  My friend Lara found four watermelons with this a design in them growing in her farm field.  Her neighbors are, um, quirky enough that one of them might have spent the night carving the design.  But a quick google for “crop circles and watermelons” turned up more equally cryptic images.

Most likely these watermelons weren’t carved by industrious aliens.  Designs like this can be caused by spot or mosaic viruses   Last year, we saw lots of the Tomato Spotted Wilt Virus that wiped out tomato plants locally.  Vining plants like cucumbers and papayas are also susceptible.

Most of these plant viruses are spread by insects, often aphids or thrips.  An infected insect goes from plant to plant spreading the virus.  Sometimes the effects are inconsequential and sometimes, as happened with the papaya ringspot virus, most of the crop can be wiped out, endangering the economic status of the entire growing area. Insects often overwinter in debris in the field or nearby, so clearing out your garden after harvest can sometimes break the disease cycle.

Not much you can do once you have the virus. Sometimes they don’t spread, and other times they wipe out the field. Lara only has four fruit so far so she’s hopeful it’s an isolated problem.

Why is tidying up always the answer to most problems?

My Squash is Wilting

Trying To Get Along With the Squash Bug

by Sandy Swegel

Eww…Yet another bug thriving this year and ruining my food.  Most of us have experienced our squashes suffering from powdery mildew that coats the leaves white, but knowledgeable gardeners are perplexed here in Colorado by squash that suddenly completely wilts and die (Asana wilt).

Turns out squash is wilting often due to a very small bug, the squash bug, that injects a nasty venom into the stems wilting and killing the entire vine.

“Can’t we just all get along?” I holler at them.  There’s an entire large squash plant and I’m willing to share with bugs….but the squash bug wants it all.

This is a pest you need to be aggressive with if you see it because it doesn’t share but will kill your whole plant given a chance. Look for the adult bug (looks a bit like a stink bug) or nymph (distinctive antenna and small head) and kill it (take a small bucket of soapy water into the garden with you and throw the bugs in, to drown them, if you don’t want to ‘squash’ them). More importantly, look for the eggs on the underside of leaves and crush them.  Handpicking works well in a small garden if you’re vigilant.

We have to stand our ground against creatures like the squash bug. I explain it to them as I dunk them in the soapy water or throw them to my chickens….if you don’t share and play well with others, you lose your privileges in my garden!

For more info http://www.ext.colostate.edu/pubs/insect/05609.html

 http://extension.entm.purdue.edu/4h/default.php?page=snr40&stage=larva

Two Midsummer Tasks

Taking Care of Your Plants in the Heat

July can be hot in the garden.  If you’ve kept up with weeding earlier in the season, there may not be too much work outside of harvesting veggies.  Two midsummer tasks are important now.

Fertilize plants that have been working hard.

Tomatoes….because I want lots of tomatoes and the plants are growing like crazy in the summer heat.  I fertilize with a liquid organic bloom fertilizer.

Roses….because they just finished their big summer grand blooming and will rest a bit….but I want another big flourish as soon as the weather cools a bit.  I like the organic granular fertilizers although if there are dogs in the yard who try to eat the blood meal and bone meal in them, you’ll need to use a liquid.

Greens and other vegetables.  The chard and kales have been working hard and I will treat them to a nice kelp foliar spray.  It also makes the garden smell like ocean breezes!

Start seeds for your Fall Garden. This is hard to remember in the summer heat.  But now is the time to start broccoli and cauliflower plants so they’ll be ready to mature and sweeten in crisp Fall nights.

And if you like peas….it’s a good time to get them started again.  I waited till August last year and didn’t get much of a Fall crop.

Of course, you should always keep up your succession planting….keep putting in new plants or seeds where you’re pulling old ones out.

Happy Summer Days!