Garlic Chives – A Rugged Plant with Pretty Flowers

Cover Crop Seeds

by Sandy Swegel


It’s that time of year when I nominate plants for this year’s Garden Awards. All Fall I’ve been admiring one plant that is a “crossover” plant able to be a contender in both the “Tough and able to handle the absolute worst soil and little water” category AND a nominee in the “Aren’t You Pretty” category. That stellar plant this year is Garlic Chives (Allium tuberosum). It gets extra kudos for being a late-season nectar and pollen source for bees and butterflies too.

The flowers are beautiful little white stars. Even as they turn to green seeds pods, they are still attractive enough to put in a vase. I’ve never seen any bugs or pests or disease on the chives…probably because they do smell like garlic.


Pungent aroma is one reason they aren’t a perfect garden flower. The greens are edible just like garden chives (and known in Asian cooking as Chinese chives). The flavor is more garlicky than oniony. They are lovely thrown in a stir fry or sauteed and served in egg or tofu dishes.

Now full disclosure requires I tell the other downside of garlic chives: they make a lot of seeds. And they love to reseed in rocks and crevices of garden walls. I deal with this by dead-heading the seed heads in about October before the black seeds drop. While this can be a bother in an irrigated flower garden, it’s not a problem at all in a tough xeric area where there’s not much water anyway.


You can direct seed the chives or start them and transplant. The only extra requirement they have is that they need dark to germinate well….so sprinkle some soil over the seeds. Most of the time the chives overwinter or reseed. They grow in clumps about a foot tall and the flowers are one-two inches wide…depending on your water and soil fertility. If you have sun and moist soil they grow big and spread quickly. But part shade is fine. So is very dry or heavy clay soil. The plants will be smaller, but still impressive.

Yes, that’s what the garlic chives were this year: impressive. Tough plants and pretty.

Photo Credits
http://www.missouribotanicalgarden.org/PlantFinder/FullImageDisplay.aspx?documentid=10864
https://www.mountainvalleygrowers.com/alltuberosum.htm
http://statebystategardening.com/images/uploads/article_uploads/11June_mwnews_5-B2.jpg

Garden and Grow Flowers all Winter Long

Wildflower Seeds

by Sandy Swegel

For gardeners foolish enough to live where winter takes hold and the ground freezes, the time between first frost and last frost can be very long. Some gardeners are wise enough to welcome the break from the work of the garden and enjoy the natural flow of the seasons. Others like me start longing for a greenhouse or dream of living in warm tropical climates. I fantasize about building a mobile greenhouse I could drive down south to grow all winter and drive back to Colorado next Spring. I mourn the death of geraniums in beautiful pots and the brown frozen leaves of basil.

Before you lug dozens of plants into your living room where they mostly suffer until they succumb to low light and pests, make a plan for how to garden your indoor area.

If you have good indoor southern exposure…

Blooming plants like geranium, Hibiscus, Bougainvillea and Mandevilla will put on winter-long displays of flowers. Often by January, the dry air and lack of circulation will cause aphid explosions, and you’ll need to give the plants a quick shower or deal with the aphids in some other way before they get completely disgusting. Fragrant plants like rosemary will also thrive and even bloom if you keep them well-watered. Plants that didn’t need much water outdoors have different needs indoors and will probably need to be watered twice a week.


Low light windows…

Winter is the time to move cyclamen and African violets out of the direct winter sun to the north or east windows to keep them happy. Begonias also do well in lower light.
Cuttings of coleus bring in lots of foliage color. Coleus plants are so attractive in pots but expensive to buy. Simple jars of water will keep the coleus happy and grow roots so you have plants next Spring.

Herbs…

The rosemary is in the southern window. You can harvest the thyme from outdoors all winter as long as you can push aside leaves or snow. Tender herbs like basil and oregano are another story. I haven’t had much luck bringing them indoors…they bolt or get buggy. I have had great luck seeding narrow windowsill pots densely and enjoying the young leaves as microgreens.

Forcing bulbs…

Amaryllis are great to start now. Setting aside a few bulbs from Fall plantings can occupy your gardeners’ heart for weeks in January and February. Not all bulbs force so there is some experimentation here and some bulbs will need a cooling period in your frig or cold garage. But little daffodils inside in late January give great joy.


Forcing stems…

Make a mental note now of what spring flowering trees and shrubs there are in your yard or neighborhood. In late winter after a warm spell, you can see the new buds swell on woody stems. Cut those stems and bring them indoors.

Winter doesn’t have to be long and gray. You can garden inside all season long.

Photos:
http://www.hiddenvalleyhibiscus.com/forum/index.php?topic=144.0
http://picklesandcheeseblog.blogspot.com/2009/11/bright-red-geraniums-in-big-black-pots.html
Miss Priss the Bougainvillea, Good To Grow, Liza’s plants

Lupines

Wildflower Seeds

by Sandy Swegel

One way to design your garden is to plan ahead, make sketches and get all of your seeds started indoors 8 weeks before frost.  Another way, for those of us not quite so organized, is to add a plant you absolutely fall in love with, no matter what the time of year.  Lupines fit this latter category for me.  Until I see them bloom, I forget how amazing they are. When they come into bloom, I am awestruck.  They are so unusual and big and beautiful and colorful.  I envy those in New Hampshire who went last week to the Sugar Hill Lupine Festival where you could ride horse-drawn wagons through fields of lupine.  The festival continues this weekend if you live nearby.  Friends sent photos of lupines against the sea in Cape Cod and I knew it was time to get the packets of seeds of lupine that I’ve had unopened since February.


June is probably a little late to get flowers for this year from seed, but it is perfect timing for growing big plants that will put out big flowers next June.  Even if you already have some lupine growing, it is a good time to start some more.  Lupines are biennial or short-lived perennials so you need to keep starting new plants if they aren’t seeding themselves around.  They germinate pretty easily especially if you give them a cold stratification or just soak them overnight in warm water before seeding.  Lupines are easy to grow.  They like moist areas but tolerate drought.


There are good reasons to grow lupine other than their drop-dead gorgeousness.  Permaculturists value lupine as nitrogen fixers and phosphorus accumulators.  Bees and other nectar-eating pollinators value the abundant nectar from lupines.  Lacewings like to lay eggs on them. Birds eat their seeds. And we feast on their beauty.

Photo Credit

Lupines of Cape Cod, L Fulton, 2016

Perched Among the Lupines, Michael Carr of Somersworth, NH 2013

Two Ways to Guarantee Your Outdoor Seeds Grow

Seed Starting

by Sandy SwegelPre-sprouting seeds

The next few weeks are crucial for new gardeners. Every year in Spring, first-time gardeners buy some seeds and dig up a garden on the first really warm weekend and sprinkle the seeds out. Then they wait. For some, within the month, weather conditions will be good and they’ll have their first garden seedlings and they will be totally hooked on the magic of gardening.

For others, something bad happens that the newbies don’t know about. They don’t realize they have to water. Or a couple of hot days come and burn the new seedlings to a crisp. Maybe the neighborhood crows watch you plant and come to eat every last pea. Sometimes the soil is cold and it’s just too early to germinate seeds. These newbie gardeners lose hope and say they just have a black thumb and give up gardening.

If you’ve had failures but are still willing to give a garden from seed a try, I have two techniques that virtually guarantee your seeds will germinate outdoors. These are especially good ideas if you’ve given up trying to grow some things because they never work for you. For years I just thought I was broccoli-impaired until I tried these hints.

First of course, you have to start your garden bed.

HOW TO START A GARDEN BED.

You can till and/or turn the soil by hand but you don’t have too if the soil is not solid concrete.
Dig out the weeds. Get the roots if you can.
Take a rake and make the soil level and a bit smoothed out.
Water soil with a soft sprayer if the soil is dry.
Sprinkle seed over the soil. How much seed and how far apart is written in the little print on the packet.
Pat the seed lightly with your hands so there is contact between the seed and the soil. Bury the seed slightly if the packet says so.

If you live in someplace humid and warm, that’s enough. Your seeds should come up.

If you live someplace dry or with fluctuating temperature or you’ve had failures in the past, try these two success techniques:

Sprouts

#1 ROW COVER

Lay a sheet of row cover loosely over the seeded bed. You want it nice and loose so the plants can grow and the row cover lifts with them. I use some heavy rocks to hold down the row cover so it doesn’t blow away. The row cover helps the seeds stay moist enough to germinate and raises the soil temperature a few degrees so the seeds germinate faster.

Water with the soft sprayer. Note….I water right on top of the row cover. You don’t have to lift it to water underneath often causing the seeds to float away. It’s permeable so the water makes its way through.

#2 PRE-SOAK AND PRE-GERMINATE the difficult seeds.

Pea sproutsSeeds like peas or carrots respond well if soak them in warm water in a bowl overnight, drain them, then plant. The soaking activates the enzymes that break the seed coat and speeds up germination. If it’s a seed you really have trouble with, you can put the seeds on a wet paper towel in a baggie and wait a few days until you see the sprouts.

These two shortcuts…pre-germination and row cover…work for me all the time. And I get better germination which means I get more plants per packet of seeds and save even more money.

Now go out and grow some food and flowers!


Photo credits:
http://daphnesdandelions.blogspot.com/2010_09_01_archive.html
http://learningandyearning.com/tag/pre-sprouting/

Jumpstart your Lettuce Garden

Heirloom Vegetable Seeds

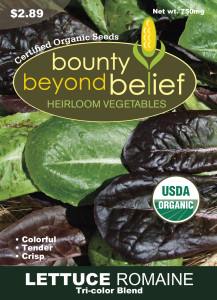
Our new tricolor blend of romaine lettuces has me itching to get my salad garden started. I like Romaines because they are especially nutritious, comparable to kale. And I like this blend because it’s shiny and colorful. There’s a lovely gloss to the colorful Romaines that looks beautiful in the garden and on the plate. I want my food pretty!

OrgLettuceRoamaineTri_BBB

It’s pretty easy to get lettuce ready to eat earlier than your standard growing season. If you’re either busy or lazy (or both as I often am) there are some almost no work ways to get your salad growing.

Almost No Extra Work: Row Cover

Direct seed as usual into your garden. Put a layer of row cover loosely over the area. Secure with anchors or with heavy rocks which will also capture a tiny bit of extra heat. The row cover alone will speed germinate the seeds if you have a spell of warmer weather. The row cover then will protect it if the warm weather is followed by frigid temps.

A Little Bit of Extra Work: Pots

Want to have lettuce even sooner? My friend Cathy seeds her lettuce in lightweight pots and brings them inside at night or when the weather is extreme. It’s easy for her because she has a south-facing sliding glass door and moving the pots in means sliding open the door and moving the pots two feet in or out. She has the extra satisfaction of going to the Farmer’s Market in April where market farmers are selling similar pots for $25.

Invest Work for the Future: Cold Frames

Cold frames are an awesome way of having more of your own fresh food. They do take some time and money….but you will quickly make up that investment with what you save on fresh greens.

Work like a Farmer for Lots of Lettuce: Plugs

Growing your own lettuce plugs is one way to get a garden of lettuce without thinning or empty spots. Start your seeds under lights in plug trays that you can plant out when it’s a bit warmer. Very satisfying to have a full evenly-space plot of lettuce plants in the hour or so it will take you to plant out the entire plug tray (100-200 plants).

http://wcfcourier.com/lifestyles/home-and-garden/gardening/lettuce-plant-some-frilly-fun-veggie-can-be-grown-in/article_2a856188-c725-5af2-960d-9fd1d89f4896.html

http://thefoxplot.com/tag/beekeeping/

EZ Indoor Seed Starting

EZ Indoor Seed Starting Setup

Gardening Tips

Indoor Seed starting is really easy and cheap.  You get so many more plants by starting your own seeds.  My mantra in my seed starting classes is “Seeds Wanna Grow.”  You just have to give them a little help to mimic outdoor conditions.

All seed-starting setups are pretty simple, once you know the basics.  I just finished designing a new setup for myself this year because BBB Seed Head Honcho Mike added so many new varieties of seeds this year, that I need more space to try them all.

Design your own setup by remembering these basics.

Light

You need long hours of bright light.  I run the lights for at least 14 hours a day. I used a timer because I’m forgetful.  For seed starting, you don’t need special full-spectrum lights…simple fluorescents or LEDs will do.  The full-spectrum is needed for adult plants that you want to bloom.  I like the new T-5 fluorescents that use less energy, but my old shop lights worked great for many a year.

Warmth

Temps need to be in the 70-degree zone for most seeds to germinate quickly and evenly.  In the bookshelf setup I’ve used, the lights themselves made enough heat.  In my cold basement, I put a heat mat under the seed tray.

Soil and container


Seeds will germinate happily anywhere, but to develop their root system they need some kind of substrate.  I used new germinating soil to avoid fungal problems.  Containers can be anything. Last year’s pots, egg cartons, yogurt containers, etc.  It just needs to drain.

Water

Even watering is the key.  I water from the bottom by filling a container underneath my seed starting tray. Humidity helps.  The most important thing to avoid is the surface of the soil drying out during germination or early growth.  That is death to the new baby plants.

Air

I always have a fan near my seedlings.  You don’t often see air mentioned, but the gentle movement of the air reduces mold and stimulates growth.  You can get by without moving air, but I get sturdier plants and less disease.


Picture credits:

https://littlehouseontheurbanprairie.wordpress.com/category/seed-starting/

http://www.vegetablegardener.com/item/10376/diy-pvc-grow-light-stand

http://www.harvesttotable.com/2011/04/vegetable_seed_and_seedling_pr/


Best Heirloom Vegetable seed

Wildflower Seed Mixes

Grass and Wildflower Seed Mixes

Start your Seeds…Again.

Why You Need to Restart Your Seeds

by Sandy Swegel

This time it’s going to be a lot easier. You don’t need lights and cold frames. You don’t even have to use trays and little pots. You can start your seeds again and put the seeds directly into the earth.  You don’t need much time.  Seeds germinate in warm soil really fast. All you really do need this time of year is water.  Seeds you start mid-summer are at risk of germinating and then drying out, so you have to remember to sprinkle them daily and keep the soil moist.  But that’s about it.

  1. Why Start Seeds Now?

The least romantic reason is to Save Money.
The second least romantic reason is to Save Time.
The romantic reason is Beauty and Abundance.

Veggies


Lettuces. In most gardens, your lettuces and even spinach have bolted and gone to seed.  You’re probably trying to salvage individual leaves here and there, but they are pretty bitter because of the heat.  Seeding new beds will give you young sweet leaves and plants that will feed you well into Fall and even Early Winter.

Cold Hardy Greens.

The key to being able to eat out of the winter garden is to have big plants with enough leaves to feed you all winter.  Chards and Kale and Spinach seeded now will be big enough come to Fall that even in cold climates you can pile leaves on them and harvest from under the snow.  But you need big plants because come October and November the plants aren’t going to be re-growing much.

Peas.

Peas germinate and grow easily this time of year.  By the time they reach maturity, the chill of Fall nights will make them sweet and yummy.  In Colorado we kind of got cheated out of our peas this year because it became so hot so fast, the peas dried up.  But we have a second chance.

Root crops.

Carrots and beets planted in summer have time to grow to maturity and wait in the soil until cooling Fall weather turns them into sugar. As long as the ground isn’t frozen solid, you can continue to harvest delectable root veggies that taste much better than the spring and summer harvests.

Herbs.

Parsley and thyme are among the many herbs you can harvest all year.  Thyme can be frozen solid.  Even parsley that has frozen will plump and be bright green on warm sunny winter days.

Perennials

You know the adage about perennials. First, they sleep, then they creep, then they leap.  Perennials need their first year to establish roots and many don’t even make flowers until the second year.  Perennials that you seed now will still consider this their first year and then be ready to bloom next year.  If you wait until next Spring to plant perennial seed….you won’t get flowers until 2016.  Planting perennials is one of the most thrifty things you can do in your gardens.  Foxglove and lupines are both underused magnificent bloomers in gardens.  And they can easily cost $8 each in garden centers. You can have dozens and dozens of them blooming next year if you seed now.  All those flowers for cutting you’ve always wanted — daisies and echinacea and rudbeckia – they are simple from seed. One packet of seed will give you dozens and dozens of flowers next year.

So save an entire year of time by planting perennial seeds now. And save a bundle of money by growing your own perennials and by having greens you can pick from for the next six months.


Photo credit:  www.modernfarmer.com


Heirloom Vegetable Seeds

Wildflower Seed Mixes

Grass Seed Mixes


Grow Your Own Food: Best Return on Investment

The Three Foods You Must Grow

by Sandy Swegel

There are so many vegetables you can grow in your garden. If only there was enough time. If you have limited time or space for your garden, think about what is the best return on your investment of time and money when you grow your own food as well as the best outcome of flavor and nutrition. Three things I grow even if I don’t have time to grow anything else are:

Salad greens.
Loose-leaf lettuces, spinach, kale, chard, and arugula are up and ready to eat in as little as three weeks after planting. You can pick what you need for tonight’s salad, and let the plant continue to grow for another night’s salad. Baby greens and mixed lettuces cost $6 per pound (and up) at the grocery…and they aren’t necessarily that fresh…sometimes they’ve been traveling in a semi-trailer from California for a week already. Grow your own greens to get maximum nutrition and taste for a couple of bucks worth of seed.

Tomatoes.
You’ve tasted one of those grocery store tomatoes that look perfect and taste like absolutely nothing? Enough said. You have to grow tomatoes because home-grown tomatoes taste so much better than anything you can buy. But tomatoes have also gotten really expensive. One or two tomato plants easily save you a couple hundred dollars if you regularly eat tomatoes in your salads and sandwiches. Cherry tomato plants are especially prolific.


Herbs.

Fresh herbs are the best way to give oomph to your cooking. They taste so much better than dried herbs and can often star in a simple dish …such as basil leaves served with mozzarella and tomato. Many herbs are perennial (like thyme and oregano) and only have to be planted once. Annual herbs, such as basil and dill produce lots and lots of flavorful leaves.

It’s always fun to grow everything there is to grow, but if you’re strapped for time or space, let the local farmers grow the long-season crops like winter squash, the root crops like onions and carrots, or the water-hogging melons. You’ll be enjoying your own magnificent home-grown healthful salads all season.

Make your own seed tape

DIY Seed Tape

by Sandy Swegel

I’ve been toying with my new packet of the Cosmic purple carrot seeds. They are so colorful I can’t wait to see them in my garden. Or better, on my own plate. But the seeds are so darn small. Some years I’ve put the seeds in and forgotten to thin the hundreds of carrot seedlings coming up and I end up with really skinny carrots. Seed tape is an obvious solution but pricey…and I don’t want ordinary orange carrots…I want purple carrots! Never mind my recent googling discovery that carrots used to be purple until about the 17th century. Then growers in Holland, trying to be patriotic to the ruling “House of Orange” hybridized seed until they got “orange.” I swear, I couldn’t make this stuff up. There is some thought the Dutch might have made it up, but that’s the official story told in the Netherlands.

It’s crazy easy to make your own seed tape.
Most of the DIY seed tapes involve dollops of glue and trying to drop a single seed onto to the glue.
My favorite technique is this:
Cut a length of thin toilet paper about one inch wide.
Put some seeds onto a flat plate
Put some glue into a tiny bowl.


Dip a toothpick into the glue and then use it to pick up a seed or two. Put the seed onto the paper. About an inch apart. That’s it. It’s not much glue so you don’t have a long drying time.

If you are going to plant soon, I don’t think you need to put on another piece of paper to hold the seeds in place. Just go out and plant.

Now, I don’t actually plant in single rows. I like to plant in swaths. So I skip cutting the toilet paper and just glue down three staggered rows of seed right onto the toilet paper.

I can’t wait for my swath of purple carrots to appear!


Photo credit:

http://www.treehugger.com/lawn-garden/why-carrots-are-orange-and-5-non-orange-carrots-grow-your-garden.htm


Best Heirloom Vegetable Seed

Wildflower Mixes

Pollinator Mixes

Grass Seed


Best Free Seed Starting Container Ever

Seed Starting Tips

By Sandy Swegel

If truth be told, growing seeds and especially food is really just a hobby for me. I do it quite earnestly and often obsessively, but it’s not like I’m not going to eat if I don’t grow my own food. That has not always been true for my ancestors or for people around the world. If they don’t grow their own gardens, they don’t eat. And they don’t have extra money to buy fancy seed-germinating setups.

A great-grandmother I met described for me how she went about seed starting back in the Depression of the 1930s living on the plains in Colorado. It’s a method that she still uses because it works so well and costs nothing. In her retirement she lives in a city townhome and but she still gardens in big pots on her patio…and each Spring she has egg-carton trays full of eggs with seedlings on her windowsill.

We’ve often heard of putting potting soil right into egg cartons. But if you plant right into the eggshell, you don’t end up with broken soggy cartons…and you putting calcium right into the garden where you need it. People who keep earthworms know that earthworms need calcium for reproduction. Eggshells in compost and in the soil make for more earthworms and better soil.

It’s super simple to start your seeds in eggshells. Save some egg shells. You’ll want to rinse them out or you’ll get that nasty sulfur smell if you leave old egg inside. Use a pin to pierce a hole or two in the bottom. Fill with some clean potting or germinating soil. That’s it. Absolutely free. Put the eggs into an egg carton on a bright warm windowsill. The eggs keep moisture in much better than the carton would. When it’s time to plant just crumble the base of the eggshell right into the garden before planting.

I sometimes get the clear plastic egg cartons. Those are really useful because the closed plastic makes a great tiny greenhouse.

You already know how to save money if you’re growing seeds. Growing from seed means each plant costs you pennies instead of dollars when you buy plants. Now you don’t have to pay for the seed containers either.

And if you time it right, you can have super cute eggs full of tiny seedlings for table decorations.


Photo Credits

http://foodstorageandbeyond.com/2011/03/feature-friday-eggshell-seed-starting-pots/

Best Heirloom Vegetable Seed

Wildflower Seed

Wildflower Seed Mixes

Grass Mixes