The Importance of Soil

by Engrid Winslow

Let’s talk about getting your vegetable and flower beds ready for planting by preparing the soil. No matter how great your soil seems to be, your new plants will welcome a boost of vital nutrients. Tomatoes, onions, peppers and other vegetables are known as “heavy feeders”. This means they need (and therefore remove) lots of minerals from the soil they grow in. Without fertile soil, many plants will struggle to produce those tasty fruits and vegetables, and beautiful blooms.

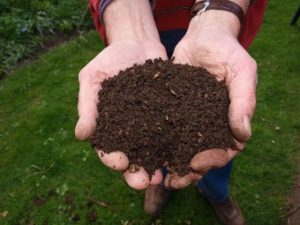
5 Tips to Improve Your SoilHands full of rich soil.

1. Add compost: Make your own or purchase a quality one such as mushroom compost. You may also like chicken manure based, beer industry bi-products or even dairy cow manure. Avoid compost made from curbside recycling (who knows what is really in there) or anything with steer manure, usually very high in salt. Spend a little extra on better quality and your garden will thank you with beautiful vegetables and flowers.

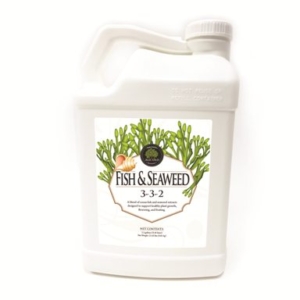
2. Use fertilizers: A mild, organic fertilizer is best and can range from fish emulsion to compost tea or kelp. Seek out a liquid fertilizer that is a balanced mix of nitrogen, phosphorus and potassium. Look for a label with low numbers for each of these 3 minerals. See below for an example (3-3-2).Age Old Fish and Seaweed Liquid Fertilizer
3. Cover the soil all year: Use mulch (shredded leaves are perfect) and cover crops when you are not growing vegetables. This will help keep weeds at bay and adds nutrients to the soil.

4. Rotate vegetables: Don’t grow the same vegetables in the same place every year, especially those “heavy feeders” (mentioned above). It’s best to give the soil a three-year break between them to avoid diseases and soil depletion. Remember that some crops (peas and beans in particular) actually add nutrients to the soil they are grown in.

5. Encourage worms: Worm castings are expensive but have such great qualities that even a little bit is well worth it. The more you amend your soil over time, the better it becomes and somehow worms find their way to worthy soil.
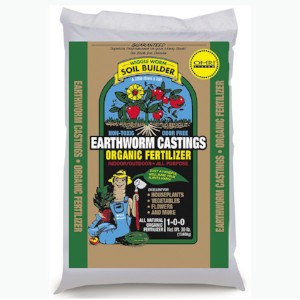
A large bag of UNCO Industries Worm Castings.

Give your House Plants a Spa Day

House Plant Care

By: Sandy Swegel

Right about this time of year is when your indoor plants are all stressed out. It’s been months of winter and dry heated air. Outdoors in nature, wild plants are enjoying spring rains that clean off their leaves and freshen their soil.

Once again, we plant lovers know to mimic nature if we want our plant friends to thrive in the odd conditions we try to grow them in. Growing plants under a roof without moving air or overhead moisture is definitely odd.

The plants I’m wintering over are the most stressed. The hibiscus has aphids. White fly that I thought I eradicated shows up in the sunroom. Scale is appearing on the underside of waxy leaves.

Time to give your house plants a Spa Day.

Take any plants that are moveable and bring them into your shower. Don’t forget a good drain catch…you don’t need perlite in your sewer pipes. Bring in the non-buggy plants first. You don’t need to spread pests and disease. Clean off dead or diseased leaves and give the whole plant a good overhead shower. Use the hand sprayer to get the underside of leaves.

Pretend you are a spring thunderstorm and really soak the soil so that water runs out the bottom taking away some of the built up salts. Use soapy water to treat any soft-bodied pests. Use your fingernail or a Q-tip with alcohol to remove scale sacs.

After the bathing and dripping dry, add a layer of clean compost — earthworm castings work great. Then douse the soil with a good natural liquid fertilizer—I like seaweed based fertilizers because then everything smells ocean fresh.

Your plants will be grateful for their Spa Day and perk right up from all that moisture and a good meal.

Of course, you might need your own Spa Day after you finish cleaning up the mess. But we all enjoy a good Spring shower.


Photos:
www.ourhouseplants.com/guides/cleaning-your-plants
www.thesmallgarden.com.au/blogpages/how-to-holiday-proof-your-garden-this-summer


Weeds Are Our Friends

Tips for Weeds

by Sandy Swegel 

Say what? Well, Spring weeds ARE my friends. August weeds not so much. But Spring is finally overcoming winter and the big leafy weeds are the proof.

So what’s to love about Spring Weeds? The most important thing is they are an abundant source of food for pollinators. They are also delightfully pretty if you don’t think of them as weeds. I especially love the wild mustards. Invasive in lawns and on bare garden soils, blue mustards’ very tiny blue flowers are everywhere and are an excellent food source for awakening bees. Bees can’t live on dandelions alone you know.

To a gardener, the best part about spring weeds is WEED TEA and COMPOST.

Weeds, especially the perennial ones like dock and thistle, are an excellent source of nutrients because of their deep tap roots. To capture these nutrients in a usable form, you have to break down the plant tissue. The easiest thing to do is just keep throwing the leaves on the compost pile. This time of year your compost bin has too many “browns” anyway with all the dead winter material. The “greens” of spring coupled with warm weather jump-starts your pile.

But if you want to really get all those nutrients available to your plants and soil, you’ll want to make some Weed Tea.

Weed Tea Recipe

Get a big container.  A Rubbermaid garbage can will work, or make a small batch in a 5-gallon bucket. Put in all the weeds you can gather. I throw in cut leaves and whole plants. Put this container someway far away from your back door where you can’t smell it!

Here’s what’s going in my bucket:
Yellow dock leaves…these are everywhere.
Pulled or dug thistles.
Comfrey if you have it….these are especially full of nitrogen, phosphorus and potassium.
Nettles. Wear gloves.
Crabgrass with clumps of dirt still attached.
Dandelions, salsify, prickly lettuce, even bindweed if it’s up already. Nothing’s going to survive this stew.
Pond scum.


Now fill your container with water at least 12 inches over the plant material. And let stand until it is a disgusting gooey stew of fermented and stinking rotted material. Stir weekly. That smell is anaerobic decomposition. If the weather is warm, this takes maybe 10 days or as long as 4 weeks if it’s cooler. That’s it. You’ve made the best fertilizer you will ever use. Capture the liquid to use to pour directly (I dilute about 1 part weed tea to 4 parts water) on your garden beds. Strain some and put it in a sprayer for foliar feeding. Hold your breath and throw the stinking mess of weed material on your compost pile.

My favorite use of weed tea is to use it as a foliar feed and watch the treated plants green up overnight. This is especially good on tomatoes.  Spring Weeds really are a gardener’s friend!

Photo credits

http://wildfoodgirl.com/2013/denver-mustard-mania/

http://permaculturenews.org/2013/12/06/simple-recipe-fertilizer-tea/


Two Ways to Guarantee Your Outdoor Seeds Grow

Seed Starting

by Sandy SwegelPre-sprouting seeds

The next few weeks are crucial for new gardeners. Every year in Spring, first-time gardeners buy some seeds and dig up a garden on the first really warm weekend and sprinkle the seeds out. Then they wait. For some, within the month, weather conditions will be good and they’ll have their first garden seedlings and they will be totally hooked on the magic of gardening.

For others, something bad happens that the newbies don’t know about. They don’t realize they have to water. Or a couple of hot days come and burn the new seedlings to a crisp. Maybe the neighborhood crows watch you plant and come to eat every last pea. Sometimes the soil is cold and it’s just too early to germinate seeds. These newbie gardeners lose hope and say they just have a black thumb and give up gardening.

If you’ve had failures but are still willing to give a garden from seed a try, I have two techniques that virtually guarantee your seeds will germinate outdoors. These are especially good ideas if you’ve given up trying to grow some things because they never work for you. For years I just thought I was broccoli-impaired until I tried these hints.

First of course, you have to start your garden bed.

HOW TO START A GARDEN BED.

You can till and/or turn the soil by hand but you don’t have too if the soil is not solid concrete.
Dig out the weeds. Get the roots if you can.
Take a rake and make the soil level and a bit smoothed out.
Water soil with a soft sprayer if the soil is dry.
Sprinkle seed over the soil. How much seed and how far apart is written in the little print on the packet.
Pat the seed lightly with your hands so there is contact between the seed and the soil. Bury the seed slightly if the packet says so.

If you live in someplace humid and warm, that’s enough. Your seeds should come up.

If you live someplace dry or with fluctuating temperature or you’ve had failures in the past, try these two success techniques:

Sprouts

#1 ROW COVER

Lay a sheet of row cover loosely over the seeded bed. You want it nice and loose so the plants can grow and the row cover lifts with them. I use some heavy rocks to hold down the row cover so it doesn’t blow away. The row cover helps the seeds stay moist enough to germinate and raises the soil temperature a few degrees so the seeds germinate faster.

Water with the soft sprayer. Note….I water right on top of the row cover. You don’t have to lift it to water underneath often causing the seeds to float away. It’s permeable so the water makes its way through.

#2 PRE-SOAK AND PRE-GERMINATE the difficult seeds.

Pea sproutsSeeds like peas or carrots respond well if soak them in warm water in a bowl overnight, drain them, then plant. The soaking activates the enzymes that break the seed coat and speeds up germination. If it’s a seed you really have trouble with, you can put the seeds on a wet paper towel in a baggie and wait a few days until you see the sprouts.

These two shortcuts…pre-germination and row cover…work for me all the time. And I get better germination which means I get more plants per packet of seeds and save even more money.

Now go out and grow some food and flowers!


Photo credits:
http://daphnesdandelions.blogspot.com/2010_09_01_archive.html
http://learningandyearning.com/tag/pre-sprouting/

Kelp: A Gardener’s Best Friend

Why to Use Kelp in Your Garden

by Sandy Swegel

Our local garden club invited a rose expert from Jackson and Perkins to give us some winter inspiration this week. Rose growers are like tomato growers….they have their own little secrets and rituals to make their roses the best and the biggest. Our expert showed us pictures from his own garden that made me a believer in kelp. His plants treated with kelp and fertilizer were bigger and more robust than plants treated with just fertilizer If you are going to use soil amendments in your garden, kelp should be at the top of the list right after organic fertilizer.

So what does kelp offer?

Sea Minerals.
Kelp and other seaweeds are good sources of trace minerals that are often deficient in ordinary garden soil. So kelp is a good ingredient as a fertilizer…but not a substitute for your regular fertilizer.

Plant Growth Hormones.
OK, this is the real reason gardeners love kelp. Its natural plant growth hormones (cytokinins) stimulate extra growth in our plants and in our soil microbes. This is the “secret weapon” part of using kelp in your garden. Kelp stimulates roots, plant growth, flower production by virtue of the hormones even more than because of the vitamins and minerals.

Plant Health and Resilience.
Plants treated with kelp showed more drought resistance and bug resistance. Aphids, in particular, don’t like the taste of kelp and avoided kelp sprayed leaves. Anecdotally, I have found that a kelp foliage spray reduces powdery mildew.

How to Use Kelp

Kelp comes as kelp meal and as a liquid. An interesting thing about kelp is that when you apply kelp changes what kelp does for your plant. If you want sturdier roots, add kelp meal when planting to stimulate root growth. If you want more flowers on roses or tomatoes, apply it as a spray when your plants were budding. (Thanks researchers from the marijuana industry for these studies.) Some tomato growers use kelp weekly once tomatoes start to flower. If you are trying to improve your soil, apply meal or liquid to the soil once soil temperatures are above 60 or so when soil microbes are active. I like to use a weak kelp liquid spray weekly during hot spells in summer and spray all over the tops and undersides of leaves. It perks the plants up and gives the garden a lovely ocean smell. Plants absorb kelp better through leaves than through roots.

How Not to Use Kelp

More kelp isn’t better than small amounts of kelp. Don’t just throw it on your garden thinking more is better. Think about what effect you want. Do you want more tomatoes? Then applying kelp when the tomato is growing leaves but not making flowers yet will give you more leafy growth, not more tomatoes. On the other hand, a little kelp spray on your greens will increase the number and vitality of leaves.

Do Your Own Experiment
If you are going to add kelp to your repertoire, try a science experiment. Select a plant that you give kelp to and one a little further away that doesn’t get kelp. Do they behave differently?

Plant Some Mustards

Certified Organic Seeds

by Sandy Swegel

Did you have fungus problems in your garden this year? Maybe powdery mildew on the squash? Or fungal blight on the tomatoes? One very natural way to treat your soil (rather than try to kill the fungus once it’s on next years’ leaves) is to plant some mustards. Mustard planted now or in early spring, and then cut up and turned into the soil, acts as a “biofumigant” that can kill the unhealthy fungus that has made a home in your soil.

A big plus of planting it now is that you might get cute little plants now that will be a lush cover crop for winter. Some mustards turn a pretty purple once it gets cold. Some plants will die if you are in a very cold or dry area, but often mustards manage to survive and put out yellow flowers in Spring that are excellent first foods for bees.

Another excellent reason to plant mustards now is that just a few spicy leaves go a long way to making a salad interesting. I especially like the curls of the Japanese mustard mizuna. Mizuna pairs beautifully with the richness of feta cheese, some red onions, and a sweeter vegetable like cucumber. Yesterday a friend served a wonderful mustard salad with the last red raspberries of the year.


Photo credit: foodandstyle.com/mizuna-and-cucumber-salad-with-red-onions-feta-tarragon-and-champagne-vinaigrette/
http://www.megaminifarm.com/gardening/growing-mustard-greens/

1000 bags of leaves and what to do with them

How to Repurpose Fall Leaves

by Sandy Swegel

Fall leaves are Nature’s parting gift from the growing season to the gardener.  Tree roots run deep and wide and have collected minerals and nutrients from deep in the soil.  These are nutrients that then spent the summer high in the sky at treetop collecting sun rays and are now being placed abundantly at your feet.

If you’ve been gardening any length of time you know how valuable leaves are.  They decompose beautifully in the compost bin when mixed in with the green matter.  You can run them over with the mower to break them down and use them as mulch in all your garden beds.  You can keep piles of them in a shady moist corner of the garden decomposing down into leaf mold which is a superior soil amendment.

The most important thing gardeners in my neighborhood do within Fall leaves is collect them.  Our neighbor Barbara is the Queen of Fall Leaves and had taught us about how valuable leaves are to the gardener.  She lives on a busy street and puts a big cardboard sign in front of her house every year that says “Bagged Leaves Wanted.” Pretty soon bags and bags of leaves start piling up, brought from strangers all over town who are happy to have a place to recycle their leaves.  Barbara gets the first 1000 bags and about fifteen of us split the next 1000 bags of leaves.

So what do you do with 1000 bags of leaves?

Mulch the garden beds. Some of the leaves have already been chopped by blower vacs. These leaves easily go on perennial beds.

Mulch the garden paths.  Big dried leaves that are slow to break down like oak leaves or pine needles go on the paths to keep the weeds down.

Put a layer over the vegetable garden. If you don’t till in the spring, a thick layer of leaves will block light and suppress weeds and keep in moisture. But wait, you say, the wind will blow the leaves away.  That’s when you put the bagged leaves on top of the garden. It’s a place to store extra leaves and the weight of the bags keeps the loose leaves from blowing away. Moisture collects under the bags and earthworms come to feast there.

Till the molding leaves into the soil in Spring with the cover crop.

Insulate the cold frame or greenhouse with bags of leaves stacked around.

Line the troughs you dig for your potatoes next year with rotting leaves.

Make easy Leaf Mold.  Stack the bags that look like they don’t have holes somewhere (as insulation or just as storage) and put the hose in to fill the bag about ¼ way with water.  This makes speedy leaf mold.

Use as free litter for chickens and bunnies. If you have farm animals, dried leaves are perfect free litter for the bottom of the coop or cage. And the manure is already pre-mixed with carbon for composting.

Feed the Goats. The most fun thing to do with the leaves (aside from jumping in piles of them) is to feed the goats.  Apparently, dry leaves are yummy like potato chips to goats and they come running to eat the crunchiest ones when I’m hauling the latest bag of leaves to the backyard.

Happy goats running with floppy ears flying is a highlight of my day.

Photo credit:  http://www.onehundreddollarsamonth.com/mavis-garden-blog-how-to-find-free-compost/

Go Play in the Dirt!

Dirt is Good For You!

by Sandy Swegel

Two health articles came across my desk this week praising the virtues of getting in touch with dirt.  Now most gardeners know that one of the best things about gardening is getting to play in the dirt.  Spring gardens are always well dug and turned because it’s such a joy (weather permitting) to prepare the garden beds for first planting. Now, apparently, instead of just being fun, getting in close contact with dirt is good for you.

Dirt is Good for your Gut.
High-end probiotics now include soil bacteria in their mix of other ordinary acidophilus bacteria.  Scientists at the Sage Colleges of Troy, N.Y., have discovered that exposure to certain kinds of soil bacteria can reduce anxiety and increase learning capabilities when ingested or inhaled, reports Physorg.com.http://phys.org/news193928997.html

Dirt is Good for your Feet.
Dr. Joseph Mercola, who has a vast website of health information, wrote that “When walking on the earth barefoot, free electrons from the earth transfer into your body via the soles of your feet. These free electrons are some of the most potent antioxidants known to man. “ http://articles.mercola.com/sites/articles/archive/2012/04/29/james-oschman-on-earthing.aspx
Walking barefoot in the grass or on dirt is now known as “earthing” and everyone should do it every day.

Other studies have been done saying dirt is good for your skin, and that kids exposed at a young age to dirt have fewer allergy problems.

So go play in the dirt and enjoy getting dirty. Eat some vegetables with bits of dirt still clinging to it.  Let the free radicals of the earth heal your body.  Playing in the dirt is good for you!