How to Grow Baby Kale

The Ins and Outs of Growing Kale

by Sandy Swegel

Mixed baby kales are the current darlings of the produce section…and in my refrigerator are Lacinato Kale, Organic Lacinato Kale, and Organic Red Russian Kale. Several companies now sell thrice-washed baby kales that are ready to use in salads, stir-fries, soups or juices.  As cute as these greens are, their prices are pretty steep…we pay $4 for five ounces and then there’s all that wasteful packaging.

You can easily grow your own baby kales (or any mixed greens). Here’s how market farmers do it:

The key is succession planting. 

About every three weeks, you should seed a patch of kale seeds fairly close together in intensive planting style. 

First Cutting
Once the leaves are about 4 inches high, use scissors or knife to cut them off about an inch above soil level.

Second Cutting
Let the patch you just cut off continue to grow as regular kale and you can harvest again in a month.  Cut those off again about an inch above soil.  The second cutting isn’t as tender as the first but still great for braising.

Third Cutting
Let the patch keep growing for the third cutting of mature kale.  Fertilize lightly.  The third cutting usually leaves the plant depleted and it’s time to pull those plants and reseed.

Because you kept making a new planting of kale every three weeks in a different section of your garden, you will regularly have both the tender young greens and mature leaves.

It’s that easy. Each packet of kale has over 200 seeds so this is a really thrifty way to get a lot of kale.  You can plant one kind of kale at a time, or mix red russian and lacinto together for a colorful mixture.

Eat more Kale! Yum.

Photo Credit and More info:
http://sixburnersue.com/cooking-fresh-eating-green/2013/03/new-at-the-grocery-store-baby-kale-10-ways-to-use-it/
http://www.fastcoexist.com/3016068/the-largest-urban-orchard-in-north-america-is-now-open-for-business


Straw Bales, Legos for Gardeners

Gardening Tips

by Sandy Swegel

Whenever I start to think about a new structure I need for the garden, straw bales are what first come to mind.  Having a bunch of straw bales is like having an entire box of Legos….there’s not much you can’t build. 

I started thinking about a cold frame today because I was a little over eager about starting perennial seeds.  They’re already emerging in my seed starting tray and the question did occur to me now, a little late, where was I going to stash all these plants when I have to plant them up in larger containers next month.  Then I remembered my first cold frame.   A rectangle of old straw bales with an old shower curtain secured on top by big rocks was a great cold frame.

I  tried storm windows one year in a community garden plot, but they are breakable if there are kids playing with rocks or loose dogs in the neighborhood.  I got a sheet of recycled tempered glass (old shower door) that worked great but was heavy for lifting.

The next great garden project is a compost bin.  I use spoiled hay bales from a nearby horse ranch because the bales are free and they also eventually become compost too.

Your imagination is your only limitation.  Think of any structure you’d like and do a Google Image Search with the name of the structure and “straw bale” and you’ll find someone who has done it already and posted a picture:  straw bale hoophouse, straw bale fort, straw bale lounge chair, straw bale chicken coop, straw bale bed, straw bale wind break, etc. etc.  Have Fun!


Mommies Who Garden

Different Ways to Garden

by Sandy Swegel

So we were hanging out at BBB Seed amid giant sacks of seeds waiting to be shipped all over the US this week talking about how many different kinds of people bought our seeds and how they all gardened in their own unique way. One definite trend we see is a joyful kind of gardening practice by moms with young kids.  I spend the evening googling “mommies who garden” and found myself by moms all over the country who garden and who make time to write about it!

Naturally, there is no one “mommy” way to garden since there are moms who work outside the home, moms who homestead, moms who use the garden as a classroom and babysitter, and moms who garden as a personal respite from the chaos that being a mommy can be.  But I saw two trends I want my own inner gardener to reconnect with:

Mommies who garden:
Don’t worry so much about having the picture-perfect garden but about whether the garden is a source of joy and fun for the family.  There’s a lot of mulch to keep the weeds down because moms don’t have so much time for weeding.  There are signs of home-made art projects everywhere: hand-painted rocks, cute makeshift fences, bowls with puddles of mud.   The garden isn’t just growing vegetables or flowers. It’s having fun and growing kids.

Mommies (and Daddies) who garden:
are totally psyched about the fact that they have planted seeds and fed their family yummy wholesome food from their own garden. It isn’t just about saving money or growing organic food, it’s about all the love that went into the garden and the joy about having provided for the whole family and shared the harvest together.

So that’s our inspiration this week as Spring is struggling to return.  Let us create gardens that are fun and playful. And let’s grow some amazing food to share with family and friends and strangers.  Go, Mommies!

Photo Credit: http://www.sheknows.com/parenting/articles/815245/a-mom-s-guide-to-gardening-with-toddlers-and-preschoolers-1
http://www.sheknows.com/parenting/articles/815245/a-mom-s-guide-to-gardening-with-toddlers-and-preschoolers-1

Keeping Drought Tolerant Plants Happy

Taking Care of Your Wildflower Seeds When it’s Dry

by Sandy Swegel

One of the most popular mixes of wildflower seeds that we sell is the Drought Tolerant Mix.  It’s a good combination of both perennial and annual flowers that can handle some stressful situations and still make beautiful flowers.

Growing drought-tolerant plants may be different than gardening the way most of us are used to.  While supplemental water is helpful during germination and the early growth of the plant, too much water will most often cause the plants to have too much fast green growth that is weak. A heavily watered drought-tolerant plant will often produce few flowers and in rich moist garden soil can simply rot and die.

Understanding what it is that makes plants “drought tolerant” may help you understand better how to care for the plants.  Even drought-tolerant wildflowers still need water to thrive, (they are drought “tolerant” not drought “loving”), but they have adapted to drought conditions in several clever ways.

Some plants, especially ones that thrive in the prairie, grow very long tap roots that seek out water deep below the surface.  Coneflower and butterfly weed are two plants that have taproots. Dandelions too, that’s one reason they are so tough to get rid of.

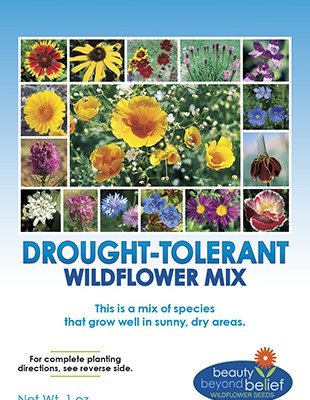
Other plants learn to store water.  Cacti and yucca come to mind first, but other plants that store water in the leaves are succulents like sedums or hen and chicks.  Break open a leaf and gel-like water oozes out. Some sturdy wildflowers save water in their roots.  The tubers that Liatris makes are a good example.Tag for Drought-Tolerant Wildflower Mix packet.

A common adaptation to drought has been to conserve water by limiting the amount of water the plants lose to the air.   Plants typically lose water through their leaves, so drought-tolerant plants will have leaves that conserve water…by having narrow leaves like penstemon, or hairy leaves such as lamb’s ear. Other plants have silver or bluish leaves that reflect back the sunlight. Desert marigolds conserve water this way.

Once you understand how the plants are holding onto water, it makes sense that lots of water would stress drought-tolerant wildflowers.  They would have no way to get rid of the extra water.

Photo credit: http://www.geograph.org.uk/photo/473362


Basil and Chili: A Love Affair

A Tasty Garden Experiment

by Sandy Swegel

Do you like chili peppers?  The plants are super easy to grow and tolerate a lot of droughts and benign neglect in the garden. The only problem I’ve ever had with peppers is that the seeds take forever to germinate. One year my seeds still hadn’t germinated for three weeks, so I gave up and bought plants…. only to have healthy seedlings come up the next week.  I decided I just hadn’t given the seedlings enough heat.

But new research this year taught me something new about seed germination that made me think maybe my pepper seedlings were just lonely.  Turns out that if you grow basil near peppers, the pepper seeds sprout faster and grow healthier plants than if you just grow peppers alone. Companion planting scientifically documented.  A controlled scientific study this year thinks it’s because the basil plants emit sound vibrations near the peppers.  We have no idea yet if the basil is just whispering encouraging words or playing a wild marimba tune.  But the chili plants come out and dance to the music.

Practically, here’s what I’m going to try.  I’m going to start my basil seeds in the tray next to the pepper seeds.  Basil always germinates first for me so I’m hoping they’ll come up and then peppers will come up faster.  I’ll plant both in the garden together too.  And finally, next August…I’ll fix a great salsa with basil and chili and eat them together. It’s a fiesta!

 Photo Credits and More Info:

http://www.huffingtonpost.com/2013/05/07/plants-talk-to-each-other-nanoscale-sound-waves-grow_n_3229021.html
http://news.nationalgeographic.com/news/2013/13/130507-talking-chili-plant-communication-science/

Bring More Color to Your Wild Areas

Wildflower Seeds

by Sandy Swegel

At this time of year when we’re mired in cold and snow, I yearn for two delights of Spring:  when the daffodils and tulips bloom and when the meadows burst with wildflowers.  One thing about wildflowers though, especially in our suburban gardens.  A few years after planting it seems that just a few wildflowers start to dominate.  Often it’s the bachelor buttons and California poppies, both beautiful flowers, but we need diversity and variety and wild color to really shake winter off.

The secret to a lush wildflower area (besides good rainfall) is to over-seed the area every once in a while with some of your favorite flowers.  I usually take the easy way and just throw out a packet of our mixed wildflower seeds to get an overall refreshing of the original mix I planted years ago.  But for one friend who has created a “hot colors” theme of red and orange in her garden, we throw out packets of red wildflowers.  This year we just did a search for Flowers by Color and picked out the flowers we liked with the truest red colors.  We settled on red columbines for Spring, red firecracker penstemons for early summer and red gaillardia for mid-summer.

Finally, my absolute favorite reseeding in the Spring is to seed the Parade of Poppies mix.  There just are never enough poppies of any sort in my mind.  This year I’ve slipped a seed packet in my coat pocket for some guerilla gardening during my sunny day walks along old abandoned properties and ditches that grows lots of weeds.  Poppies will brighten my path this year!

This year I’m also going to try taking a baggie full of our new StrawNet (pellets of straw) when I do my wild area guerilla gardening.  The biggest problem with just throwing seeds out onto abandoned land is that I can’t water them every day.  StrawNet absorbs water and helps create a little moist barrier for new seeds so I expect it to help more seedlings survive even if we have a dry Spring.  Sometimes nature needs a little help to be as beautiful as she can be.

Photo Credit: http://www.fs.fed.us/wildflowers/beauty/columbines/images/aschockleyi/aquilegia_schockleyi_habitat_katewalker_lg.jpg

Grow Your Own Food: Best Return on Investment

Heirloom Vegetable Seeds

by Sandy Swegel

There are so many vegetables you can grow in your garden. If only there was enough time. If you have limited time or space for your garden, think about what is the best return on your investment of time and money as well as the best outcome of flavor and nutrition.  Three things I grow even if I don’t have time to grow anything else are:

Salad greens. Loose-leaf lettuces, spinach, kale, chard, and arugula are up and ready to eat in as little as three weeks after planting.  You can pick what you need for tonight’s salad, and let the plant continue to grow for another night’s salad.  Baby greens and mixed lettuces cost $6 per pound add up at the grocery…and they aren’t necessarily that fresh…sometimes they’ve been traveling in a semi-trailer from California for a week already.  Grow your own greens to get maximum nutrition and taste for a couple of bucks worth of seed.

Tomatoes.  You’ve tasted one of those grocery store tomatoes that look perfect and taste like absolutely nothing?  Enough said. You have to grow tomatoes because homegrown tomatoes taste so much better than anything you can buy.  But tomatoes have also gotten really expensive.  One or two tomato plants easily save you a couple hundred dollars if you regularly eat tomatoes in your salads and sandwiches.  Cherry tomato plants are especially prolific.

Herbs. Fresh herbs are the best way to give oomph to your cooking.  They taste so much better than dried herbs and can often star in a simple dish …such as a basil leaves served with mozzarella and tomato.  Many herbs are perennial (like thyme and oregano) and only have to be planted once.  Annual herbs such as basil and dill produce lots and lots of flavorful leaves.

It’s always fun to grow your own food and everything there is to grow, but if you’re strapped for time or space, let the local farmers grow the long-season crops like winter squash, the root crops like onions and carrots, or the water-hogging melons.  You’ll be enjoying your own magnificent home-grown healthful salads all season.

How to Become a Great Gardener

Why You Should be a Self-Taught Gardner

by Sandy Swegel

I garden and landscape for a living.  I have accumulated a massive amount of information about the best ways to grow things, to take care of the soil, to encourage native plants and bees, etc.  When I’m talking to people, they naturally assume I have a degree in horticulture or botany.  So it surprises people to learn I have a BA in History and an MA in Theology. I’ve been thinking a lot about this because my friend’s kids are all starting college and trying to decide what to major in.  I had no idea when I was 18 that I would one day garden for a living.  But studying history taught me to think and analyze and reflect. And studying theology taught me the world is a mystery and it’s important to learn to observe and notice and simply “be” with nature.

So I encourage everyone to become self-taught gardening experts. You don’t have to go to school or even study.  You just need to start noticing what’s going on in the natural world. No teacher can tell you as much as your own personal experience will.  If you’re just a little systematic about it, you can be a much better gardener at the end of this year. Here’s some homework to learn how to become a great gardener:

Journal.

Keeping a garden journal of what you do, what you plant and what the weather is like is a great way to learn.  You may not know why what you are writing is important (when you planted, when plants started, days without rain, birds and insects observed, etc) but in hindsight, you can figure out when to plant so there are flowers for hummingbirds, or how much rain it takes to have big fungal outbreaks.  Even just being able to read the seed packet you glued into your journal when it’s time to harvest will be a big help.  Keep notes. Understand them later.

Pick a specialty this season.

One year I decided to learn herbs.  I bought seeds and plants of every herb I could think of and grew them in a tiny 4 x 6-foot garden. I learned tansy is a big space hog that kinda stinks and crowds out the other plants, that cilantro and dill practically grow themselves, and that ginger root from the grocery store grows beautiful plants and tons of free ginger.

Take pictures of everything that intrigues you.

Take shots of plants in other people’s yards, wildflowers on walks, blooming containers, weird plants you’ve never seen before. The photos will show you what you like and what really interests you.

Observe.

Just look and notice everywhere you go. Ask questions of gardeners. Wonder about the weather. Notice creepy crawly things or buzzing flying things.  Again. Just take notice with a sense of wonder. You’ll make sense of it eventually.

One thing I’ve noticed about our BBB Seed readers:  you notice the natural world. You stand in awe at beautiful landscapes, tiny birds in nests, and clever ways people arrange flowers in a shabby chic decoration.  Use these great powers of observation and really teach yourself something new this year.

Seeds You Can Start Outdoors NOW!

Seed Starting

by Sandy Swegel

Yes, most of the country has been caught up in a polar vortex. Snow and ice are on the ground and you, the gardener, are stuck with nothing to garden.

There are still two flower seeds you can start outdoors now!

Poppies and Calendula.

A friend who has gardened “naturally” for sixty years always has beautiful stands of poppies that I covet.  She shared her secret for poppies and it works great for calendula too.

“Anytime after the new year, preferably the night before a big snow, spread a packet of seeds where you want the flowers to grow.”

That’s it. That’s all it takes. In nature’s time, the seeds will germinate and grow. Putting the seeds out before a snow helps both with giving a little moisture and with hiding the seeds from birds.  But I’ve also had luck just throwing the seeds on hard snow.

Winter Sowing

Seed Starting

by Sandy Swegel

My first packets of seeds have come in the mail and I’m so eager to start gardening, but the 10 inches of old snow that’s still all over my garden is a real obstacle.  My lights are reserved for tomatoes and peppers….but I want to Garden NOW.  When I’m in this predicament, there’s only one thing to do: head out to the recycling bins and dumpster dive for plastic milk jugs and salad containers and all other types of clear plastic to start some seeds in.

Winter Sowing is my favorite way to start wildflower seeds but it works for all seeds.  Winter Sowing is all about starting your seeds outside and letting nature’s natural rhythms stir the seeds to life at the right time.  It’s also all about getting LOTS of plants practically free without having extravagant indoor light setups or greenhouses.

There’s lots of info online about Winter Sowing…a term coined by the Queen of Winter Sowing, Trudi Davidoff, back in the early days of the internet on the Garden Web forums.  Trudi has it all consolidated on her web page www.wintersown.org  with answers to every question you can possibly have. We all love Trudi because she took something rather mysterious…making new plants…and made it easy and almost foolproof.

To make it even easier for you, here’s your “Short Form” Winter Sowing Instructions:

1. Recycle a plastic container. I’m fond of the gallon water jugs but any container with a clear lid that you can put holes in the bottom works.

2. Label your container at least twice.  Sharpies aren’t really permanent so I use an art deco paint pen from Michael’s to write directly on the container or on a strip of duct tape.

3. Put in 2-4 inches of potting soil.  Wet the soil. Sprinkle the seeds on top. Lightly water the seeds into the soil or press them with your fingers.

4. Secure the top of the container with duct tape. Place the container outside where the wind won’t blow it over.

5. Check periodically (twice a month) for watering. This is really important.  If the soil dries out completely, this seeds will likely die because germination had already started. If you can see condensation on the inside of the container you’re probably OK. A foot of snow on top is probably also a safe sign.

6. Beginning in April or May here in Zone 5, anytime after the seedlings come out you can plant them directly into the garden.

Timing is the beauty of this method…On cold winter days, you yearn for spring and have more time for starting seeds. In my experience, the plants started this way are much sturdier than ones started indoors under warm conditions.

Winter Sowing is an ideal technique for wildflowers.  You can start now and keep making containers when you have time until as late as March or April.

Enjoy!

For more info: www.wintersown.org http://forums2.gardenweb.com/forums/wtrsow/