Tag Archive for: Drought Tolerant

My 10 Favorite Drought Tolerant Plants

Plants For a Tight Water Budget

By Heather Stone

 Here in Colorado, our summers are often hot and dry and there’s often some sort of “watering restrictions” in place. Those two words can bring just about any gardener to their knees.  But, you can still have a garden filled with beautiful flowers even if you’re on a tight water budget.  In my Zone 5 garden, these plants perform well whether we have a temporary or longer-term drought situation.


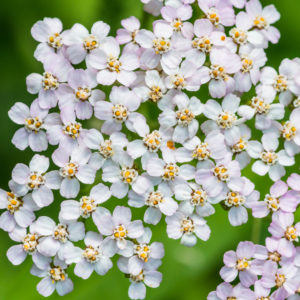
Yarrow- Achillea

This long-blooming perennial comes in a rainbow of colors (pink, white, red, orange and yellow).  The colorful blossoms are attractive to butterflies and make a good cut flower. Yarrow is hardy in Zones 3-9 and is best planted in full sun.


Lavender- Lavandula
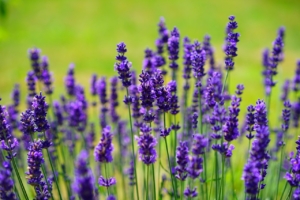
Purple Lavender blossoms.

Photo courtesy of Hans / pixabay

This native Mediterranean plant is accustomed to dry, sunny conditions.  The beautiful purple flower spikes look great on their own or in the border.  Lavender is prized for its fragrance and medicinal properties and is attractive to many pollinators. Hardy in Zones 5-10.


Sedum –Sedum spp.

There are many varieties of sedum from upright to low growing groundcovers.  They are sure to fit in just about any garden design from the back of the border to the rock garden. These easy to grow plants need little care once established.  Hardy in Zones 3-9.

Coneflower –Echinacea spp.

These beautiful, long blooming perennials are not only drought tolerant but will thrive in almost any soil and often self-sow. The blossoms are attractive to both butterflies and birds. The goldfinches love to eat the seed. There are several species and many varieties of this rugged plant with flowers in many shapes, sizes and colors. Don’t leave this trusty plant out of the drought-tolerant garden.Purple Coneflower bloom with bumble bee.

Soapwort- Saponaria spp.

A profusion of pink blooms covers this low growing plant for weeks in the spring attracting many bees and butterflies. This hardy evergreen plant grows best in Zones 3-8.  Soapwort was used by the early settlers to make soap.

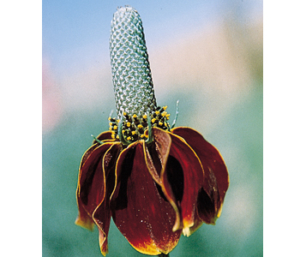
Mexican Hat- Ratibida columnifera

This sun-loving wildflower is both long-lived and long blooming and thrives in dry conditions.  The dark red blossoms look great planted in masses, attracting many bees and butterflies. Mexican hat is both a great cut and dried flower. Hardy in Zones 4-8.
Veronica spp.

Covered in blue, purple, white or pink flowers for weeks in spring or mid-summer this long blooming perennial comes in a variety of sizes. Clump forming varieties look great along the edge of the garden or the groundcovers really make a statement in the spring when covered in a mass of blue flowers. Plant in full sun. Hardy to Zones 3-9.

Beardtongues- Penstemon spp.

Native to most parts of North America Penstemons are a great choice for the dry garden. Their flowers are attractive to many pollinators and come in a variety of colors, sizes, shapes and bloom times. Some excellent choices for the dry garden include Penstemon Mexicali, P. pinifolius, P. eatonii,  P. strictus.

Catmint- Nepeta spp.

Catmint is a show stopper, blooming from early spring to early fall. The fragrant blue-purple flowers are attractive to many pollinators. This nearly indestructible plant is both deer and rabbit resistant and thrives in full sun in Zones 4-9.

Keeping Drought Tolerant Plants Happy

Taking Care of Your Wildflower Seeds When it’s Dry

by Sandy Swegel

One of the most popular mixes of wildflower seeds that we sell is the Drought Tolerant Mix.  It’s a good combination of both perennial and annual flowers that can handle some stressful situations and still make beautiful flowers.

Growing drought-tolerant plants may be different than gardening the way most of us are used to.  While supplemental water is helpful during germination and the early growth of the plant, too much water will most often cause the plants to have too much fast green growth that is weak. A heavily watered drought-tolerant plant will often produce few flowers and in rich moist garden soil can simply rot and die.

Understanding what it is that makes plants “drought tolerant” may help you understand better how to care for the plants.  Even drought-tolerant wildflowers still need water to thrive, (they are drought “tolerant” not drought “loving”), but they have adapted to drought conditions in several clever ways.

Some plants, especially ones that thrive in the prairie, grow very long tap roots that seek out water deep below the surface.  Coneflower and butterfly weed are two plants that have taproots. Dandelions too, that’s one reason they are so tough to get rid of.

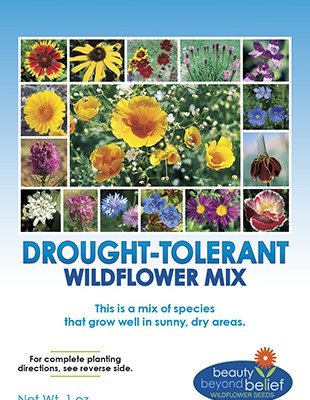
Other plants learn to store water.  Cacti and yucca come to mind first, but other plants that store water in the leaves are succulents like sedums or hen and chicks.  Break open a leaf and gel-like water oozes out. Some sturdy wildflowers save water in their roots.  The tubers that Liatris makes are a good example.Tag for Drought-Tolerant Wildflower Mix packet.

A common adaptation to drought has been to conserve water by limiting the amount of water the plants lose to the air.   Plants typically lose water through their leaves, so drought-tolerant plants will have leaves that conserve water…by having narrow leaves like penstemon, or hairy leaves such as lamb’s ear. Other plants have silver or bluish leaves that reflect back the sunlight. Desert marigolds conserve water this way.

Once you understand how the plants are holding onto water, it makes sense that lots of water would stress drought-tolerant wildflowers.  They would have no way to get rid of the extra water.

Photo credit: http://www.geograph.org.uk/photo/473362


Bring More Color to Your Wild Areas

Wildflower Seeds

by Sandy Swegel

At this time of year when we’re mired in cold and snow, I yearn for two delights of Spring:  when the daffodils and tulips bloom and when the meadows burst with wildflowers.  One thing about wildflowers though, especially in our suburban gardens.  A few years after planting it seems that just a few wildflowers start to dominate.  Often it’s the bachelor buttons and California poppies, both beautiful flowers, but we need diversity and variety and wild color to really shake winter off.

The secret to a lush wildflower area (besides good rainfall) is to over-seed the area every once in a while with some of your favorite flowers.  I usually take the easy way and just throw out a packet of our mixed wildflower seeds to get an overall refreshing of the original mix I planted years ago.  But for one friend who has created a “hot colors” theme of red and orange in her garden, we throw out packets of red wildflowers.  This year we just did a search for Flowers by Color and picked out the flowers we liked with the truest red colors.  We settled on red columbines for Spring, red firecracker penstemons for early summer and red gaillardia for mid-summer.

Finally, my absolute favorite reseeding in the Spring is to seed the Parade of Poppies mix.  There just are never enough poppies of any sort in my mind.  This year I’ve slipped a seed packet in my coat pocket for some guerilla gardening during my sunny day walks along old abandoned properties and ditches that grows lots of weeds.  Poppies will brighten my path this year!

This year I’m also going to try taking a baggie full of our new StrawNet (pellets of straw) when I do my wild area guerilla gardening.  The biggest problem with just throwing seeds out onto abandoned land is that I can’t water them every day.  StrawNet absorbs water and helps create a little moist barrier for new seeds so I expect it to help more seedlings survive even if we have a dry Spring.  Sometimes nature needs a little help to be as beautiful as she can be.

Photo Credit: http://www.fs.fed.us/wildflowers/beauty/columbines/images/aschockleyi/aquilegia_schockleyi_habitat_katewalker_lg.jpg

Grow Your Own Food: Best Return on Investment

Heirloom Vegetable Seeds

by Sandy Swegel

There are so many vegetables you can grow in your garden. If only there was enough time. If you have limited time or space for your garden, think about what is the best return on your investment of time and money as well as the best outcome of flavor and nutrition.  Three things I grow even if I don’t have time to grow anything else are:

Salad greens. Loose-leaf lettuces, spinach, kale, chard, and arugula are up and ready to eat in as little as three weeks after planting.  You can pick what you need for tonight’s salad, and let the plant continue to grow for another night’s salad.  Baby greens and mixed lettuces cost $6 per pound add up at the grocery…and they aren’t necessarily that fresh…sometimes they’ve been traveling in a semi-trailer from California for a week already.  Grow your own greens to get maximum nutrition and taste for a couple of bucks worth of seed.

Tomatoes.  You’ve tasted one of those grocery store tomatoes that look perfect and taste like absolutely nothing?  Enough said. You have to grow tomatoes because homegrown tomatoes taste so much better than anything you can buy.  But tomatoes have also gotten really expensive.  One or two tomato plants easily save you a couple hundred dollars if you regularly eat tomatoes in your salads and sandwiches.  Cherry tomato plants are especially prolific.

Herbs. Fresh herbs are the best way to give oomph to your cooking.  They taste so much better than dried herbs and can often star in a simple dish …such as a basil leaves served with mozzarella and tomato.  Many herbs are perennial (like thyme and oregano) and only have to be planted once.  Annual herbs such as basil and dill produce lots and lots of flavorful leaves.

It’s always fun to grow your own food and everything there is to grow, but if you’re strapped for time or space, let the local farmers grow the long-season crops like winter squash, the root crops like onions and carrots, or the water-hogging melons.  You’ll be enjoying your own magnificent home-grown healthful salads all season.

How to Become a Great Gardener

Why You Should be a Self-Taught Gardner

by Sandy Swegel

I garden and landscape for a living.  I have accumulated a massive amount of information about the best ways to grow things, to take care of the soil, to encourage native plants and bees, etc.  When I’m talking to people, they naturally assume I have a degree in horticulture or botany.  So it surprises people to learn I have a BA in History and an MA in Theology. I’ve been thinking a lot about this because my friend’s kids are all starting college and trying to decide what to major in.  I had no idea when I was 18 that I would one day garden for a living.  But studying history taught me to think and analyze and reflect. And studying theology taught me the world is a mystery and it’s important to learn to observe and notice and simply “be” with nature.

So I encourage everyone to become self-taught gardening experts. You don’t have to go to school or even study.  You just need to start noticing what’s going on in the natural world. No teacher can tell you as much as your own personal experience will.  If you’re just a little systematic about it, you can be a much better gardener at the end of this year. Here’s some homework to learn how to become a great gardener:

Journal.

Keeping a garden journal of what you do, what you plant and what the weather is like is a great way to learn.  You may not know why what you are writing is important (when you planted, when plants started, days without rain, birds and insects observed, etc) but in hindsight, you can figure out when to plant so there are flowers for hummingbirds, or how much rain it takes to have big fungal outbreaks.  Even just being able to read the seed packet you glued into your journal when it’s time to harvest will be a big help.  Keep notes. Understand them later.

Pick a specialty this season.

One year I decided to learn herbs.  I bought seeds and plants of every herb I could think of and grew them in a tiny 4 x 6-foot garden. I learned tansy is a big space hog that kinda stinks and crowds out the other plants, that cilantro and dill practically grow themselves, and that ginger root from the grocery store grows beautiful plants and tons of free ginger.

Take pictures of everything that intrigues you.

Take shots of plants in other people’s yards, wildflowers on walks, blooming containers, weird plants you’ve never seen before. The photos will show you what you like and what really interests you.

Observe.

Just look and notice everywhere you go. Ask questions of gardeners. Wonder about the weather. Notice creepy crawly things or buzzing flying things.  Again. Just take notice with a sense of wonder. You’ll make sense of it eventually.

One thing I’ve noticed about our BBB Seed readers:  you notice the natural world. You stand in awe at beautiful landscapes, tiny birds in nests, and clever ways people arrange flowers in a shabby chic decoration.  Use these great powers of observation and really teach yourself something new this year.

5 FREE Soil Amendments that you can Easily Find!

Creative Ways to Help Your Garden

by Sandy Swegel

One of the problems with gardening is that you just can’t rush Mother Nature.  If you don’t get those tomato seeds planted early enough, there’s just no way to trick the plants into growing overnight. Compost is the same…you can’t just mix everything up today and use the compost tomorrow.  But there are things you can scavenge that you can add directly to your garden that help your garden a lot more than those sterile-looking bags of manure or compost they sell at the store. And they’re free!

1. Leaf Mold

Better even than regular compost for improving soil texture, leaf mold is what you end up with after a pile of leaves has rotted down to a dark earthy mix with only a few leaves still recognizable. This can take one or two years depending on how wet your climate is.  You can find leaf mold that’s been breaking down for months or years anywhere leaves collect:  where the wind blows them behind the garage or along the shady side of the fence.  Your neighbor’s yard is a good place to find it, or along stream beds or in shady woods.  Dig in to get the dark damp leaf mold next to the soil and leave the dry leaves for another year. Spread the leaf mold over your garden, at the bottom of planting holes, or along the trenches for your potatoes.  This is pure gold for your garden.

2. Coffee grounds

Coffee shops are often willing to give you their used coffee grounds for free. Starbucks packages them up for you in empty large coffee bags.  No need to do anything special with the grounds…just sprinkle them across your soil or at the base of plants.  The plants like the boost from caffeine almost as much as you do.

3. Weed Tea  

When I’m weeding, I keep two buckets with me…one for the green leaves (and roots) of weeds like dandelions, thistle, dock, lambsquarters and one for the seed heads or other garden debris I’m cleaning.  All those long tap roots that are so hard to dig out have been pulling up minerals and micronutrients from deep in the soil.  Once my bucket of green leaves is mostly full, I fill the rest with water and leave the bucket out to “steep.” After four days or longer, (ideally until it starts to smell bad), I use this nutrient rich water to water the garden. The leaves get thrown out or into the compost. Plants that get this water turn a nice dark green.

4. Grass Clippings

If you (or your neighbor) have a lawn (and you don’t use weed killer), the grass clippings are the perfect mulch for your garden.  Layer the clippings thinly on the surface of the soil near your plants. Keep adding it every week and it will keep breaking down at the soil line into compost.

5. Newspaper

Most newspapers are printed now with soy ink and safe to use in the garden.  Lay three or four sheets of newspaper over the soil in your walkways or between rows and cover with mulch.  The newspaper helps block weeds from coming up, and reduces evaporation.  Worms LOVE the taste of newspaper and will help break it down into rich soil.

How to Manipulate Your Microclimates

Fooling Mother Nature

by Chris McLaughlin

Whoever said “You can’t fool Mother Nature,” never met a gardener. We can and we do fool her as often as we can get away with it.  Anyone living anywhere can learn to use their unique microclimates and to take the greatest advantage of their situation.

Permanent structures such as houses, walls, and neighboring buildings can have a huge effect on the immediate area surrounding them. For instance, all of these things can serve as wind barriers or conversely, create wind tunnels. But gardeners can take advantage of the very things that would otherwise seem to be in the way.

Walls made of brick, stone, cement, or stucco will absorb the heat and radiate it during the cool night hours. Walls not only hold heat effectively, but they can also provide shelter and be a protective wind-block for plants.

The sun’s exposure can also be the difference between a perennial plant making it through the winter or not — even when its tag says it won’t survive the cold months in your zone. Bougainvilleas, for example, don’t usually make it through a Northern California winter like they do in Southern California. But there are Bougainvilleas that are alive and well in the San Francisco Bay Area because they were planted against a wall with a southern exposure.

If you’re planting heat-loving vegetables this season, be sure to plant them on the south side of your house. If you’re planning on using a wall for vertical vegetables, plant them against any wall but the north-facing one, as they won’t get enough sun there to produce well.  A southern exposure sees the longest hours of sun; a west wall will get the intense afternoon sun; the east wall will have morning sun, and a (true) northern wall will receive no direct sun.  A word of caution here: the southern side is also one of the most drastic sides for perennial plants because of temperature fluctuation during the changing seasons — it can be a circle of freezing and thawing.

On the other hand, if you’re looking for a cooler place to plant your lettuce, then go for the north side. The northern side of your house might also be the best place for early flowering fruit trees like cherries and peaches. A late spring frost will set fruit production back, and the idea here is that if fruit trees are planted where there’s a northern exposure, it can help suspend blossoming until the frost date has passed.

A good place for tender plants is on the eastern side of any structure because morning sun is the most gentle at that time of day. While sun-worshipping roses like the brilliance of the west side. Keep in mind that a southern exposure is no longer the hot spot that it could be if there’s a structure such as a neighboring building or large tree situated between your planting space and the sun. This is a perfect example of a man-made microclimate.

Use a wall’s upwind and downwind sides to your advantage by remembering the upwind side is the right place for water-loving plants as it’s going to receive more rain than the downwind side. Plants growing on the downwind side will be protected against a driving rain. This can be a handy little microclimate to have around. These are just a handful of ideas — other examples of creating microclimates is using mulch, paved surfaces, fences, balconies, and rooftops.