Tag Archive for: Gardening Tips

Gardening for the Native Bees: 4 Easy Tips For Making Your Garden Solitary Bee Friendly

Creating a Native Bee Paradise

by Sam DollA cavity-nesting native bee.

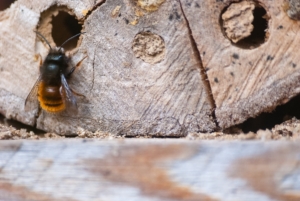
There are nearly 4,000 species of native bees in the United States alone! With the exception of bumblebees, nearly every native bee species in North America are solitary. They come in a variety of shapes in sizes, from enormous carpenter bees to the tiny Perdita genus.

If you want to learn more about bumblebees, check out our blog about how you can make your garden bumblebee friendly!

Unlike European honeybees or bumblebees, solitary bees are stingless, do not have a queen, live in a colony, or make honey and wax. Instead, female solitary bees build tunnels to use as nests, where they lay their eggs in a series of chambers packed with a pollen and nectar “paste” for their young to munch on when they hatch. Since males will hatch and emerge from the nest first, the mamma bee will lay the females in the deepest portion of the nest and males in the front.

Around 70% of solitary bees are known as “mining bees” because they tunnel underground to build their nests. The other 30% of bees are cavity-nesting bees and will nest in anything from hollow or pithy stems to dead wood, or even abandoned snail shells!

Native bees are incredibly important pollinators. Unlike honeybees, which carry pollen in a “pollen pouch” on their legs, native bees are a bit less tidy, covering their whole bodies in pollen to carry it home. This messiness means they lose much more pollen as they go flower to flower and it actually makes them much more efficient pollinators. Some plants actually need native bees to be pollinated at all! Squash and gourds and any other members of the Cucurbita genus all rely on very specialized Squash Bees!

For more on the Squash Bees, check out our Blog on the topic!

These bees are pretty neat! Here are some tips for Making your garden a native bee paradise!

1.    Preserve and manage nesting sites

One of the most important things you can do to help protect your local native bees is to make sure that your yard is full of potential nesting sites. For mining bees, leave sunny patches of bare earth for nest sites and try to avoid laying down anything that could be a barrier (like landscaping cloth, gravel, or mulch) for bees accessing or emerging from potential existing nest sites. Also, leave unused areas of your garden with old wood, stones, or branches undisturbed as a cavity-nesting bee haven.

You can also install a bee hotel in your yard. Often made from wood or bamboo, these hotels are great for cavity-nesting bees like the Blue Orchard Mason Bee or Leafcutter Bee! You can build one yourself or buy them from reputable suppliers like our friends at The Bees Waggle.

2.    Make your garden a bee buffet

To ensure that your garden is a Mecca for bees of all shapes and sizes, you need to make sure that there is a diversity of forage as well. Plant a mix of perennials and annuals so that you will have a mix of different blooms at the same time throughout the entire growing season. Also, try to have blocks of color in your garden so bees can easily find their way to the flowers they like over and over again, without having to hunt all around for them. Of course, native bees like native plants, so make sure to dedicate a portion (or all) of your garden to wildflowers. The Xerces Society has a variety of region-specific plant guides for pollinators that can get you started toward planting for native bees.

We did the hard work for you and made our Bee Rescue Wildflower Mix that will provide great season-long forage for both native and honeybees!

3.    Lay off the pesticides

Pesticides can’t discriminate between the bad and good bugs. These insecticides pose a particular danger to mining bees since they are often applied to bare ground areas around structures that are ideal nesting sites for these bees. These insecticides also pose the risk of washing into other areas of the garden and contaminating nest sites.

Neonicotinoids, or neonics, are systematic pesticides that live inside the plants that they are trying to protect. These have been particularly harmful to our various pollinator species because they work their way up through the plant into the nectar and pollen that various pollinators are attracted to. Flowers with neonics applied are actually luring bees and other insect pollinators to their deaths!

For tips on how to protect your garden and the bees in it, check out our eBook on Organic Pest Control!

4.    Take a closer look

One of the most important things your can do to protect native bees is to learn! Take some time to watch all the bees that visit and live in your garden. Visit the Xerces Society website and use their identification guides to try to figure out which bees you are seeing. Most importantly, SPREAD THE WORD! Educate your friends and family about all the bees that don’t make the nightly news and how vital they are to our future!

Other Resources

Check out these resources for more about pollinators and how you can help them

How to Pick a Pea

Heirloom Vegetable Tips

By: Sandy Swegel

How to pick a pea to grow, that is.

There are so many varieties of peas to choose from….which one shall we grow? Here are three peas with very good reasons to grow them.

For snow peas, the generally accepted superior variety is “Oregon Sugar Pod II.” Research trials have documented that Oregon Sugar Pod producers twice as many snow peas as other cultivars. And there’s a cool reason for that: Oregon Sugar Pods split and produce two peas at every growth node while other snow peas produce just one. And the “II” in Oregon Sugar Pod II? That refers to the fact that this evolution of the pea is disease resistant. So you get lots of peas and no powdery mildew.

Despite the obvious perfection of the Oregon Sugar Pod II, I also like to grow the Dwarf Grey Sugar. They taste about the same to me and I get lots of peas from the Dwarf Grey Sugar, but the real reason to have them is that they have purple flowers. All the other peas have white flowers. More Purple Flowers Please.

Finally, the third pea I’m enamored of is Sugar Ann…an heirloom edible Pod pea. No shucking or shelling…you eat the whole thing…pod and all. They are delicious steamed or sautéed but we rarely eat them that way. Any pea lover will attest: peas taste best fresh picked, while you’re still standing in the garden.

Do you want a secret to more peas in less space? Plant your peas (or thin) a little further apart—4 inches between plants. Research in Oklahoma showed those plants branch more and produce 23% more peas than plants 2 inches apart.

Whatever variety you choose…start them soon. All peas stop producing when the temperatures get up above 75 degrees.

Photo credit:

www.rodalesorganiclife.com/garden/snowpeas
theenchantedtree.blogspot.com/search?q=Pea
www.thekitchn.com/5-ways-to-eat-sugar-snap-peas-144936

Eat More Pie

by Sandy Swegel

Now that’s the kind of advice I like to hear from a scientific study.

Yesterday someone served me some organic “wild” blueberries (Woodstock brand, frozen) and I was immediately smitten with the intensely delicious flavor of these half-size berries.  I’ve been eating more blueberries lately for health reasons…good antioxidant, anti-inflammatory, protective against diabetes and cardiovascular problems but I like the idea of healthy and intensely flavored.

Since I’m still reading James Wong’s Grow for Flavor book, I wondered what he said about blueberries.  I could already guess that they shouldn’t be over-watered, but what other variables might there be?


So here’s James Wong’s  scoop on blueberries:

The amount of anthocyanins (the good antioxidants in blue red and purple food) can vary dramatically from plant to plant, and from growing conditions, and from food preparations.

*Some cultivars like Rubel have more antioxidants…but we can only control for that if we grow them ourselves or know the grower.

*Growing methods make a difference…research shows that blueberries grown organically without additional fertilizer can have twice as many anthocyanins.

*And finally there’s food preparation.  Raw blueberries are amazingly healthy for you but their antioxidant levels double when they are lightly cooked.  As in pie!!!!

So the only sane conclusion we can reach is Eat More (Organic) Blueberry Pie!


Photo credits

http://www.jameswong.co.uk/blueberries/4588105999

Quit Working so Hard This Fall

Garden Clean Up

by Sandy Swegel

The old adages say cleanliness and hard work are virtues. That may be true in your kitchen, but in the garden, a little sloth can save many lives and make your life a little easier.  Mother Nature isn’t just messy when she clutters up the Fall garden with leaves and debris….she’s making homes for her creatures.  Old dead leaves may look like clutter that needs to be tidied up, but it’s really nice rustic sustainable homes for many of a gardener’s best friends.

Here’s who is hiding in your garden this winter if you DON’T clean up.

Ladybugs in the garden beds next to the house.  Ladybugs want a nice sheltered home safe from wind and exposed soil. I most often find them under the leaves and dead flower stalks in the perennial garden.

Butterfly larvae (aka caterpillars) in leaf bundles. Sometimes in winter, you’ll see a couple of leaves looking stuck to a bush or tree or in a clump on the ground.  Often there’s a butterfly baby overwintering there.

Lacewing at the base of willows or in the old vegetable garden.  Insects don’t work very hard in the fall either.  Often they are eating happily on the aphids in your vegetable garden or your mini forest and just go through their life cycle right there.  They lay their eggs on the bottom of leaves and the leaves fall to the ground.  If you clean up too much, you’ll clean up all the beneficial insect’s eggs

Slugs in your hosta garden. Even slugs are a good thing to leave for the winter.  They will be plump food for baby birds next Spring.

The bottom line is don’t do a good job of cleaning up in the Fall.  Take away any very diseased leaves.  Clean up the thick mats of leaves on the lawn so they don’t encourage lawn fungus.  But leave the flower stalks with seeds and the leaves in the beds.  They insulate and protect plants and insects.

Another good reason to be a little lazy this Fall.

Photos: http://www.nashvilleparent.com/2013/07/fall-for-fun/http://antsbeesbutterfliesnature.blogspot.com/2009/11/overwintering-caterpillars.html

Apples

All About Apples

by Sandy Swegel

Two things I learned about apples this year.

Reduce codling moths in your trees.

A few years ago, I started following the advice of a local organic farmer to pick up the bad apples under my apple trees. I’ve always left them there to compost in place or waited until they were all down to pick them up. My delicious McIntosh apple tree had lots of codling moths which left unappealing frass in the apples as well as the occasional worm. The tree was too tall to spray clay and I didn’t want to use anything toxic. So I did start religiously picking up the apples as they fell. Now, some five years later, I’ve noticed that while codling moths still attack the apples, they are MUCH fewer in number affecting maybe only 10-20% of the apples. What a difference sanitation made.


Bake awesomely easy gluten-free Apple Crisp

The second thing I learned came from the new “problem” of what to do with so many apples. If you pick up the apples soon after they fall from the tree, then you notice the apples are in pretty good shape if you cut out the bad parts right away. So now I had a surplus of apples. The freezer was full of sauce and still, the apples came. Fortunately, I gave the apples to a baker friend who made a gluten-free apple crisp that was better than anything I had ever had. And that’s when she taught me a professional secret. You have to bake the apples first before you put the crisp topping on. When you just layer apple pieces in a pan and sprinkle with your crisp mixture, you can end up with apples that are too crunchy and/or a burnt crisp top.

So here’s the basic recipe:

Cut up apples into pan. Bake until mostly soft.

Crisp topping:
Oats, cinnamon, nuts (almond meal, tiny pecan pieces) Optional: butter, brown sugar.
Sprinkle topping on baked apples. Put the pan back in the oven until the crisp is browned and crispy. Twice-baked apples melt in your mouth (without lots of extra sugar) and the topping is crispy delicious. The perfect foil for vanilla ice cream.

So now I spend more time working to clean up apples…..but am rewarded with more apple crisp!

Photos:

http://utahpests.usu.edu/ipm/htm/fruits/fruit-insect-disease/apple-pear-control03
http://allrecipes.com/recipe/229088/apple-crisp-with-oat-topping/

Why Won’t my Garden do What I Say?

Tips for Garden Frustration

by Sandy Swegel

That’s the kind of questions I’m hearing these days.  Why won’t my plant bloom?  Why aren’t my tomatoes red? Why does my garden look so bad? Why is my tree dying?  Let’s tackle a few of these questions so you can figure out why it seems your garden is disobedient?

Why won’t my pineapple sage bloom?  It’s so beautiful in the magazines. Salvia elegans or pineapple sage smells deliciously of pineapple and hummingbirds flock to it.  Alas, what I discovered after a season of coaxing and fertilizing is that it will never look so beautiful in Colorado as it does in the Sunset magazine pictures of California.  It’s one of those plants that bloom according to day length and short days to stimulate blooming.  So no matter what we do, it simply is not going to put out blooms till late August.  Since our first frost can be in September, this is a very unsatisfying plant to grow in a northern area with long summer days.

The second part of this question is “Why did all the other fancy hybrid flowers I bought in Spring quit blooming?”  Some may be day length sensitive like the pineapple sage.  Most have issues with our hot dry summer heat.  If you keep deadheading as soon as the weather starts to cool, the blooms will restart.  And there’s no changing Nature’s mind with more fertilizer or water.

“Why won’t my watermelon plants get big?” a friend asked over afternoon tea.  The answer to most questions is to put my finger in the soil. It was dry, dry, dry.  There was one drip tube on the plant but that’s not nearly enough for a watermelon which needs lots of water.  I looked up. The garden was right next to a big spruce tree. The tree was on the north side so the plant had lots of sun, but the sneaky tree roots ran all through the garden sucking up irrigation water. If you’re going to grow a plant with a name like “water” melon…you have to put a lot of water in the system.

The second most-asked question is “Why do I have so many weeds?” The answer is, alas, because you didn’t spend enough time in July keeping after them.  Who wants to weed in the heat of summer?  And summer weeds grow really fast and tall.  You can’t even blink.

The most-asked question, of course, is “Why won’t my tomatoes turn red?”  This year everybody has lots of green tomatoes but not nearly enough red tomatoes. The truthful answer is “D***d if I know. I wish mine would turn red.”  A Google search shows thousands of people ask this question.  People who answer have all kinds of pet theories about leaves and fertilizer and pruning the plant etc. I’m just learning to wait and making a note to grow more early tomatoes next year.

Nature just doesn’t work the way we want sometimes.

Photo Credit: http://eugenebirds.blogspot.com/2010_11_01_archive.html

Our Native Bees

How to Help the Bees Feel At Home

by Sandy Swegel


Ever feel like you’re doing all the work and everybody else is getting all the credit?  That was the great scenario I watched unfold yesterday.  It was a warm sunny day and there were hundreds of honey bees buzzing loudly in a hot pink crab apple tree.  Such a sight and sound is a crowning point of Spring and gives us hope for honeybees.  But I was working in the rock garden nearby pulling weeds out of a mini-hedge of yellow Basket of Gold. (Aurinia saxatilis)  While everybody else was watching the crab apple full of honey bees, there was one solitary native bee happily feeding and pollinating an entire row of bright yellow alyssum growing over the rocks.  This native bee wasn’t getting all the glory but he was a Rock Star.

Native bees are often much smaller than honey bees. They don’t make honey for us.  They have evolved alongside native plants so they prefer to feed on native plants rather than human-made hybrids.  The native bee I watched wasn’t a hive builder but makes a solitary nest just for itself in the dirt or somewhere in a little hole in an old dead tree.


You can encourage native bees to live in your garden by planting native plants and by building little nests the native bee likes.  You can make a small practical native bee nest out of a box and hollow tubes, or you can go all out and make some garden art as we see in these pictures.

Or just honor the native bee by noticing it.  Next time you’re in the garden, look for the little bee that’s at least half the size of all the other bees you see.  That’s one of our unsung pollinator heroes.

How to Build your Own Native Bee Nest:
http://www.xerces.org/wp-content/uploads/2008/11/nests_for_native_bees_fact_sheet_xerces_society.pdf

Photo Credits
http://landscaping.about.com/od/Deer-Proof-Plants/tp/deer-resistant-perennials.htm
nativebeeconservancy.org


Pruning for Holiday Decorations

Collecting Holiday Decorations from Your Garden

by Sandy Swegel

I’m a big fan of multi-tasking so it’s natural that whenever there’s a garden chore to be done, I think about whether it might solve some other task that needs doing. In the Spring I schedule perennial weed digging so the roots can be thrown to the chickens for yummy spring greens.  In Summer I arrange to cut grass when I need the clippings to mulch the vegetable beds.  In Fall I pick up leaves when I need to insulate rose bushes and perennials.  One of the tasks I still want to do this year is “rejuvenation pruning” on shrubs or simple pruning on shrubs and trees that are poking me in the eye when I walk by or blocking the sidewalk.

Rejuvenation pruning is a great way to keep all your shrubs looking great.  Every year you simply cut back to the ground 1/4th to 1/3rd of the oldest branches in your bushes.  The shrub will put out new growth next spring to fill in and you’ll always have a self-rejuvenating plant.

So the multi-tasking solution here is to do some needed pruning on plants that happen to also look good, when cut, to use the pruning for holiday decorations.  Some of the plants I’ll be pruning for Thanksgiving or Christmas are:

Branches with Berries: Pyracantha (orange berries) or Hawthorn (red berries)…be careful about thorns Cotoneaster with red berries Coral berry or porcelain berry

Branches with an interesting structure: Harry Lauder or curly willow both make nice twisty branches.  Birch stems can have interesting bark.  Yellow and redtwig dogwoods add great color.  Even simple wild plum branches can be put in the center of a flower arrangement to hold the flowers up

Evergreens: Early winter is a great time to prune those Mugo pines or spruce trees that block the driveway. Juniper and cedar trimmings offer great aroma as well as evergreen color.

So once again, twice the work in half the time or something like that.  The bushes have old wood removed, the shrubs and trees have a better shape, and the house is decorated for free with dramatic gifts from nature, brought indoors.

Photo Credit: http://liveatvillages.com/blog/?p=334http://ikebanalessons.blogspot.com/2012/10/ikebana-class-1052012.html

1000 bags of leaves and what to do with them

How to Repurpose Fall Leaves

by Sandy Swegel

Fall leaves are Nature’s parting gift from the growing season to the gardener.  Tree roots run deep and wide and have collected minerals and nutrients from deep in the soil.  These are nutrients that then spent the summer high in the sky at treetop collecting sun rays and are now being placed abundantly at your feet.

If you’ve been gardening any length of time you know how valuable leaves are.  They decompose beautifully in the compost bin when mixed in with the green matter.  You can run them over with the mower to break them down and use them as mulch in all your garden beds.  You can keep piles of them in a shady moist corner of the garden decomposing down into leaf mold which is a superior soil amendment.

The most important thing gardeners in my neighborhood do within Fall leaves is collect them.  Our neighbor Barbara is the Queen of Fall Leaves and had taught us about how valuable leaves are to the gardener.  She lives on a busy street and puts a big cardboard sign in front of her house every year that says “Bagged Leaves Wanted.” Pretty soon bags and bags of leaves start piling up, brought from strangers all over town who are happy to have a place to recycle their leaves.  Barbara gets the first 1000 bags and about fifteen of us split the next 1000 bags of leaves.

So what do you do with 1000 bags of leaves?

Mulch the garden beds. Some of the leaves have already been chopped by blower vacs. These leaves easily go on perennial beds.

Mulch the garden paths.  Big dried leaves that are slow to break down like oak leaves or pine needles go on the paths to keep the weeds down.

Put a layer over the vegetable garden. If you don’t till in the spring, a thick layer of leaves will block light and suppress weeds and keep in moisture. But wait, you say, the wind will blow the leaves away.  That’s when you put the bagged leaves on top of the garden. It’s a place to store extra leaves and the weight of the bags keeps the loose leaves from blowing away. Moisture collects under the bags and earthworms come to feast there.

Till the molding leaves into the soil in Spring with the cover crop.

Insulate the cold frame or greenhouse with bags of leaves stacked around.

Line the troughs you dig for your potatoes next year with rotting leaves.

Make easy Leaf Mold.  Stack the bags that look like they don’t have holes somewhere (as insulation or just as storage) and put the hose in to fill the bag about ¼ way with water.  This makes speedy leaf mold.

Use as free litter for chickens and bunnies. If you have farm animals, dried leaves are perfect free litter for the bottom of the coop or cage. And the manure is already pre-mixed with carbon for composting.

Feed the Goats. The most fun thing to do with the leaves (aside from jumping in piles of them) is to feed the goats.  Apparently, dry leaves are yummy like potato chips to goats and they come running to eat the crunchiest ones when I’m hauling the latest bag of leaves to the backyard.

Happy goats running with floppy ears flying is a highlight of my day.

Photo credit:  http://www.onehundreddollarsamonth.com/mavis-garden-blog-how-to-find-free-compost/

Expand Your Vegetable Garden the Easy Way

Heirloom Vegetable Seeds

by Sandy Swegel

Two forces collided around the kitchen table this week.  First I was oogling our seed catalog and indulging in winter snow day daydreams about summer gardens and how I might turn my tiny urban yard into a farm so I could grow one of everything. At that moment I wanted to be surrounded by beautiful shiny vegetables. Then the second force came.  I went grocery shopping for my favorite winter recipe:  a very simple roasted winter vegetable dish with squash and sweet potatoes and beets, marinated in olive oil and rosemary. Yum. The winter squash was even on sale.  Then sticker shock hit. A single large winter squash was $5, even on sale!

The force of wanting to buy more seed collided with the force of not wanting to pay retail prices for food.  The only natural outcome is I have to find more space to garden so I can plant more squash.

It’s too late for any of the summer or fall garden expansion methods of either tilling in land or doing some lasagna gardening.  So I will use the easy method my urban farmer friend Barbara taught me.  Out in a neglected corner of the yard where there’s just some old grass, I’ll dig a shallow hole next May and fill it to an overflowing mound with a bucket of compost.  I’ll plant squash seeds there and cover the surrounding grass with cardboard.  The squash plants will grow over the cardboard as it takes another year to make good garden soil underneath.  I can drape the burgeoning squash plants over the fence and maybe up an old ladder onto the shed roof. (I did mention the tiny yard, didn’t I?)  But the key to expanding my garden this way is that I’m not doing all the heavy work of putting in a new 10 x 10 garden bed for squash.  The squash roots and cardboard are going to help do that.  My yield won’t be as high this year as a full amended composted garden, but then the work will be almost nothing to grow a lot of $5 squash for the price of $1.89 seed packet.

The key to baking yummy winter vegetables is to cut them in 1-1/2 inch pieces, marinate them in olive oil, salt and rosemary, and bake them on flat cookie sheets.  The flat baking sheet is crucial to the outcome because then the sides of the vegetable get a nice crisp roasted texture.  Here’s a more formal recipe:

Recipe:  http://www.foodnetwork.com/recipes/ina-garten/roasted-winter-vegetables-recipe/index.html